Dynamics
Hair contains a complete dynamics system (in the following simply referred to as dynamics). The next two tabs that will be explained are used to control these dynamics.
So, what are dynamics and what are they good for?
Well, dynamics primarily have the following two tasks:
- To make hair move realistically based on gravity or other forces, and the movement of the surface on which the hair grows. For character animation: Let’s say your character wants to do a little fitness (jogging), so you animate it accordingly. Of course the hair should move in accordance with the movement of the character. All you have to do is adjust a few settings and the rest will be done automatically.
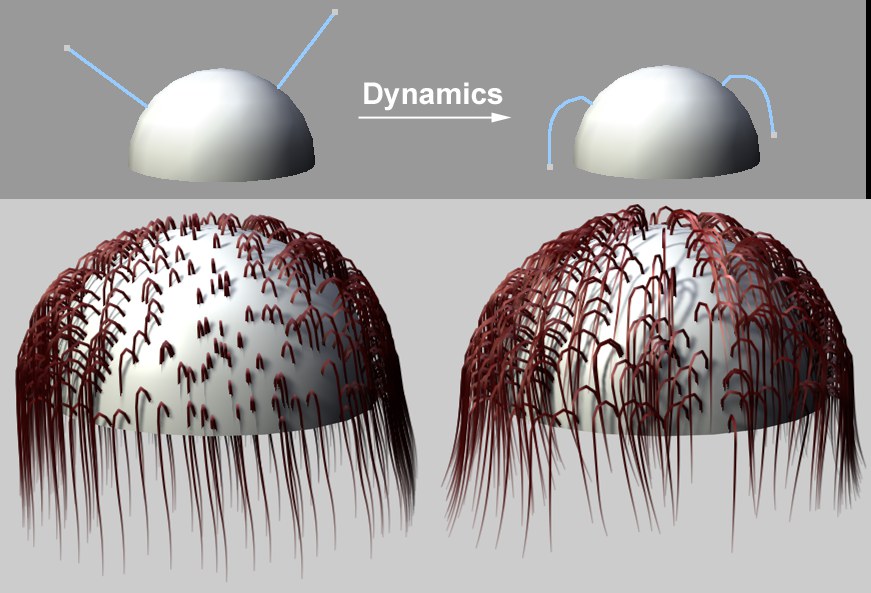
- Dynamics can be used to create a hairstyle: As guides are added, they (and thus the hair) usually project perpendicularly from the surface onto which they are planted. Needless to say, this does not look very realistic. Simply apply dynamics and the hair will fall onto the head, where they should lay. The top of the head can also serve as a collision surface, which will prevent the hair or guides from penetrating the surface. This state can then be fixed and used as the starting point for further styling steps.
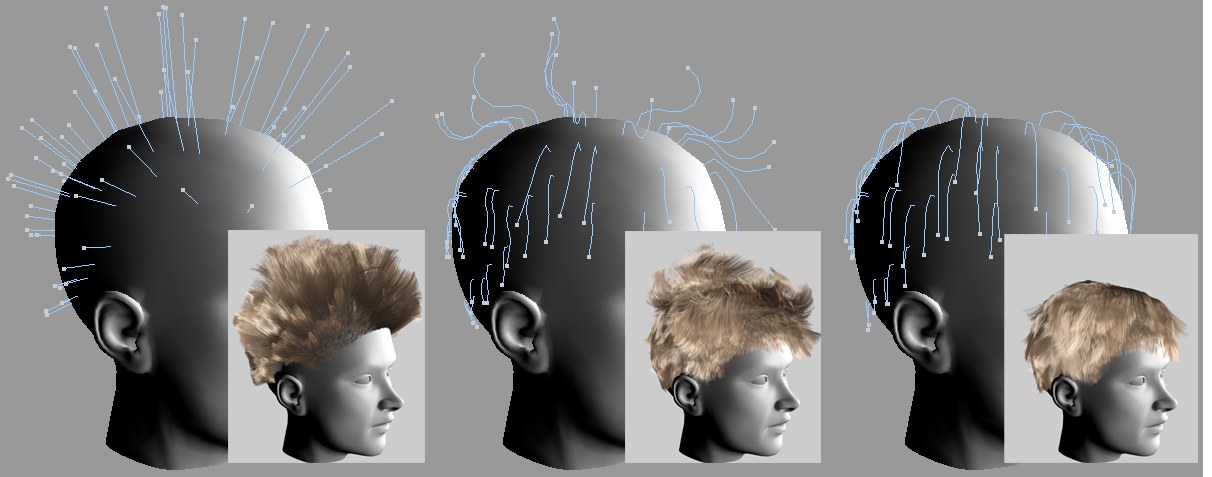 From left to right: Rest state; frame 10; frame 40.
You can also take a look at the spline dynamics system, located in the Spline Dynamics tag
Let’s say you have already created guides, including hair: Click on Play Forward in the Time Manager tool palette. The guides will fall under the influence of the applied gravity. Simple!
Dynamics systems always require a defined state from which to start, the so-called rest state. This is also the state that will be called up as soon as a Hair tool is selected. What if you want to let guides fall using dynamics, to later edit them in that state? This is what Set Initial State is for. It will set the current state as the rest state, which can then be brushed or cut as desired. The effects of dynamics will always initiate from the rest state.
- Dynamics primarily affects guides, between which hair is merely interpolated. Dynamics can affect each hair individually, but for normal amounts of hair (50000 – 10000) the resulting render times can be very long.
- The higher the number of guide segments or hairs that are selected, the more precise the dynamics will be calculated, especially in regard to collision detection (as usual, render time will increase accordingly).
- Imagine this arrangement of springs attached to each guide (all springs simultaneously serve to pull or press), which ensures that the guides do not simply collapse when a force is applied. The guide pictured above consists of three segments. The arrangement of springs also functions the same with guides containing more segments.
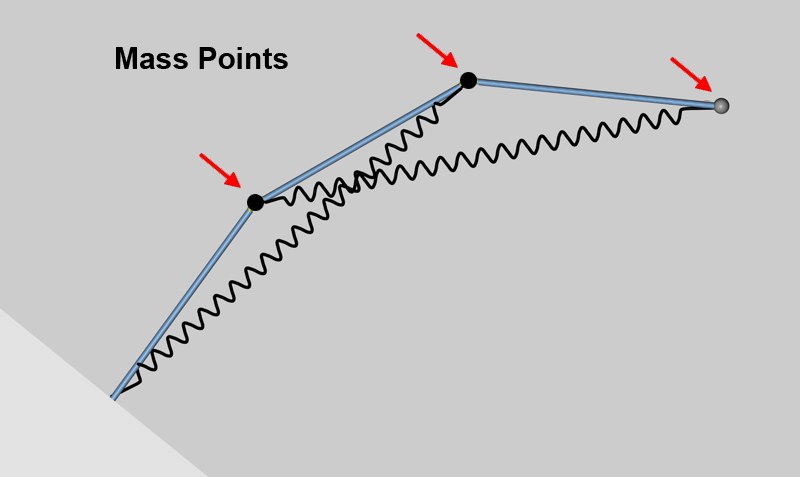 A simplified depiction of the arrangement of dynamics springs.
The following springs are not pictured:
- The spring that holds the root segment in place (this spring is attached to the first guide kink and pulls the root segment back to its rest state if moved. This spring can be adjusted using the Hold Roots setting).
- Springs between each mass point (these cannot be varied). The mass of the guides is concentrated in the mass points, the effect of which can be seen in the different spring movements.
- Cinema 4D particle modifiers are used by Hair dynamics (except for Deflector and Destructor). This makes creating effects such as wind and turbulence possible.
By default, the following settings only affect the guides. Nevertheless, if you select the Hair option in the Advanced menu of the Dynamics tab, the following settings will affect each individual hair (this will also result in a dramatic increase in calculation and render time). So, although in the following we will only refer to guides, keep in mind that what is described can also be applied to individual hairs.
Use this setting to turn dynamics on or off for a given Hair object.
Activate this setting if the guides should be checked for collisions with other objects. Simply assign a Collisions tag to the collision object.
Activate this setting once your hairstyle is finished. The hair will be made rigid and will try to maintain its shape. The guides will no longer simply fall, as is the case with the default setting, but will behave realistically and move in accordance with the object on which they are positioned.
![]() Properties
Properties
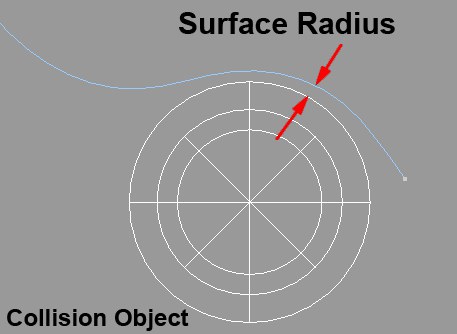 The Surface Radius setting defines the radius around the guide, within which collisions will have an effect.
The Surface Radius setting defines the radius around individual guides, within which collisions will have an effect. It may be necessary to increase this value for longer animations in order to prevent surfaces from being penetrated.
If you have unrooted hair (hair around whose base a green circle is visible), the roots of this hair can be affected by dynamics. To avoid this, activate the Fixed Roots setting.
The absolute mass does not have a notable influence on the behavior of dynamics. The Mass function graph in the Modifiers menu and the Mass map in the Maps menu are of more importance. These settings allow you to distribute and vary mass along the length of the guides or hair, which will result in random oscillation.
Guide points with a mass value of 0 (only possible using Hair vertex maps or mass modifiers) will not be affected by dynamics.
Use Drag to drain energy from the movement of the guides. The effect can be compared to hair moving in a liquid or substance with a higher viscosity. Drag can also be used to suppress unwanted twitching of hair, which can occasionally occur.

Use this setting to adjust the stiffness of the anchored root segments. Higher values will result in more voluminous hair that will not lie directly on the scalp.
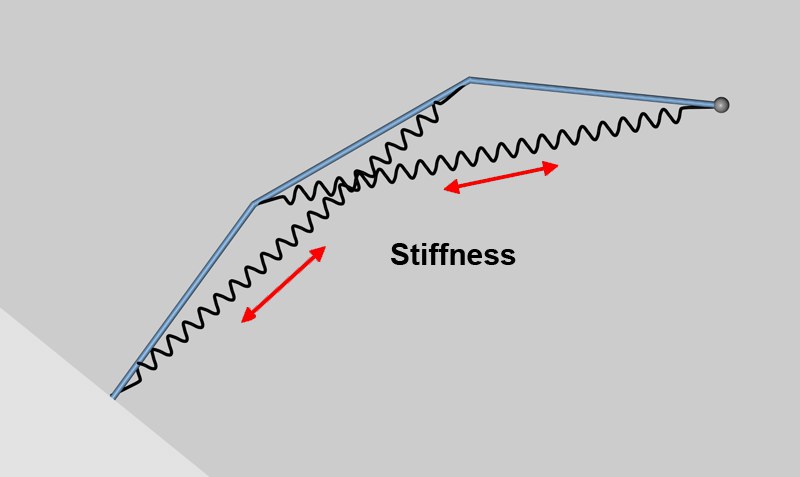 The effect of stiffness.
Use this setting to define to what degree the springs should affect the guides. Lower values will offer less resistance to gravity (or other forces). Higher values will offer more resistance, thus helping keep the guide closer to its rest state. If you want to create states similar to the rest state, the Rigid setting must be activated. Additional springs will be added that will not allow the movement of the guides to diverge much from their rest state.
Use this setting to mix the rest state with the current guide position. Internally, dynamics will not change: If you set Rest Mix back to 0%, you will notice that dynamics will proceed as before.
So, what’s this good for? Well, let’s say you have applied dynamics to hair. At some point, the hair will approach its rest state (by nature, though, not to 100%). By animating Rest Mix (100%) the hair can be brought to its exact rest state. The hair will be cemented into position and will in no way be affected by dynamics, which will continue (internally) to run. By reducing the Rest Mix value, you can later seamlessly return to the actual dynamic state.
Imagine small springs that are attached at one end at each mass point of the guides (positioned at the guide kinks) and at the other to the rest position of the guide mass points. Rest Hold defines the strength of the springs: 0% will have no effect, whereas 100% at each point will maintain the rest position.
The effect is similar to fastening several springs to a garden hose along its length.
Elastic Limit [0..+∞%]
Deform [0..100%]
Guides will stretch a certain distance when they swing. If the stretch should be maintained, increase the Deform and Elastic Limit values until a consistent stretch is achieved.
![]() Animation
Animation
If this setting is active, dynamics will be calculated over the entire file length (main menu: Edit / Project Settings). If you want to manually restrict the effect of dynamics, deactivate Auto Time and use the Start and End settings to the right.
If you want to see the effects of dynamics without playing the entire animation (i.e. without clicking on Play Forward), click on the Relax button. The effects of dynamics will then be played over the length of frames defined in the Frames setting to the right (default = 10). Each subsequent click on the Relax button will play the next 10 frames.
![]() Maps
Maps
Hair Vertex tags can be placed into the Maps menu fields. The Brush tool can then be used to apply the corresponding effects to the Hair Vertex Maps (at the hair vertex layer).
Drag
Stiffness
Rest Hold
Mass
Forces
The Forces field can be used for all forces, including Hair gravitation itself and other forces that can be defined in the Forces tab, and Cinema 4D particle modifiers. For example, hair can be made to wave in the wind using the Wind modifier, and the effect on individual hairs can be controlled.
Below, the guides on the right half of the head were assigned a maximum strength (red). Rigid is active and Stiffness is set to 100%. The Hair Vertex tag in the Stiffness field ensures that the hair with the least amount of stiffness (blue) will fall, while the hair with the maximum Stiffness value (red) remains completely straight.
 A Hair Vertex tag is used to control the stiffness of hair at the vertex level.
The other Maps fields work the same.
![]() Modifiers
Modifiers
Drag
Stiffness
Rest Hold
Mass
Forces
Use these graphs to adjust a given setting (same settings as in the Properties menu) along the length of the hair. The values assigned to the settings in the Properties menu represent the maximum value available for the graphs.
The Forces modifier represents all applied forces (gravity, Cinema 4D particle modifiers, etc.).
A Rest Hold value of 100% will lead to the result shown below (if all guides are positioned perpendicular in the rest state):
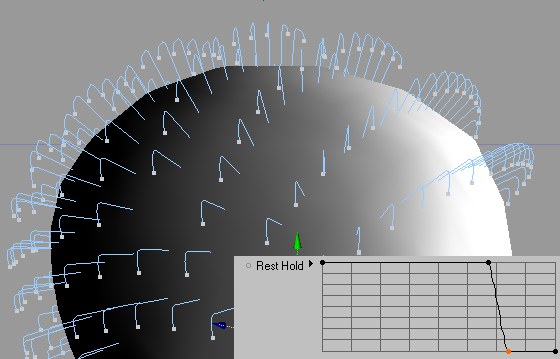 The guide shapes are a result of the modifier shown (inset).
In the graph above (inset), each guide has a maximum Rest Hold value over 2/3 of its length. Most of the remaining 1/3 of each guide has a Rest Hold value of 0, and is therefore affected to the maximum degree possible by gravity.
All other modifiers work the same.
![]() Advanced
Advanced
The Advanced menu settings let you define if and how dynamics should affect only guides or each(!) hair. In most cases, the Guides option can be used. The Hairs option should only be selected if the utmost precision is required, e.g., if individual hairs need to be controlled with regard to collision detection. Since the number of hairs greatly outnumbers the number of guides, the calculation and render times will be correspondingly high.
In such instances, it may be necessary to select the Hairs option.
 Bottom left: Guides mode. Bottom right: Hairs mode.
Let's say you let dynamics affect a guide setup as shown above (the hemisphere has a Hair Collision tag assigned to it). If you select the Guides option, the hair interpolated between the guides will penetrate the surface of the hemisphere. If you select the Hairs option, each hair will be checked for collision.
Use these settings if you require a different number of segments for guides or hair merely for the calculation of dynamics (not for rendering).
Don’t forget that more segments will take longer to render and will result in a softer overall behavior of the hair. Furthermore, a mass point is attached to each segment, which will increase the overall mass of the hair and lead to drooping hair.
This is the number of sub frames into which each frame of the animation will be divided, and used to calculate dynamics. This results in more precise calculations, which can be especially helpful when calculating fast movement with collision detection.
This setting can be used to further influence the tension of the springs. In general, the higher the value, the stiffer the guides will be. As a rule of thumb, a value equal to the number of segments should be used (very large values will at some point have no additional effect, and will only serve to further slow render times).
The settings in the Advanced menu generally will not have to be changed.