Guides
Everything having to do with the creation and distribution of guides is defined using this tab.
Guides can grow on the following objects / elements:
- All objects made up of geometry, polygonal or parametric.
- Splines
- Other guides
Guides will normally be generated if: You select Add Hair while an object is selected; after having added weighted points; while a point-, edge-, or polygon selection is active. If you are not happy with the guides that were generated automatically, you can use the settings in this tab to define the exact number, placement and orientation of additional or newly created guides.
Changes made to the following settings will not always be seen in real time in the editor view. It may be necessary to click on the Regrow or Re-Root buttons in order to make changes visible. This will also cause the previous hairstyle to be deleted (changes to guides)!
How to make guides visible that have been made invisible as a result of using Cloth is explained here.
An object, Selection tag or Vertex Map tag can be placed into this field. This will then define approximately where guides or hair should grow (after the Regrow button has been pressed). Additional guides can be added at any time using the Add Guides tool.
As a rule, the corresponding element will automatically be linked if it was active when Add Hair was invoked.
The position of guides and hair can be defined more precisely using the settings in the Guides and Hairs tabs.
![]() Roots
Roots
Use this setting to define the number of guides for a given Hair object. Depending on what option was selected in the Roots setting, the number of guides that can be created may be limited. If, for example, Polygon Center is selected, the guide count will be restricted to that particular surface.
Otherwise you can create as many guides as you wish.
The number of guides is almost never related to the number of hairs that will be rendered. The number of hairs is defined in the Hairs tab.
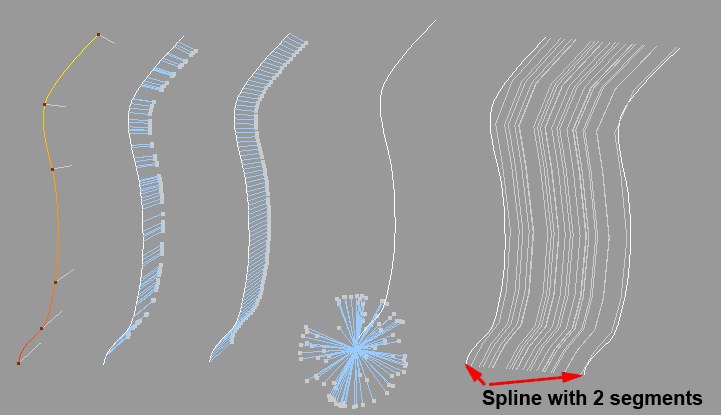
Use this setting to define the number of guide segments. The more segments guides have, the more accurately they can be styled using the various tools, and the more precisely they will be affected by dynamics. The more segments that are added, more guide points that will also be added, resulting in slower styling and dynamics.
The number of segments guides have is also a deciding factor when using dynamics, since a higher number of segments results in longer calculation times and a more flowing movement. Furthermore, a separate mass point will be attached to each segment, which enlarges the general volume of the hair and leads to droopy hair.
Use this setting to define the length of the guides. If no changes are made to the corresponding Hair material, the Length setting will also define the length of the hair.
Use this setting to select exactly where the guide roots will be placed. Depending on the type of object the guides will grow on (polygon object, spline or on existing guides), different options are available. You will find the same options in the Hairs tab, where you can actually position the hair roots.
 Left: Polygon mode. Right: Polygon Area mode.
The guides will be distributed randomly across corresponding polygons. This bears the disadvantage that very small polygons will be assigned many more guides in relation to their size than large polygons. If you want the guides to be distributed evenly, independent of polygon size, select the next option, Polygon Area.
Select this option to distribute guides evenly, more or less independent of the size of the polygons.
Depending on the Count setting, a maximum of one guide will be arranged in the center of a polygon.
This option ensures a random distribution of guides, exclusively along the edges of polygons. This is very practical for growing eyelashes, for example.
Guides will be distributed randomly across the existing UV space. The larger the UV polygons, the more guides that will be arranged onto the corresponding polygons, i.e., fewer guides will be assigned to polygons with small UV polygons.
Guides will be distributed in a grid-like manner across the existing UV space. The grid spacing can be adjusted using the U Spacing and V Spacing settings. The grid can also be varied by entering different U Variation and V Variation values (assuming Count is set high enough).
The lower the Spacing values, the tighter the guide grid will be.
Select this option if you want to, for example, add guides using the Add Guides tool.
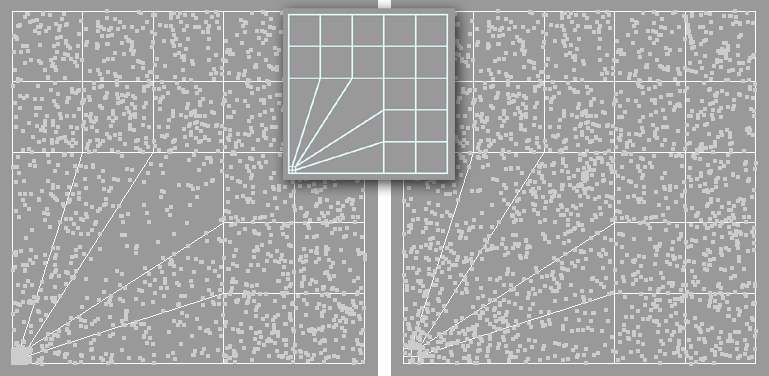
 From left to right: Spline Vertex; Spline Segment; Spline Uniform; spline Tip (Growth set to Random); Spline 2D.
A maximum of one guide point will be added, base on the value entered for Guide.
Guides (the amount will be defined by the Count setting) will be randomly distributed along the length of the spline.
Guides will be distributed evenly along the length of the spline.
Guides will only be positioned at the beginning of the spline. If Random is selected in the Growth setting, the guides will be arranged spherically around this point.
Guides will be created between existing spline segments, using interpolation. These guides cannot be manipulated using any tool.
Splines will be viewed as guides. This option should be selected if, for example, you want splines to be rendered as hair. As Guides should then also be activated in the Root setting of the Hair tab. These guides cannot be manipulated using any tool.
If you happen to have a Spline with a single segment this mode is perfect for creating strands of hair. The hairs simply have to be cloned.
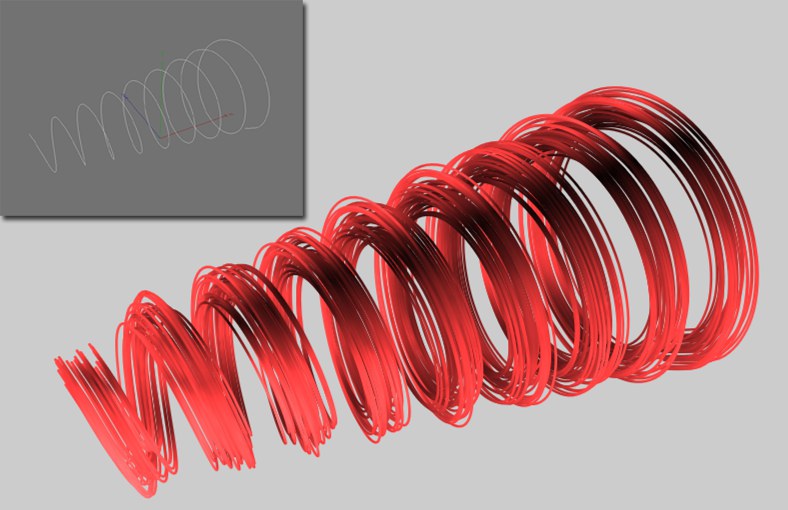 Cloned hairs growing along a spline.
A new guide will be created at each guide point. The number of new guides created is dependent on the number of segments (Segments setting) the original guides have.
New guides will be created and placed randomly on the original guides. The number of guides created can be adjusted using the Count setting.
The original guides will be assumed as new guides, virtually duplicating the hairstyle.
New guides will be created and positioned at the tips of the original guides. When using this option, the Random option in the Growth menu should also be selected.
This setting always then comes into use if you edit the geometry on which existing guides are rooted (i.e. by deleting polygons, cutting the geometry with the Knife tool, subdividing the mesh, etc.) or if guide settings are changed.
Internally, guides are linked to polygons, points, etc. If these are edited, some guides will be changed as well. The following options are available:
Selecting this option can result in a completely new distribution of guides. This can cause your hairstyle to have a really bad hair day, i.e., your hairstyle may become entirely messed up. In this case, selecting Old or Unroot would be better.
This (default) option basically leaves everything the way it was. Any guides affected by this option will be positioned as closely as possible to the old guide. If this is not possible, existing guides will be interpolated to create a new guide.
Basically works like the Old option, except that newly created guides will be unrooted, preventing changes from being made to the hairstyle. Hence, deleting polygons on which hair grows will not delete the corresponding guides, as would be the case if you used either of the previous two options. So, use this option if you definitely want to avoid the hairstyle from being affected by changes to the underlying mesh. Nevertheless, unrooted guides do offer several disadvantages.
U Spacing [0..100%]
V Spacing [0..100%]
U Variation [0..100%]
V Variation [0..100%]
See Roots / UV-Grid.
![]() Growth
Growth
Use this setting to set the direction in which the guides should be oriented. The following options are available:
The guides will point in the direction of the surface Normals.
The guides will point in the direction defined in the Axis setting.
The guides will point in just about every (random) directions.
Use these settings to define the world axis, in whose direction the guides should point (if the Direction option is selected in the Growth menu). If Local is activated, the coordinate system of the object on which the hair grows will be used.
Min. Spacing
Distance [0..+∞m]
Activate Min. Spacing if the guides should maintain a minimum distance (Distance setting) from one another. The Min. Spacing setting will not work if the number of guides is set so high that maintaining the defined minimum distance is no longer possible. The Redistribute Roots setting in the Advanced tab can be used to try to maintain the minimum distance between roots. One of the functions of the Redistribute Roots setting is to define (internally) how often guides should be redistributed in order to meet the requirements of this setting.
A texture can be placed into this field and used to define the guide density over the area of that texture. UV mapping will be applied to the hair-covered object, to which the Hair object is assigned. If this object already uses several UVW Tags, the corresponding tag can be placed into the UV Tag field in the Advanced tab.
Density is a restrictive setting and can only be used in conjunction with the previously described settings, which, by the way, have priority. For example, if you have a guide count of 400 on an object with 400 polygons, and the Polygon Center option is selected in the Roots setting, even the most elaborate texture will have no effect on the distribution of guides.
This setting quantizes (internally) a loaded texture according to its grayscale values. Levels defines the number of gray tones that can be used. The lower the value, the rougher the steps will be, the higher the value, the more precise the steps will be.
![]() Editing
Editing
Let’s say you want to edit the guides using Cinema 4D point editing tools. No problem: Create an empty Spline object (main menu: Create / Spline / Empty Spline) and drag it into the Points Link field.
 Splines as guides. Left: Active Hair object. Right: Active Spline object.
The guides will then be linked with the Spline object. If you switch to point mode and click on the Spline object, the guides will be treated as splines and can be edited accordingly. If you subsequently select the Hair object, you will see that the guides have conformed to the spline. You can also edit the guides using the Hair tools, which will, in turn, affect the spline.
If you should then want to animate the splines per PLA animation, the guides will be affected as well.
Any point-based object can be placed into the Points Link field, even an empty polygon object. Dragging an empty object into this field would not make much sense, though, since most polygon tools will only affect the polygons themselves.
If you are in vertex mode, you can use this setting to define which guide vertex should be active. A value of 0 will affect the point at the root of the guides; increasing values will correspondingly affect points located higher on the guides.
Use this button to manually re-root the guides in accordance with the settings in this tab. This setting has the same function as if the New option in the Map setting were selected and Auto Update active.
Clicking this button will create new guides based on the settings in the Guides tab. Existing hairstyles, though, may be destroyed, (i.e. guides that have been manipulated using the Hair tools).
Use Store to temporarily store a guide state (e.g., a specific hairstyle), to which you can later revert by clicking the Restore button. You have three guesses as to what will happen if you click on Clear. Exactly, the stored guide state will be cleared (deleted).
![]() Symmetry
Symmetry
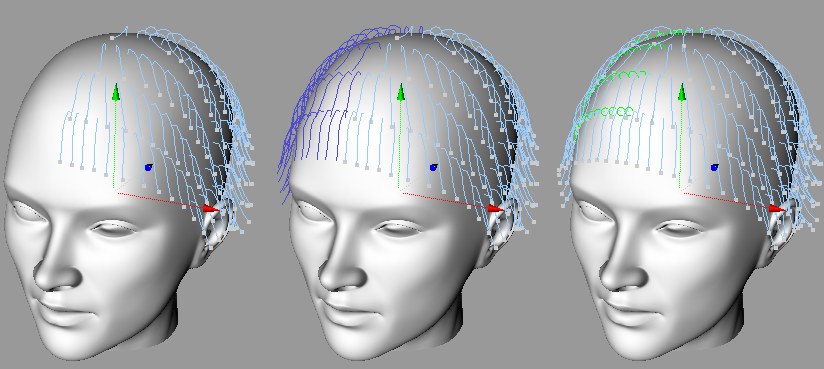 Left: Initial state. Center: Show Guides active. Right: The guides after Make Editable was pressed.
Symmetry is designed for such instances when, for example, only half a head was modeled, and mirrored using the Cinema 4D Symmetry Tool. You can then position guides on the half of the head that was modeled first, and mirror them onto the subsequently created half.
To activate this function, simply activate the Symmetry setting.
Use this setting to define the mirror plane. With regard to characters, this will most often be the YZ plane. Mirror planes lie in the respective object’s coordinate system and run through the null point.
Activate this setting if you want to have the (still virtual) mirrored guides displayed as blue lines.
As soon as you click on Make Editable, new guides will be created. Auto Root defines whether roots will automatically be assigned to the guides (active) or if the guides should remain unrooted (not active).
Virtual guides will only then become real guides when Make Editable is pressed. The Hair tools can then be used to manipulate the hair a little in order to avoid a perfectly symmetrical look.
If the mesh is not perfectly symmetrical, newly generated mirrored guides will not be mirrored exactly, since they will have to be replanted.
If you make changes to the guide settings, the changes made will automatically be shown in the editor view if the Auto Update setting has been activated. Otherwise, any changes made will first be visible after the Update Guides button has been pressed.