The Create Page
The Create Page is where you build and customize your own Maxon Studio capsules by selecting elements from an After Effects project. Think of comps, layers, effects, assets, and parameters as building blocks from which you can craft your own capsules.
You expose parameters in Studio's Create Page through a drag-and-drop interface, organize controls into groups, and link properties, all within a live, synchronized environment that updates with After Effects in real time. This streamlines the process of turning project components and attributes into reusable, shareable assets based on dynamic code and instructions rather than endlessly iterating project files.
Meet the Create Page
Clicking the Create tab reveals one, two, or three panels of the Create UI, depending on how wide you have Studio displayed. The leftmost panel begins with your capsule's thumbnail image (assuming you have already selected at least one capsule property; more on this soon) and allows you to supply some capsule metadata. The second panel helps organize your selected parameters into groups. The third focuses on any selected parameter's properties.
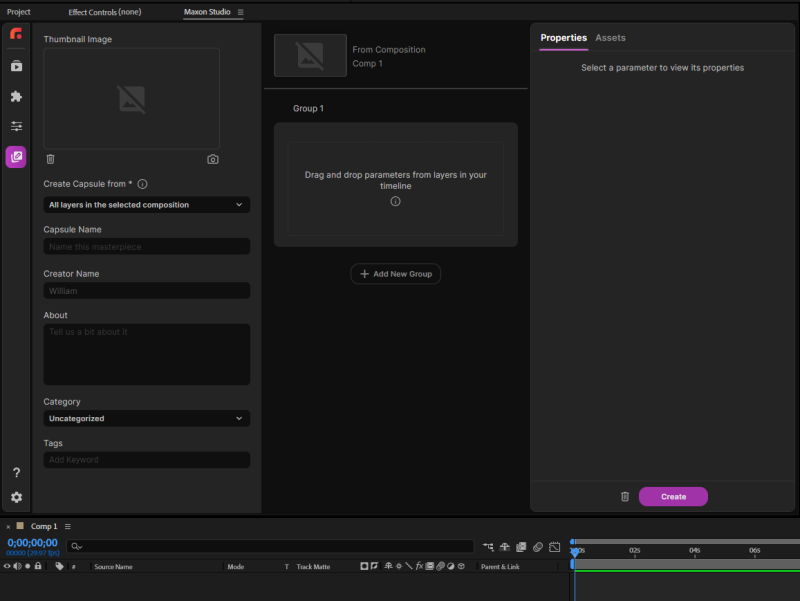
To be clear, Studio's Create functionality is not a system meant for building capsules from thin air. Rather, it is a system for building capsules from other capsules or Adobe After Effects projects (including their settings and assets). If you start a new AE project and proceed straight to the Create tab, then click the New button, expect to see something dark and lonely like this:
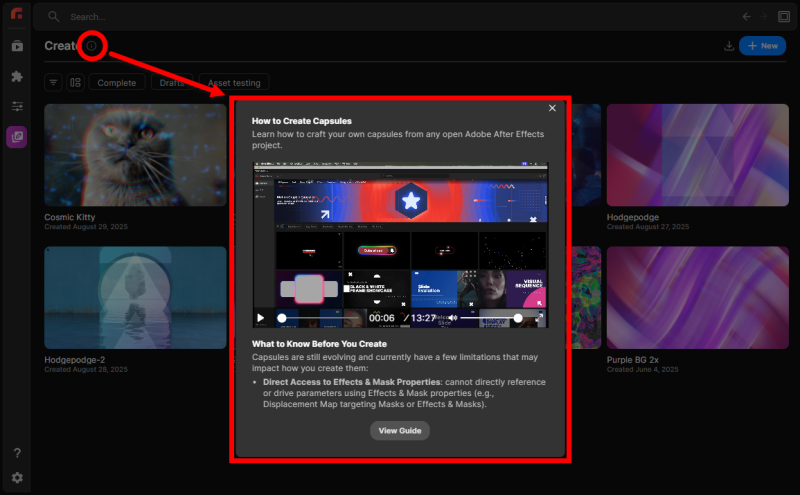
If you're utterly new to Studio and don't know what it is or what you can do with it, fear not. We've got a handy overview video tucked away for just such an occasion. Simply click the little "i" info icon next to "Create," then click the video player's "expand" icon to fill the Studio panel.
Now, if you have an existing project with at least one layer, then you'll encounter a process similar to the following. First, Studio sees which composition is active and automatically selects that comp as the basis for your capsule. If you only have one composition on your timeline, then that automatically populates your Create process.
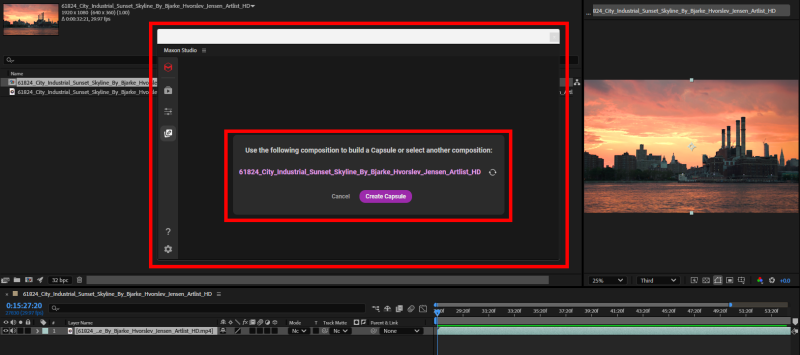
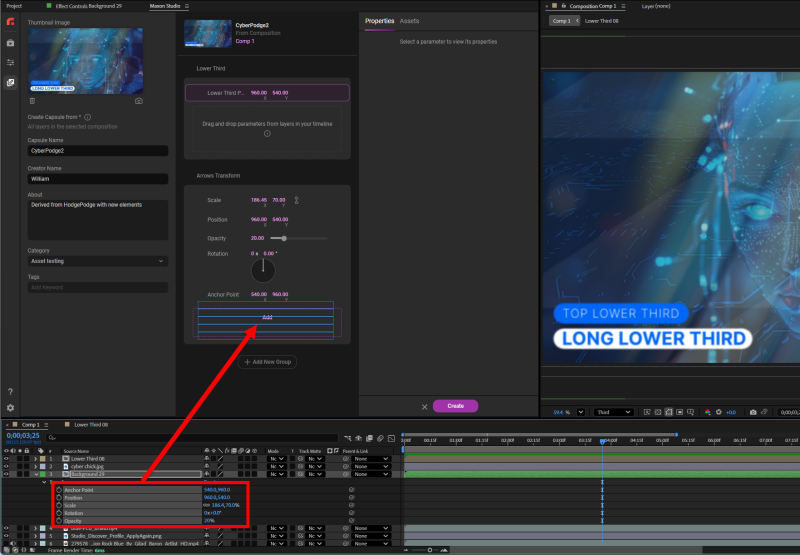
When you have multiple comps from which to choose, you can select a different comp within your project from which to pull your new capsule's elements. However, you need to expose your target comp's panel. Consider this setup:
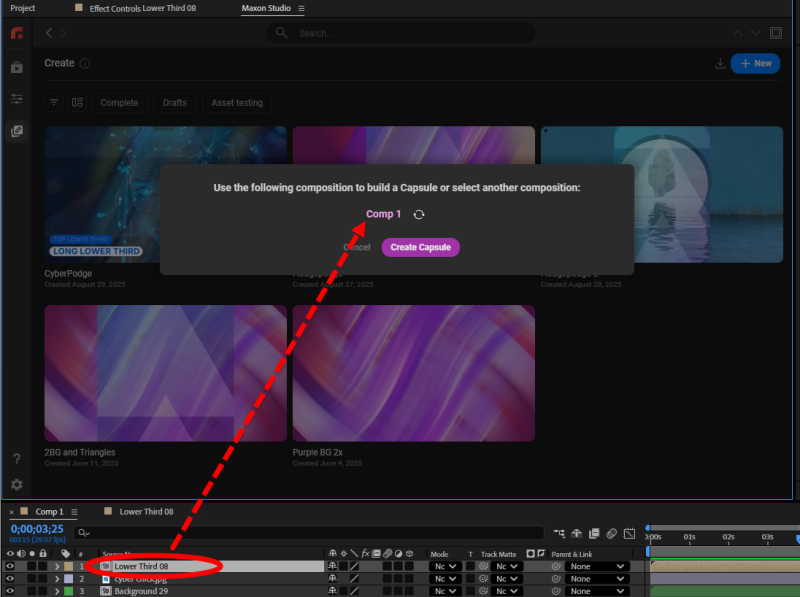
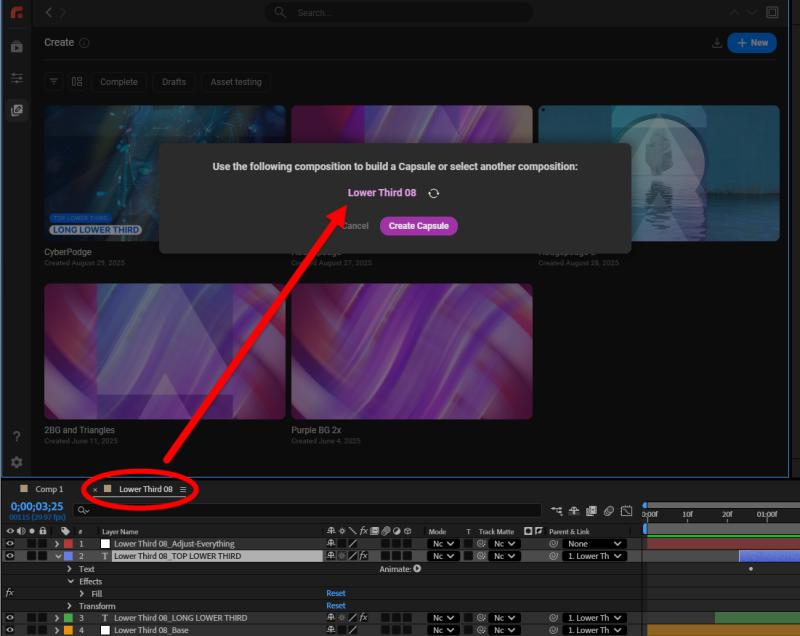
Even though we can see and highlight the Lower Third 08 layer, clicking the circular Refresh icon in the capsule creation pop-up does not point Studio at that layer. Instead, we have to double-click the layer in the timeline and then select the desired comp panel, as shown before. Then you can refresh and switch comps.
Capsule Creation Workflow
Let's keep working from the above example. After you click the Create Capsule button, the following setup will appear. (Remember, the exact appearance may change, depending on your Studio UI width.)
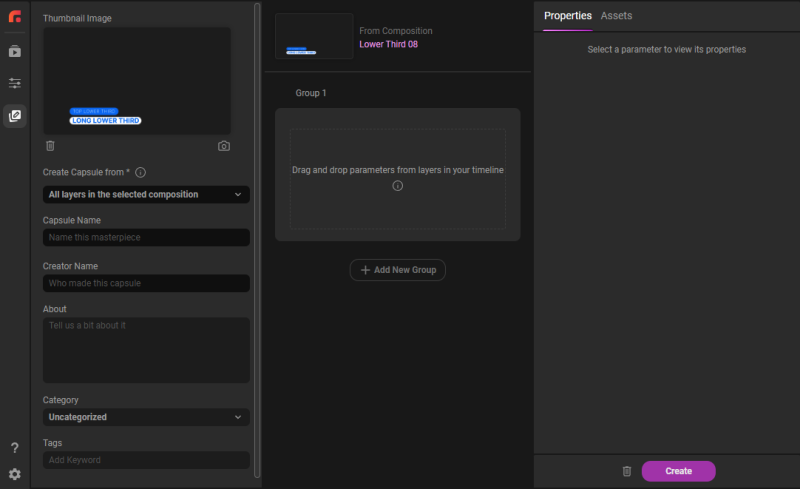
Notice that there are no parameters or assets populating this setup yet. With nothing to encapsulate, there is no capsule. So far, all we see is a preview thumbnail of the comp.
As noted earlier, the Create Page is comprised of three panels. Let's examine those in turn.
Capsule Information
The thumbnail image is generated from your comp at the point when you begin creating the capsule. You can scrub along the timeline, and the thumbnail will remain unaffected. However, if you're not fond of the image, simply click the trashcan icon under the thumbnail box to delete it. Got a frame you'd prefer to use? Position the playhead in your comp accordingly and click the camera icon to replace the thumbnail with your current preview display.
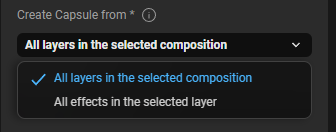
The Create Capsule from offers two options. Do you want the capsule made from all layers in the selected comp or only the effects in a selected layer?
Capsule Name, Creator Name, and About fields are self-explanatory. Capsule Type and Tags both offer metadata tags you can use for filtering content back in the Capsules gallery.
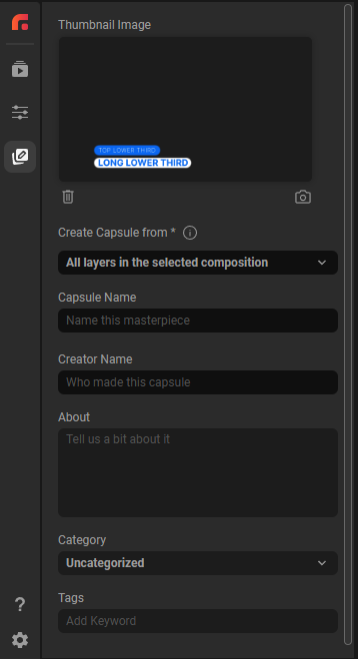
If you compress Studio's width sufficiently, to the point that it reduces from three panels to two, the Capsule Information panel will vanish and suddenly respawn within the Properties and Assets panel (see below) as the Details tab.
Groups & Properties
The second Create panel is where you place and organize the parameters that comprise your capsule-to-be. For example, one layer within the Lower Thirds 15 capsule uses the Universe Gradient Ramp tool. After exposing the effect's attributes, we can single- or batch-select any number of parameters and drag them into the panel's default Group 1 area.
Dropping those parameters into the group results in the population of that group, as shown above. Studio carries over the control method for each parameter. Check box controls retain their check boxes, sliders remain sliders, and so on. The rightmost Properties panel fills with the properties for whichever parameter is selected.
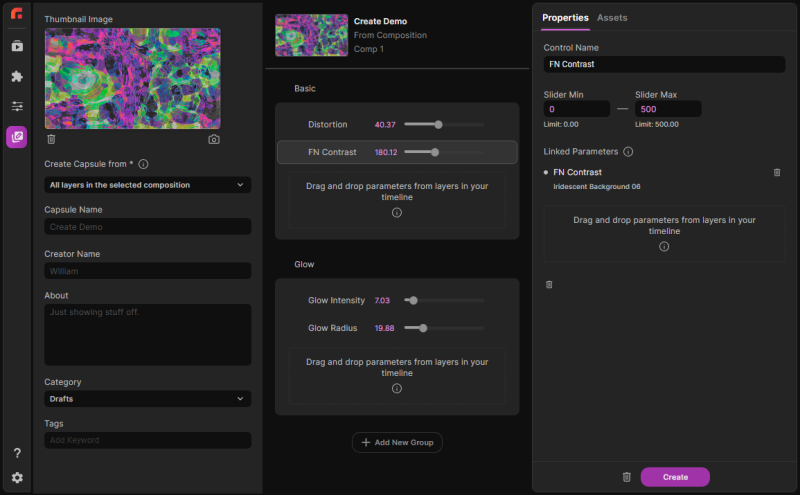
You may find yourself dealing with multiple parameters sharing the same name. For example, you might drop several parameters from different layers, all named Color or Start Point. How can you tell which is which? Easy — rename them.
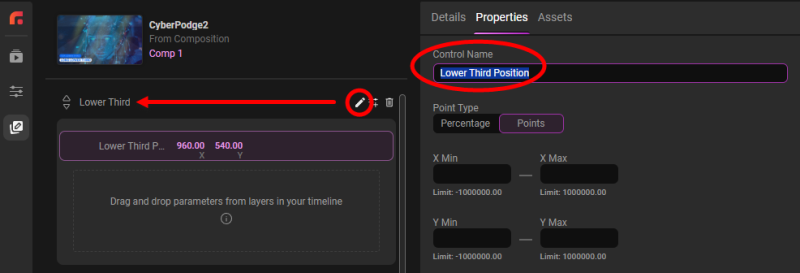
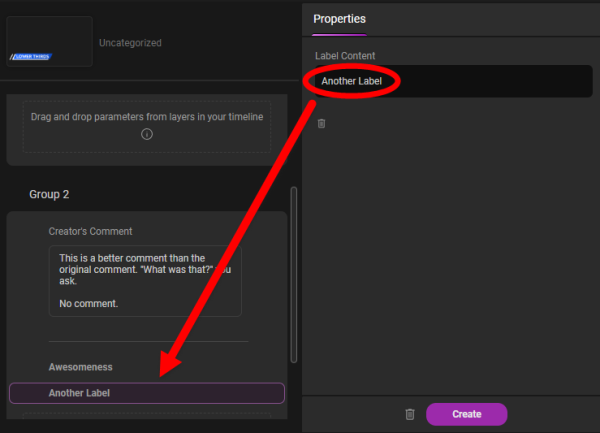
In the image below, the little pencil icon next to the group name allows you to edit that group's label. You might find it makes sense to call your group something like Layer 6 or Colors. Additionally, the image's right side shows how, by clicking in the Properties panel's Control Name field, you can rename a parameter to something more descriptive.
Back in the Groups panel, notice how group and parameter names have icons appear while you mouse-over them. The up/down triangle icons let you bump that item one space so you can reorder them as you please. (You need multiple groups to move group positions. Clicking the Add New Group button accomplishes this.) The trashcan icon deletes that parameter or group.
One more icon awaits in the Groups panel. To the right of each group name, you'll find the Add Format Controls icon, which opens the Format Controls menu and its Format Elements and Blank Controls sections.
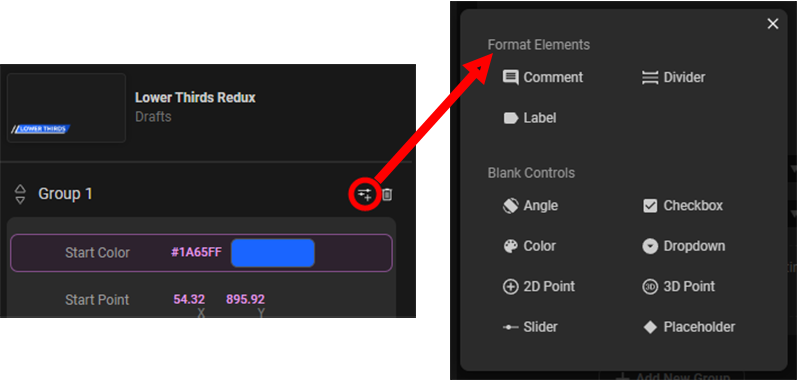
Format Elements options give you another way to organize your parameters. With comments and labels, you supply the text you'd like to appear in the Properties panel, as shown below. Observe how Group 2 now has one comment followed by a divider followed by two labels.
Blank Controls offer a way to place multiple parameters from several layers under the management of a single Studio control. To illustrate, say we start with an existing background capsule based on beautiful, wavy blues and reds. But maybe red feels too confrontational today, and you want to change that to green. No problem.
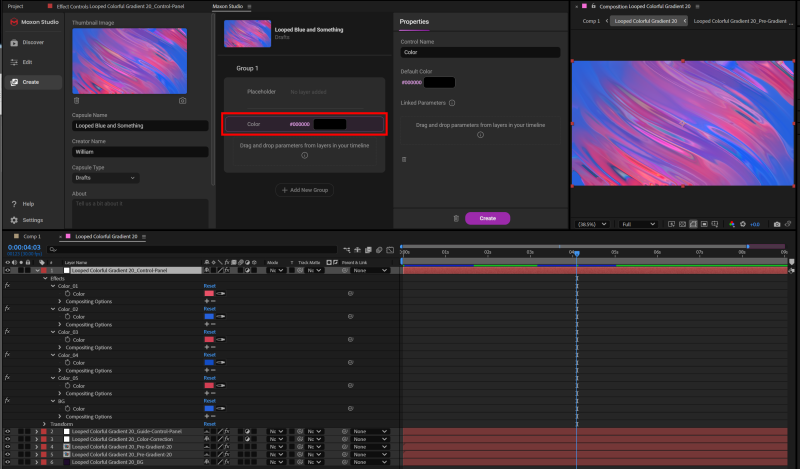
Start by clicking the Add Format Controls icon, then select Blank Controls > Color. Assuming you've left the default control color as black, you should see something like the above arrangement.
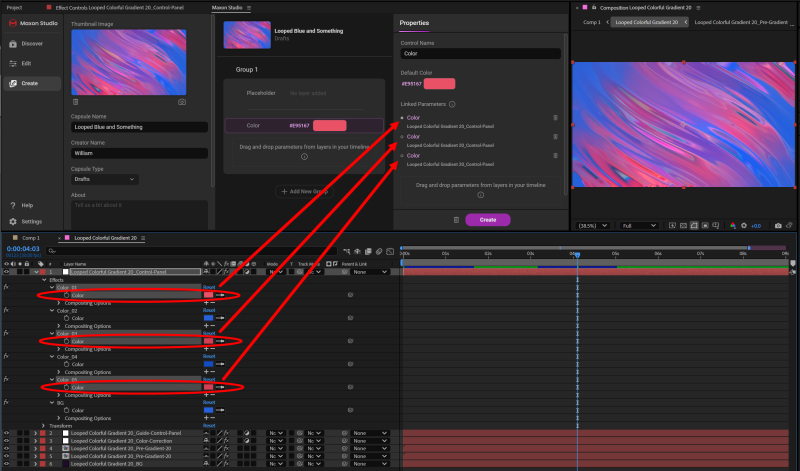
Now, it's time to locate your desired color parameters from your comp's layer(s) and drag them into the Properties panel (shown above). Observe how the color chip now changes from black to red, picking up the color from our dragged parameters.
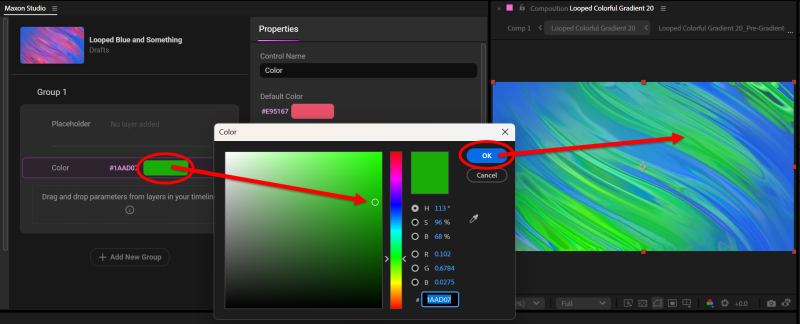
Finally, click on the color chip in the Groups panel, select the new target color for those parameters, and click OK. Now, your single color parameter controls all of the capsule's formerly red tones.
Assets
Beyond the parameters and settings contained within Groups and Properties panels, Studio incorporates an Assets tab (and panel) adjacent to Properties.
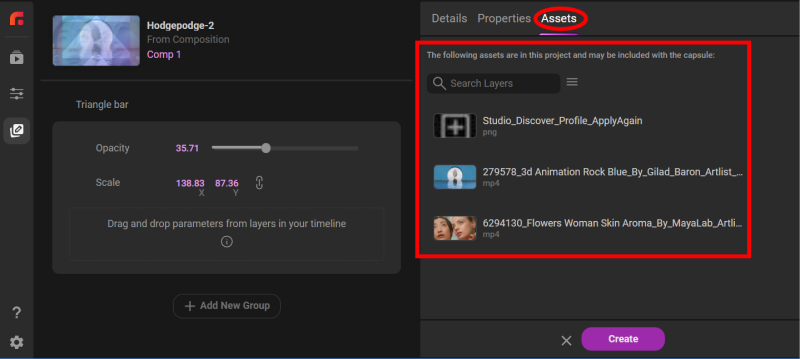
When you create or export a capsule, Studio can include all the assets referenced by that capsule, including:
-
Video clips (for example, .mp4, .mov)
-
Still images (for example, .png, .jpeg, .webm, .gif)
-
Adobe Illustrator and Photoshop files
-
Solids
-
Text
-
3D models (.obj, .fbx, and others)
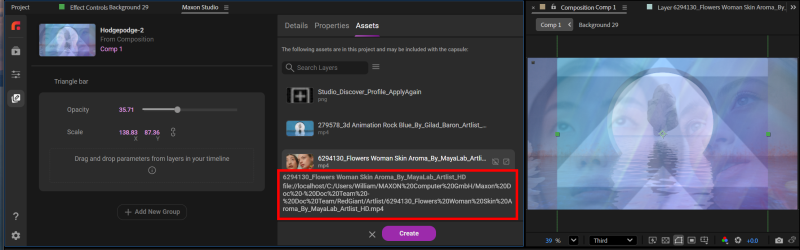
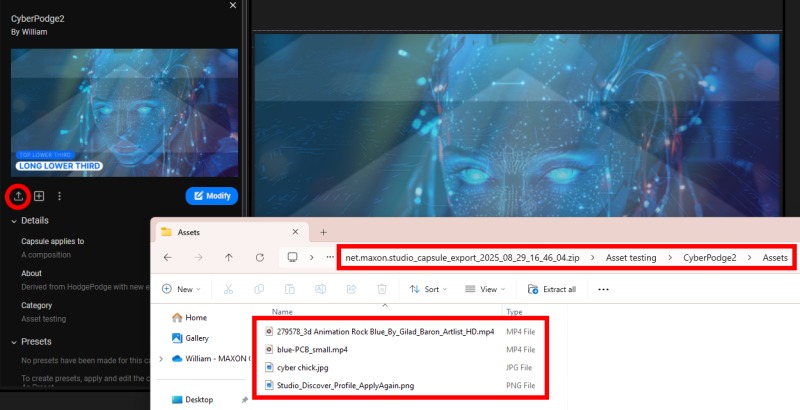
Hovering over an asset's name spawns a pop-up showing its full filename as well as that asset's storage location/path, as shown below.
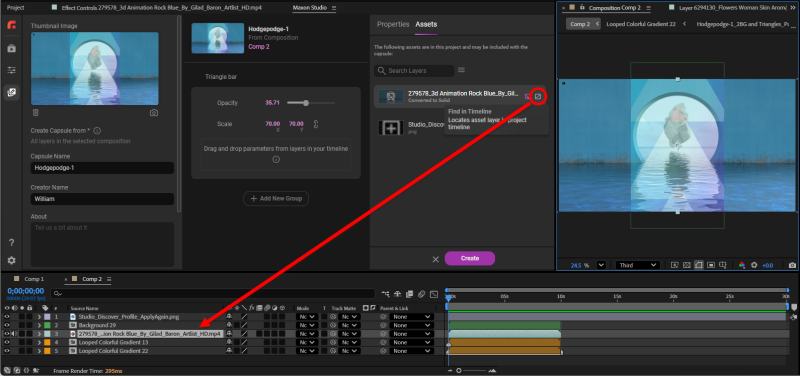
When you hover over an asset, you'll also notice that two little icons appear to the right of its name. The first of these is Convert, which converts the asset to a black solid (and turns the icon from gray to purple). This can be useful in situations where, for example, a content creator wants to share a capsule but not specific assets within it. The solid can function as a placeholder, different from but akin to the more robust Placeholder function described below.
The second icon, Find in Timeline, does exactly what it says. Click it to select the asset on your timeline. This is a remarkably useful convenience when your project grows into dozens of layers.
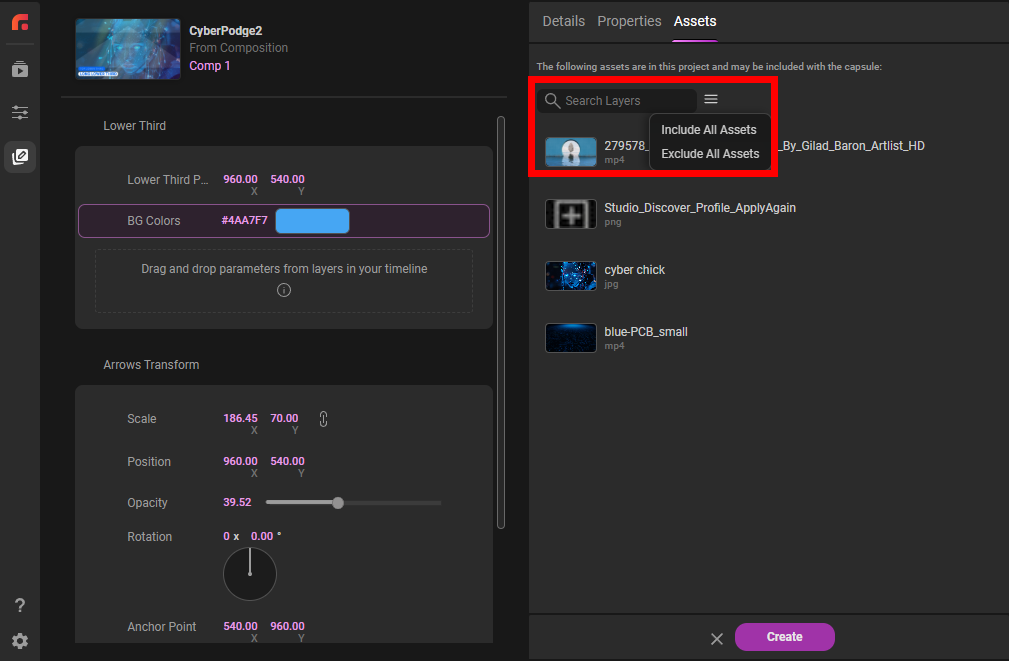
It's easy to amass a long, potentially unwieldy list of assets in a project. Fortunately, Studio includes search/filter functionality, but keep in mind that the purpose here is to isolate assets for either inclusion or exclusion from your capsule. Thus, in the example below, if we search for "st," it returns two results, based on finding the string segments "Artlist" and "Studio." Then, using the pull-down menu, we could opt to include or exclude those results from our to-be-created capsule. Selecting Exclude All Assets converts all assets shown in the panel into solids. Thus, if we didn't use Search Layers at all, selecting Exclude All Assets would convert all four project assets to solids. And if you change your mind on that operation, no problem. Simply undo the conversion or select Include All Assets to restore them.
By default, all assets are bundled automatically when you export a capsule. And if you're curious about confirming whether your assets do in fact export as expected, use the Export function, click Take Me There in the resulting pop-up, and then you should see something like the file navigator results below.
Effects Capsules
So far in this Create Page, we've discussed capsules in terms of layers, meaning parameters, settings, and assets that exist within your project's timeline layers. However, Studio also supports effects capsules, or capsules comprised of various effects within the Red Giant tool family. Let's see what this means with an example.
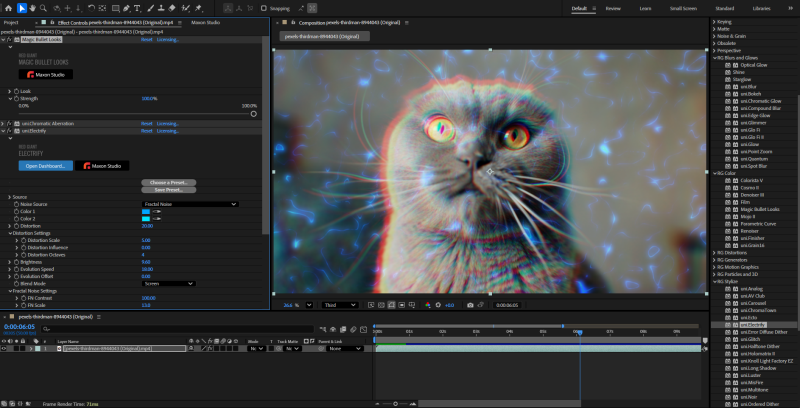
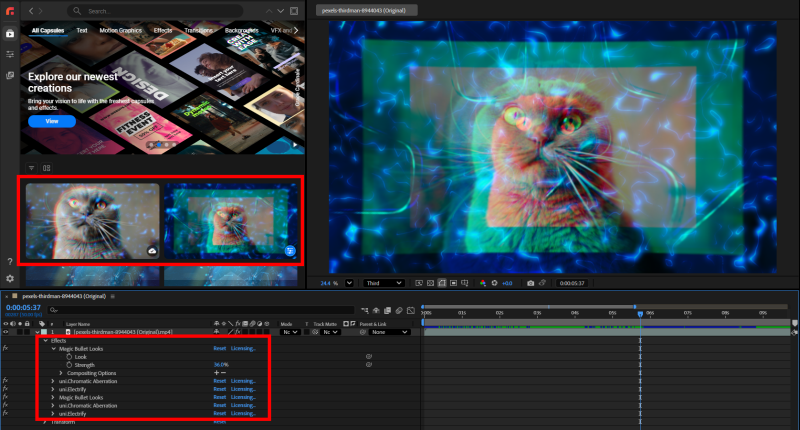
We start with an MP4 kitty clip in After Effects and apply some Red Giant tools. In this case, we selected Magic Bullet Looks, Chromatic Aberration, and Electrify. Kitty has gotten deep in the catnip.
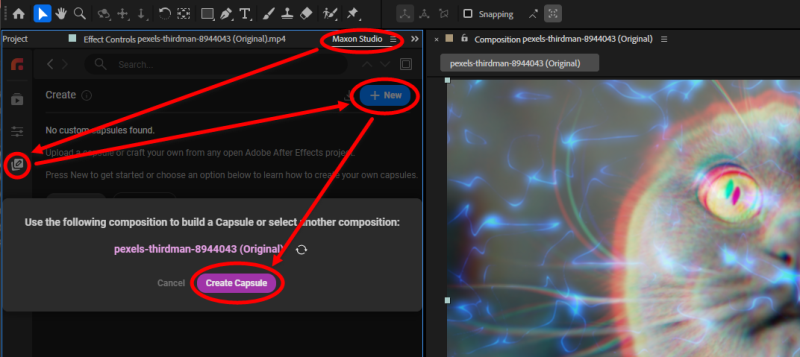
Once we have the entire effect dialed in, we open Studio, enter the Create Page, click the New button, and hit Create Capsule.
From here, you can drag specific parameters into capsule groups and treat the under-construction effects capsule like any other capsule described previously. When you've got everything in your Details, Controls, Properties, and Assets panels configured as desired, continue to saving.
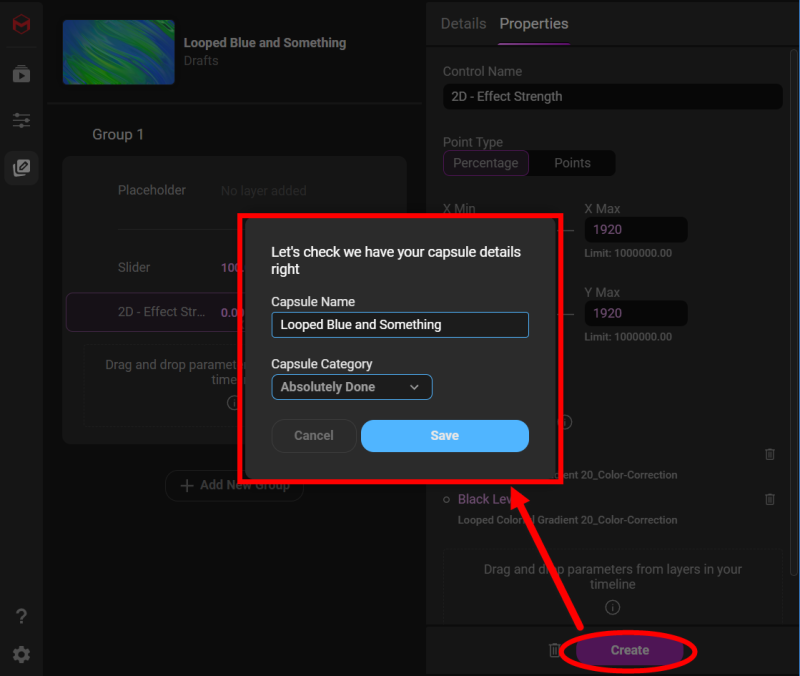
Next comes a key piece. As you enter the information for your capsule, be sure to select All effects in the selected layer from the Create Capsule from pull-down.
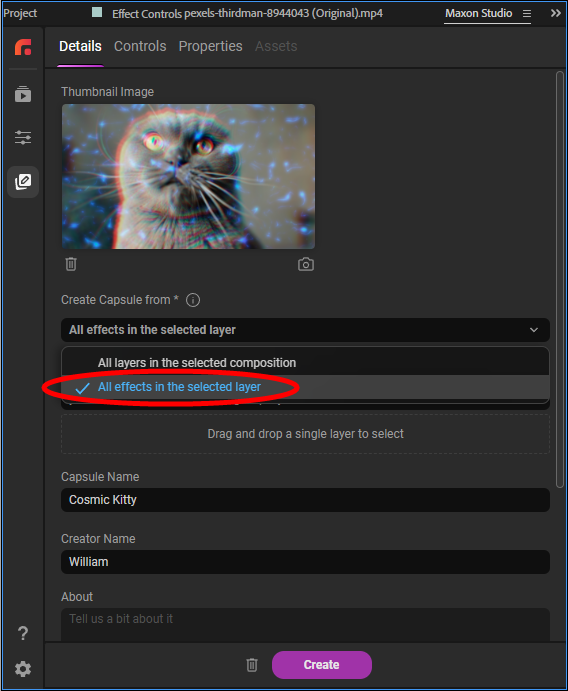
Confirm in the following pop-up that the capsule name and category are correct, then click Save.
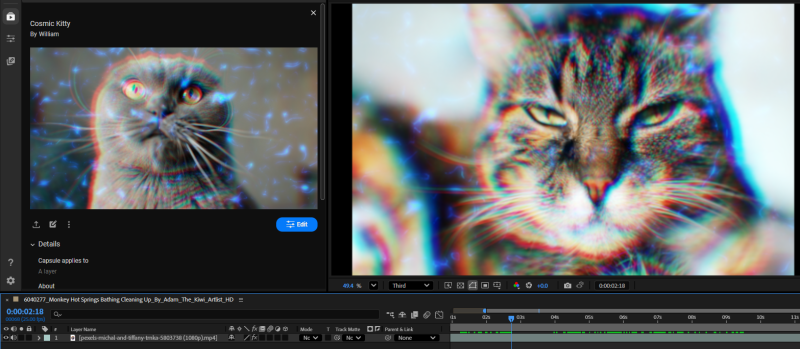
The beauty of effects capsules is that minutes to hours of work in experimenting with a host of tools are now reduced to three seconds. Say we start a new project with a different cat and we want the exact same look applied. No problem. Dip into the Capsules gallery, select your effect capsule of choice, and click Apply. Another cosmic kitty...done.
If you want to iterate on your effect capsule and create different versions for different looks, feels, environments, and so on, just modify your project's tools and/or their settings, then save the iterations as distinct capsules or capsule presets.
Placeholders
The idea is deceptively simple: A placeholder is a Studio capsule element that reserves space in a group for a capsule element you may develop or implement later. If that seems clear as mud, let's clarify things with an example.
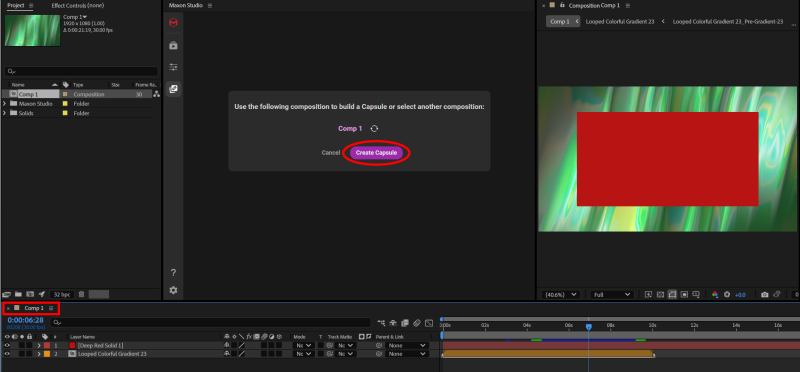
In the setup below, we have a new AE project featuring a single comp comprised of two solid layers, one red and one blue. The red layer will serve as a simple frame while the blue will be our placeholder for what will ultimately be a video clip.
In Maxon Studio, we dip into the Create Page and create a new capsule based on Comp 1. In this example, we apply a stock Studio background capsule, add another solid (red) layer atop it (this red area will become our placeholder), click the Create Page's New button, then click the Create Capsule button from the following pop-up box.
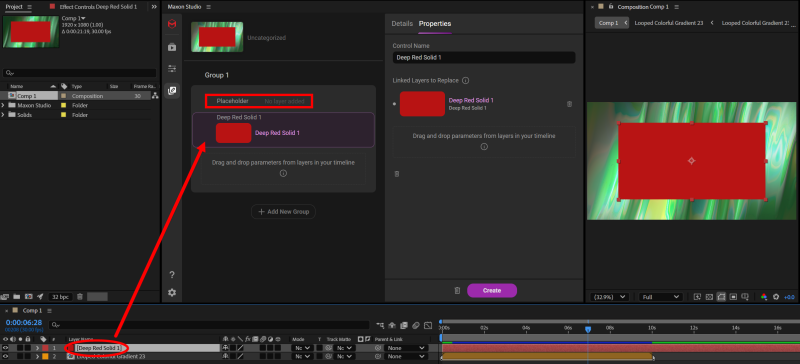
With a blank Group 1 before us, we click through the Add Format Controls icon, select Placeholder, then drag our red solid layer into the Placeholder parameters.
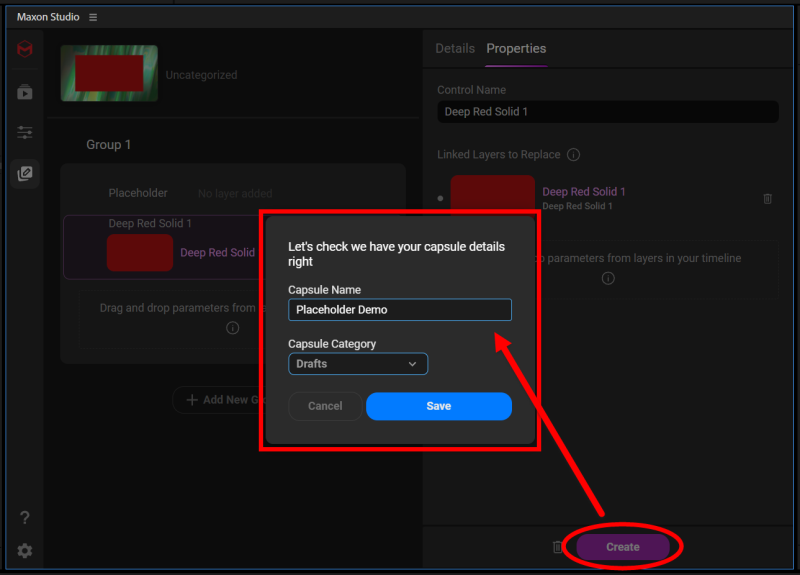
Now, we have our placeholder established, but we still need to save our newly constructed capsule. So, we click the Create button and supply a Capsule Name and Capsule Category in the pop-up, if desired.
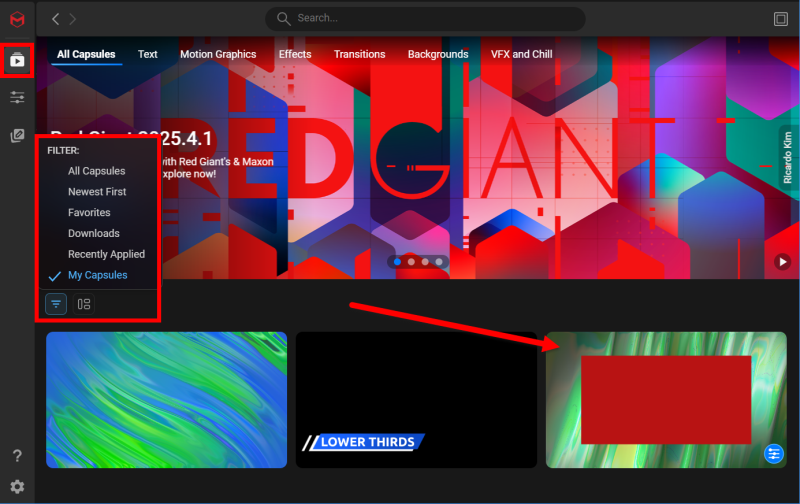
Once the capsule save completes, we can find it either within the Create Capsules gallery or back in the Capsules gallery (albeit with a little filtering, as shown below).
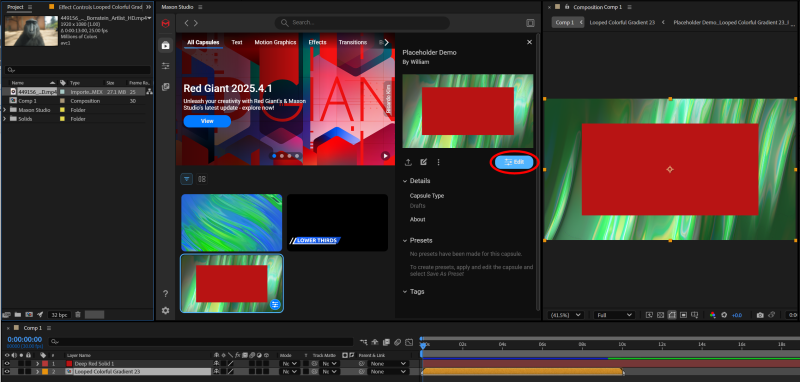
At this point, we might step away, have some lunch, take a vacation, then want to pick up where we left off. No problem. We start a new AE project, create a new composition, then apply our just-made capsule to the comp. We also know it's time to make use of that placeholder, so we bring a video clip into the project assets. That puts us here, ready to click the capsule's Edit button:
Now, we're in Studio's Edit Page. From here, we just drag our video asset over and drop it into the parameters space for our red layer within Group 1.
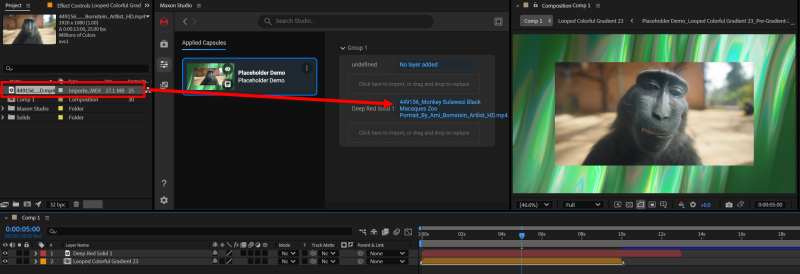
And voilà! There's our magnificent macaque, all smiles at a Studio placeholder put to good use.
To restate the point for clarity, this is but one way to use placeholders, simply to get your creativity moving. You could just as easily replace that element with another comp, a special effect, image, or video. Placeholders are a way to capture your creative vision and prevent future repetitive work.
Saving
Once you put the final touches on your capsule, it's time to save it. Click the Create button at the bottom of the Properties panel (see below). Studio will offer a pop-up window in which you can confirm your capsule name and category. Note that all your created capsules are stored locally.
Curious about where to put these new categories to work? In the Create Page, they're just to the right of your Filter and Orientation icons (which work just like the same functions in the Capsules Page).
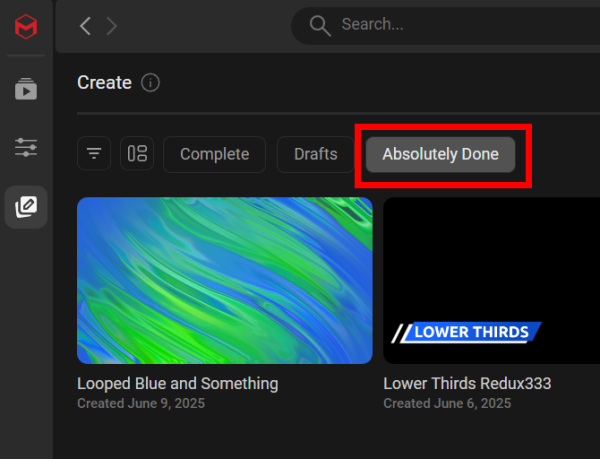
Clicking a category on this bar activates it to behave like a filter. Clicking on our Absolutely Done custom category will turn that button's text blue. You can activate as many of these category filters as you please to better control your capsule results.
Exporting and Importing
So, you've worked your capsule creation magic, and your colleague says, "That's amazing! Can you send me that?" Of course you can. Here's how:
From the Capsules Page, access the export icon from the details area, just under the capsule thumbnail. From the Create Page, work from the thumbnail's three-dots menu.
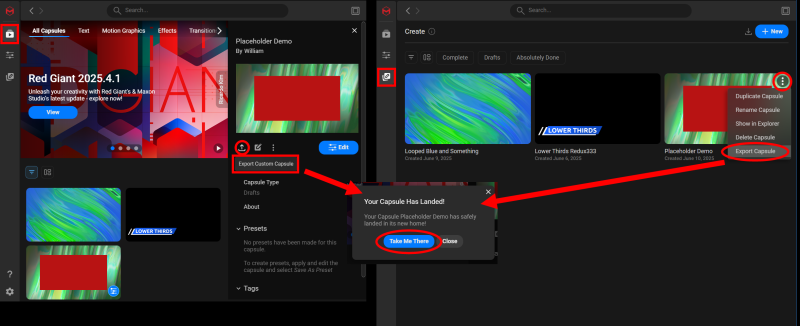
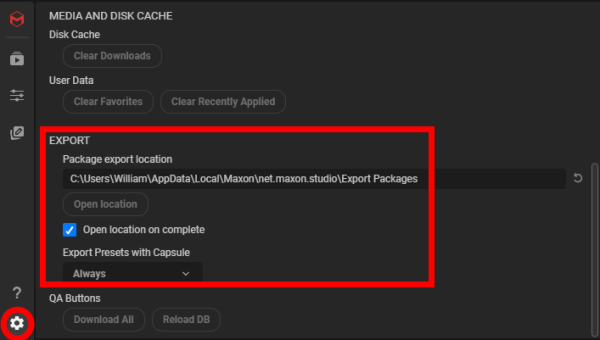
Both methods are shown above, and both yield a success message with a Take Me There button that spawns a file explorer screen. (This will happen automatically if you have Open location on complete checked in your Settings; see below.) Your capsules will default to exporting to the local folder designated in your Settings.
All capsule exports compress into folders stored within ZIP files. Whether you send one capsule or batch select multiple capsules for a single export, the outcome will still be one ZIP per export operation.
Note the Export Presets with Capsule menu in the Settings. The options are Always, Ask on export, or Never. Most users will want to leave this on Always, but your specific needs may vary depending on your capsule workflows.
Now, what about your anxiously waiting colleague? First, you send that ZIP file. On the receiving end, your colleague will extract the desired files or folder(s) from that ZIP and save them locally.
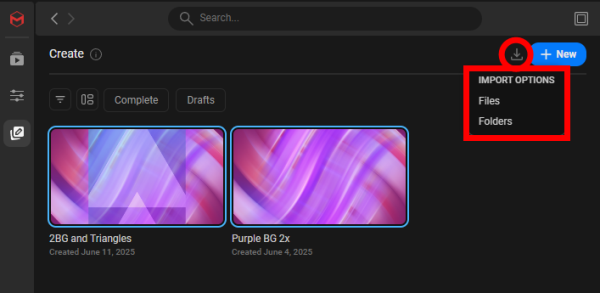
From there, look to the right of the Create Page's find bar and click the import icon (shown below). Select Files or Folders, and the capsules will immediately add into the Studio gallery.
Modifying Capsules
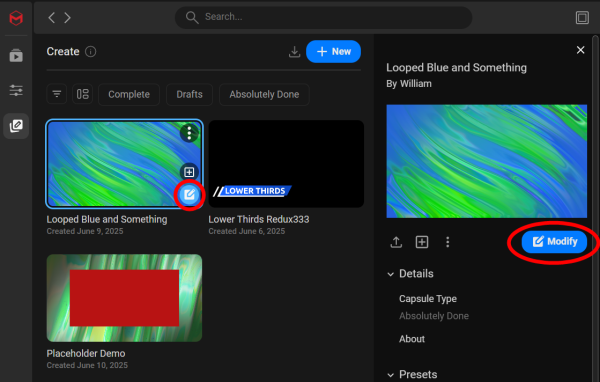
As with standard Studio capsules, you can modify your custom capsules by clicking the Modify button either in the gallery thumbnail or from the capsule's details panel.
If Studio detects that your pending capsule modification is not based on an original project file, then you only receive the Apply Instance in New Comp option in the resulting pop-up.
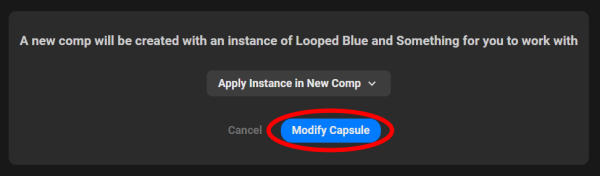
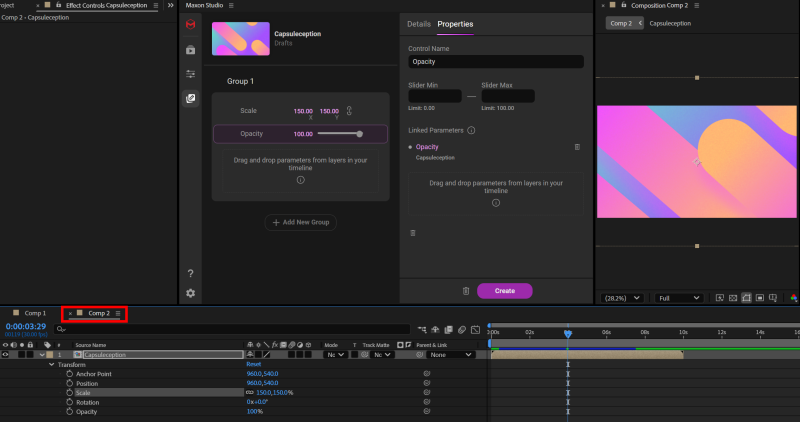
Clicking Modify Capsule instigates AE's new composition pop-up box. The new comp begins with the capsule as the only layer in a new Comp 2 (or whatever you name it). From here, you may add more effects, assets, or anything else, and those in turn can provide the building blocks to expand on your capsule modification.
If you have the original project file and click Modify, the pop-up looks a bit different.
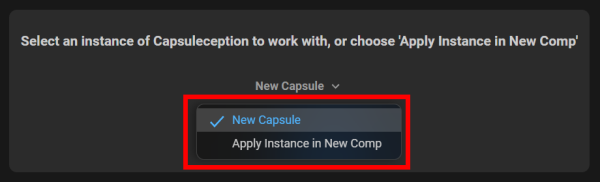
Now you have the option to turn your modification into a New Capsule, which is based on your original project file, or Apply Instance in New Comp. If you click the latter, then click Modify Capsule and create the resulting new comp, your capsule copy shows up in a new comp, ready to be finalized and saved.
A Couple of Caveats
Studio's Create Page is a stellar way to take either Maxon's own capsules or capsules from third parties and quickly adapt them into new capsules that suit your needs and vision. As noted earlier, capsules support project asset awareness. When you create or export a capsule, Studio defaults to including a wide variety of assets referenced by that capsule, including video clips, still images, Adobe Illustrator and Photoshop files, image sequences, and 3D models. This allows other users to apply the capsule without hunting for missing files. However, if you don't want to share assets, you can convert those into placeholders before exporting.
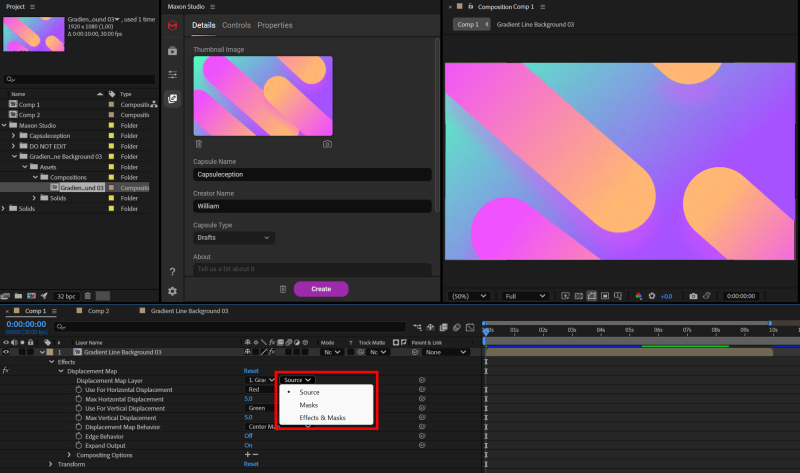
The second notable point is a lack of specific parameter support in some effects, specifically the Sources, Masks, and Effects & Masks selections found in effects that support those options (see below). Every other parameter within the effect works with Studio capsules just fine; it's only those three options in that one pull-down menu. Studio supports third-party plugins, 3D renderers, shape layers, solids, layer properties, frame rate, resolution, on and on, even the source layer selection on the same effect layer line. Source selection is the exception. After Effects does not make that function available in this context.
See Create in Action
If you'd like to see all these new Create Page concepts in action, get ready to be impressed. The Maxon Red Giant channel has some excellent Studio content, including this tutorial on creating carousel presets. Be sure to follow the channel for the latest ideas and how-to walk-throughs.
Frequently Asked Questions
What is the Create Page in Maxon Studio?
The Create Page is where you build and customize your own Studio capsules by selecting elements from an After Effects project. Through a drag-and-drop interface, you can expose parameters, organize controls into groups, and link properties, all within a live environment that updates with After Effects in real time.
Can I build a capsule from scratch with nothing in my AE project?
No. Studio's Create functionality is not a system for building capsules from thin air. It's a system for building capsules from other capsules or from existing After Effects projects and their settings and assets. Starting with an empty AE project and clicking New gives you an empty Create Page on which to build.
What are Blank Controls for in the Create Page?
Blank Controls let you place multiple parameters from several layers under the management of a single Studio control. For example, you can link the color values from multiple layers to a single Color chip, so one edit in Studio drives all the linked parameters at once.
What is a placeholder in a Studio capsule?
A placeholder is a Studio capsule element that reserves space in a group for an element you'll supply later. You can use placeholders for solids, video clips, comps, special effects, or any element you want users to fill in when they apply the capsule.
Can I drag parameters directly from the Effects Control Panel (ECP)?
No. You cannot drag and drop properties from the Effects Control Panel into the Create Page. You must drag them from layer properties on the After Effects timeline instead.
How do exported Studio capsules get packaged?
All capsule exports compress into folders stored within ZIP files. Whether you export one capsule or batch select multiple capsules, the result is a single ZIP per export operation, containing the capsule data and any bundled assets.
Are there any effect parameters Studio Create can't capture?
Yes. The Sources, Masks, and Effects & Masks selection options found in certain effects cannot be captured as Studio parameters. After Effects doesn't expose that specific selection in a context Studio can use. Every other parameter in those effects works normally with Studio capsules.