The Edit Page
The Edit Page is where you customize applied capsules after adding them to your After Effects project. No matter how impressive any given capsule might be, odds are you'll want to make it your own. Here, you adjust parameters, create instances, save presets, and compare variations without digging into the layer stack.
Edit Page Anatomy
When you open the Edit Page, you'll see three primary components working together.
- The Applied Capsules Panel shows the thumbnails and names of all capsules applied to your project.
- The Controls Panel exposes the "shortcut" parameters selected by the capsule creator.
- Groups are collections of controls in the Controls Panel tied to a given capsule feature.
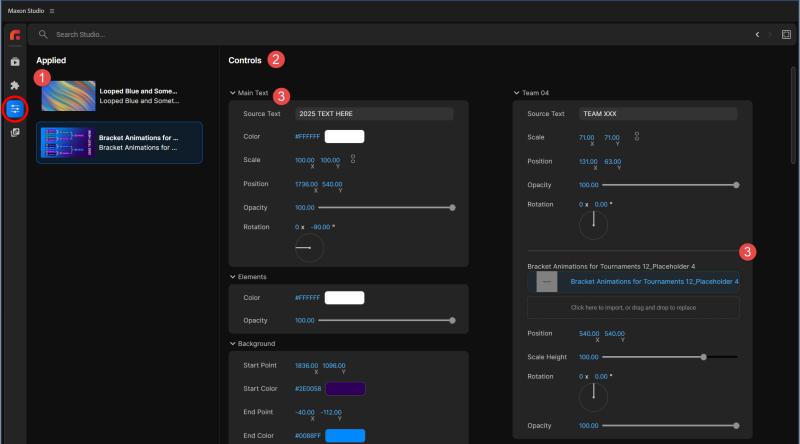
The Applied Capsules Panel
This panel shows the thumbnails and names of all capsules applied to your project. One important note: changes made to your capsule in the project do not reflect in these thumbnail images. The thumbnails represent the original capsule state, not your current modifications.
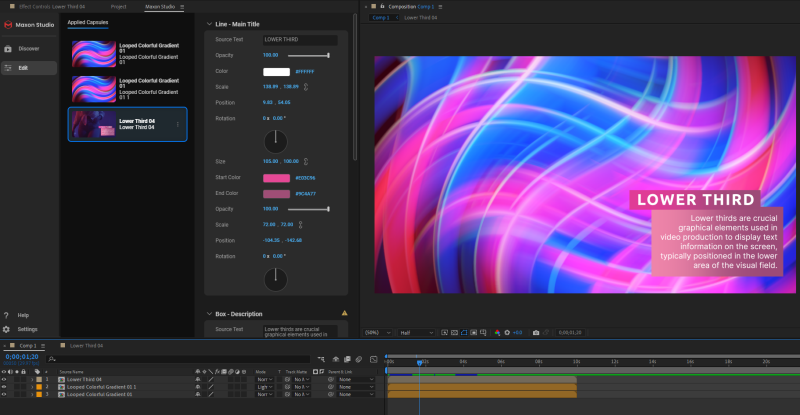
The Controls Panel
The Controls Panel exposes the "shortcut" parameters that the capsule creator selected for easy access. Instead of digging through every possible control, you see only the ones that matter most for that capsule.
Groups
Groups are collections of controls in the Controls Panel tied to a specific capsule feature. For example, if your capsule contains multiple text elements, you might see a group for "Text Line 01" containing a "Source Text" field and parameters for position, rotation, and other text properties. There is no firm rule limiting the number of controls or groups in the Controls Panel, but most creators aim for around 20 to 25 controls per capsule as a practical guideline.
Adjusting Capsule Parameters
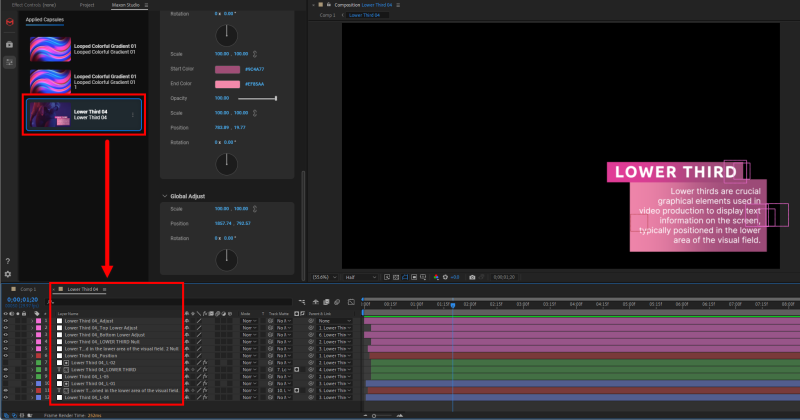
When you click into the Edit Page and select a capsule, you can either change parameter values in the Controls Panel or select that capsule on the After Effects timeline (shown below). Note: The capsule becomes the topmost visible layer on the timeline, meaning its content will hide layers underneath. If you need to work with underlying layers, you may need to delete elements from the capsule or use the techniques described in the Core Concepts section.
Digging directly into a capsule's layers inside After Effects gives you the greatest amount of control, but it also takes the most time. The Edit Page offers a much faster path.
Parameters vs. Timeline Editing: A Comparison
Say you want to control an element's opacity and animate it fading into the composition. Using the Edit Page, the workflow is straightforward. Put your timeline playhead where the fade-in should begin, set the opacity parameter to 0.00 (as shown below), move the playhead to where the fade-in ends, then set the opacity to 100. That's it.
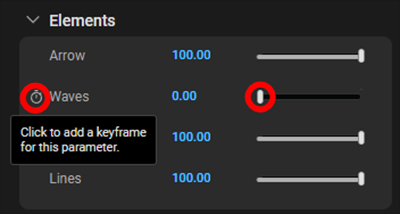
That's considerably quicker and easier than the conventional approach: digging through the layer stack, finding the correct layer, locating the opacity property, and manually keyframing the effect. The Edit Page eliminates that excavation step entirely.
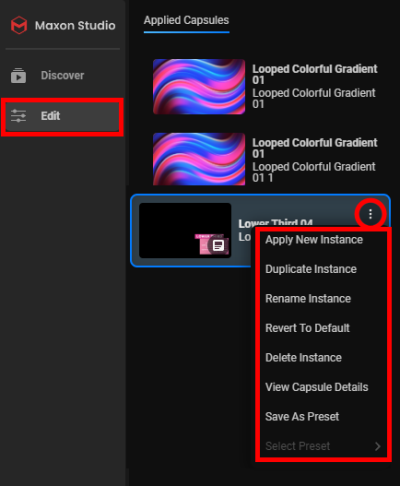
Managing Capsule Instances
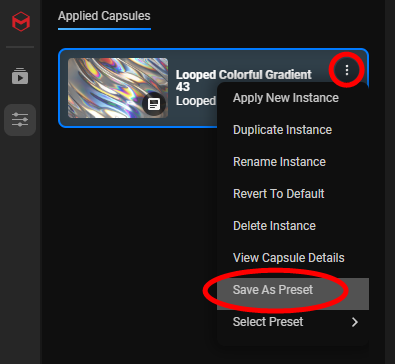
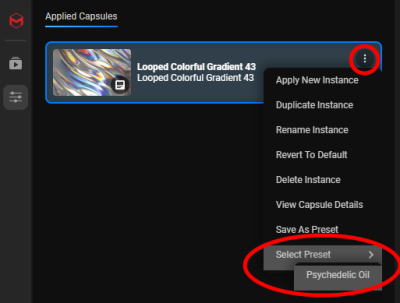
Circling back to the Applied Capsules Panel, you'll notice that each capsule entry features a "three dots" menu icon (⋮). Clicking this brings up a menu with seven powerful options for managing that capsule instance.
Instance Menu Options
The menu contains these options: Apply New Instance, Duplicate Instance, Rename Instance, Revert to Default, Delete Instance, View Capsule Details, Save As Preset, and Select Preset. Let's work through them.
Apply New Instance
This option applies a fresh copy of the capsule with no customizations. Let's say your project currently has three layers. When you select Apply New Instance for a capsule you've already modified, a new instance is created with a numeric suffix (e.g., "Lower Third 04 1"). This new instance:
- Creates a new visible layer at the top of the timeline
- Starts with the capsule's default parameters (not your previous customizations)
- Lets you compare different color schemes, timing, or settings side-by-side
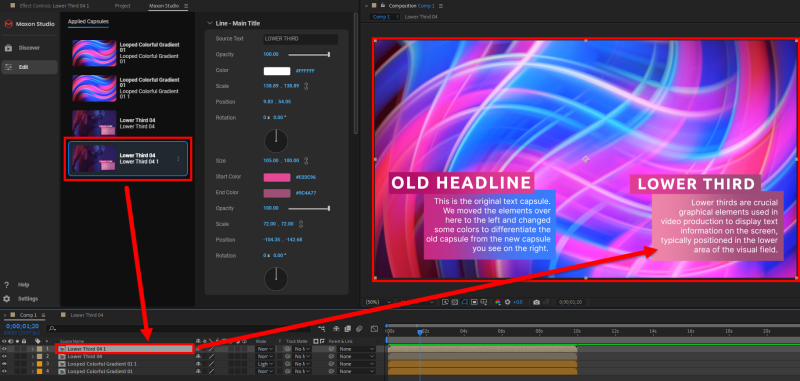
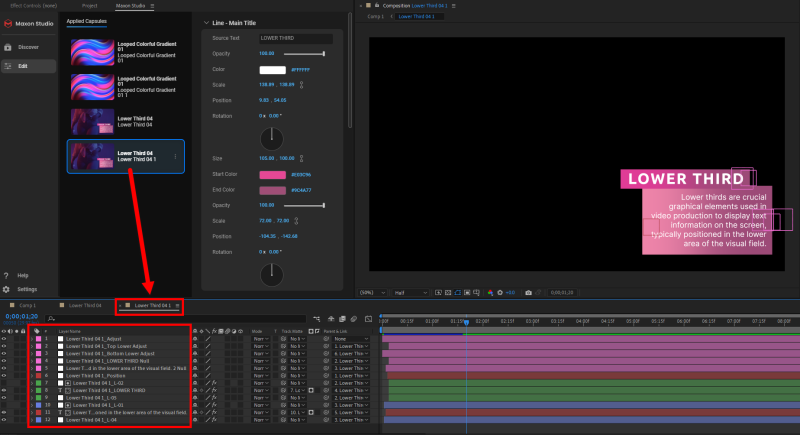
This approach is excellent for experimenting. You might try different color schemes, keyframe timing, or any other parameter variation, then turn layer visibilities on and off to compare them. If you need to dig deeper into an instance's internal layers and effects, double-click its timeline layer to create a new tab for detailed editing.
Duplicate Instance
Duplicate Instance is similar to Apply New Instance, but with one key difference. It copies all your customizations forward. If you've spent time fine-tuning colors, timing, and parameters on one instance and want to create a variation of it, Duplicate Instance saves you from starting from scratch.
Rename Instance
Rename Instance does exactly what its name suggests. It lets you customize the instance name. When you select it, the second line of your capsule's name becomes editable. The first line (the original capsule name) remains unchanged, giving you a clear reference to the base capsule even after renaming the instance. This becomes invaluable as your Applied Capsules list grows.
Revert to Default
Revert to Default changes the capsule instance back to the capsule's original settings, erasing all your customizations. If you accidentally select this option, don't panic. A Cmd/Ctrl+Z undo command will instantly un-revert your work.
Delete Instance
Delete Instance removes that instance from the Applied Capsules Panel and its corresponding layer from the timeline.
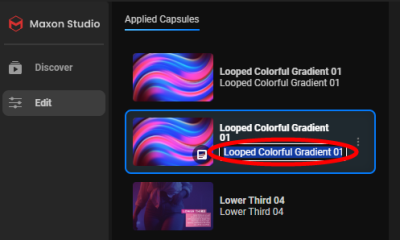
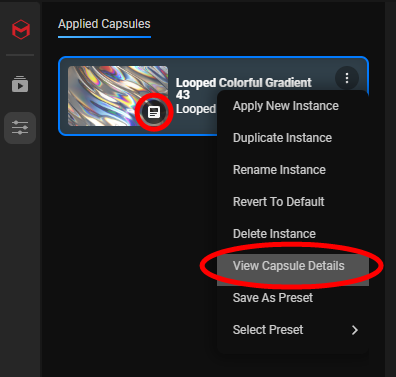
View Capsule Details
This option replaces the Applied Capsules Panel with the Profile Panel (detailed in the Core Concepts section), showing you the complete list of parameters available for that capsule, including those hidden from the Controls Panel.
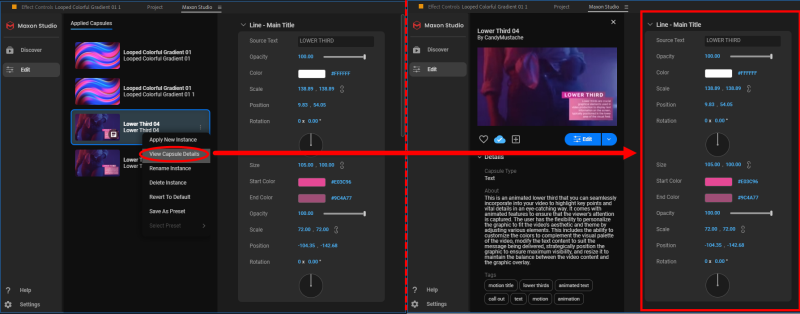
Fun fact: See that little white icon in the lower-right corner of the selected capsule thumbnail? Clicking that also brings up the View Capsule Details information, in case you feel like saving a click or two.
Presets
Studio's preset options deserve their own deep dive. A preset is similar to a capsule instance, except presets are saved as separate files in the Maxon Studio Presets folder. This makes them easy to share with other Studio users in your organization and to use across multiple projects.
Creating a Preset
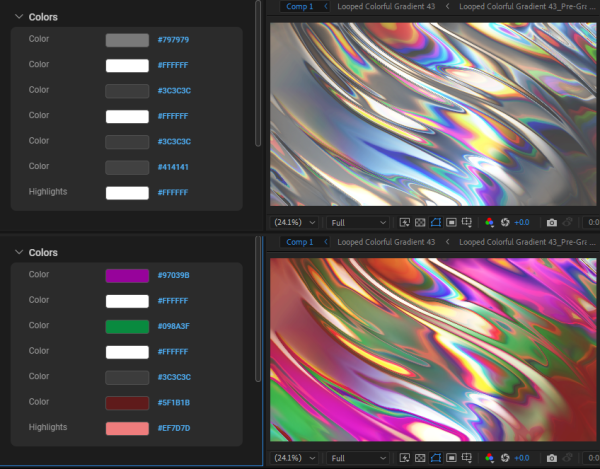
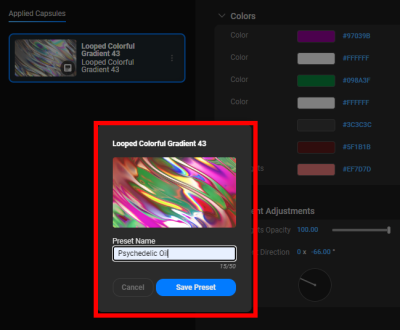
Let's begin with a practical example. Imagine you're working with a background capsule like "Looped Colorful Gradient 43." You decide to customize its colors to match your project's brand palette. After adjusting the parameters (shown below), you're happy with the result and want to save this color combination as a preset for future projects.
From here, click the three dots menu and select Save As Preset.
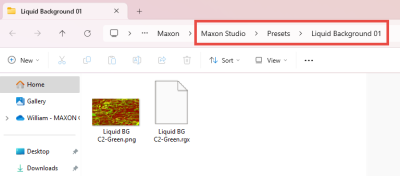
Studio opens a dialog asking for a name. You might call your custom gradient "Psychedelic Oil" or any name that helps you remember what it is.
After you save, Studio confirms the preset was created. But...where is it? The Applied Capsules Panel still shows only your original capsule. The answer lies in the Details pane, accessible via the capsule's three-dots menu or by clicking the little white corner icon on the capsule thumbnail.
Understanding Preset Hierarchy
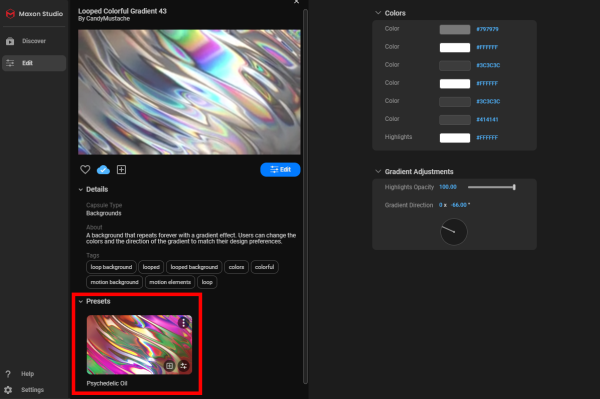
Here's a key concept. Presets are subordinate to capsules. Think of presets as children and capsules as parents. One capsule can spawn any number of presets, all with their own saved parameter values. When you view the Details pane for a capsule, you'll see a "Presets" section listing all presets created from that capsule.
To illustrate this relationship, consider what happens when you revert a capsule to its defaults and then check the Details pane. The presets remain intact (they're separate saved states), but the capsule instance itself returns to its original parameters.
Applying Presets
If you save your project, exit After Effects, and return later, your presets remain available. You can apply a saved preset in two ways: through the Details pane or by selecting Select Preset from the capsule's three-dots menu.
When you apply a preset, any existing capsule parameter values are overwritten by the preset's values within the Edit Page. Note: Default values remain unchanged in the Capsules Page's browser. The preset only affects your current project's instance.
Preset Controls
When you mouse over a preset's thumbnail in the Details pane, three icons appear:
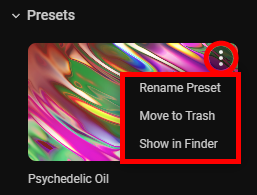
Three-dots menu (top-right): Opens a menu with three options:
- Rename Preset — Change the preset's name
- Move to Trash — Delete the preset
- Show in Folder — Open a file explorer window to the Studio Presets folder
Selection icon (bottom-right): Applies the preset's values to the applied parent capsule. For example, if you've made many experimental value changes to a capsule instance and want to revert to a preset's state, click this icon.
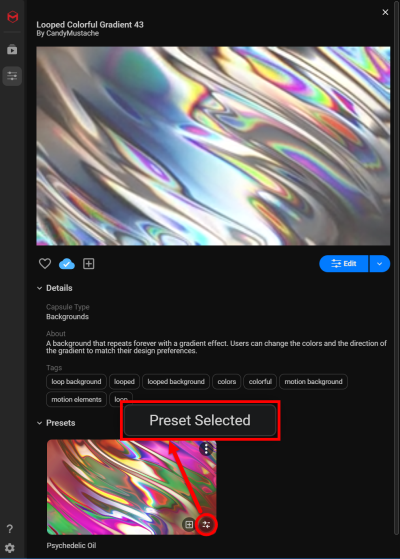
Plus icon: Applies the preset to create a new instance of the parent capsule with the preset's parameter values. This is useful when you want multiple instances of the same capsule, each with different preset values.
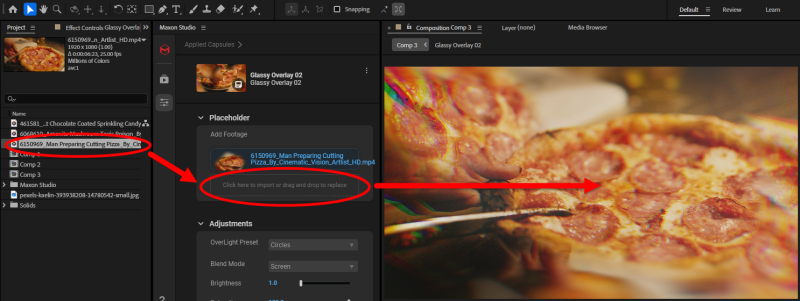
Placeholders: Adding Your Footage
Some Maxon Studio capsules come with placeholders, which are pre-designed visual structures waiting for your footage to fill them. These capsules include built-in visual effects and layouts (the "visual shenanigans," as some might say), and all you need to do is slot in your clips.
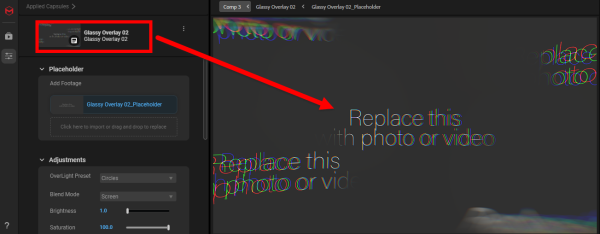
For a detailed walkthrough of working with placeholders on the After Effects timeline, see the Tips, Tricks & Extras page. However, Studio also provides a faster method: the Placeholder module in the Controls Panel includes an Add Footage tool for supported capsules.
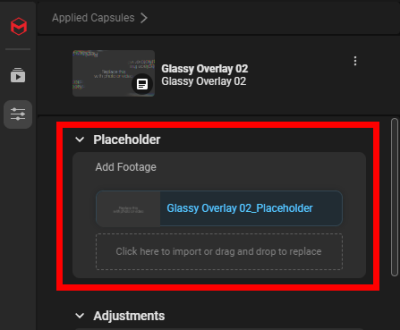
Using Add Footage is straightforward. Click the button to browse and import your clip, or drag and drop your clip directly from your file explorer onto the Add Footage button. Your footage will fill all placeholder locations at once. (You can replace individual placeholders using the techniques described in Tips, Tricks & Extras if you need to swap out specific clips.)
To illustrate, imagine using "Glassy Overlay 2" (a visually psychedelic capsule) and deciding to drop in some footage for demonstration. We chose a mushroom clip (amanita muscaria, for authenticity). Just a friendly reminder: the mushrooms shown are poisonous and not psychedelic. Always VFX responsibly.

Beyond dragging a clip from your file browser, you have additional flexibility. You can drag and drop a clip directly from your After Effects timeline or from your Project asset panel onto the Add Footage tool. Studio handles all the heavy lifting.
Frequently Asked Questions
What's the difference between creating a new instance and duplicating an instance?
Apply New Instance creates a fresh copy of the capsule with all default parameters. Duplicate Instance copies the current instance, including all your customizations. Use Apply New Instance to experiment with different variations; use Duplicate Instance when you want to build on your current work.
Can I edit the parameters directly in the After Effects timeline instead of using the Edit Page?
Yes, you can double-click a capsule's timeline layer to open its internal layer structure and edit effects, transforms, and properties directly in After Effects. However, the Edit Page provides a much faster workflow for the most common adjustments, since the capsule creator has already exposed the key parameters you're likely to need.
If I revert a capsule instance to its defaults, will my presets be deleted?
No. Presets are independent saved states stored in the Maxon Studio Presets folder. Reverting a capsule instance only resets that instance's parameters to the capsule's defaults. Your presets remain intact and available in the Details pane.
Can I share presets with colleagues?
Yes. Presets are saved as files in the Maxon Studio Presets folder on your system. You can share this folder (or individual preset files) with team members, and they can drop them into their own Presets folder to use them in their projects.
How do I add footage to placeholder-based capsules without using Add Footage?
You can manually replace placeholder layers on the After Effects timeline. See the Tips, Tricks & Extras page for detailed steps on swapping individual placeholders.