Displace
You should already be familiar with the displacement channel in Cinema 4D, which raises, lowers and displaces surface points using a texture. The Displacement channel in Hair basically works the same way: Hair points are displaced in 3D using the curves in the Displacement channel (X Curve, Y Curve and Z Curve). These graphs can be used to precisely adjust the hair – as long as you are not using guides.
Use this setting to define whether you want the X, Y and Z curves to be affected by the world or by the immovable local coordinate system.
When this setting is activated, Displace will change its unit of measure from m to %. This percentage is the amount of displacement with regard to hair length. This is important, when hair length is controlled using guides of various lengths. Let’s say you used guides to define a complete hairstyle, including sideburns, and the hair on the head is fairly long compared to that of sideburns. If, for whatever reason, you should then want to apply a relatively large displacement, the sideburns would look completely out of whack! To avoid this, activate Relative.
Distance [-∞..+∞m]
Variation [-∞..+∞m]
Displace [-∞..+∞%]
Variation [-∞..+∞%]
Displace defines the strength of the displacement effect. If Relative is activated, the unit of measure for Displace will change from m to %. This percentage is the amount of displacement with regard to hair length.
Use this slider to adjust the percentage of hair that should be affected by Displacement. A value of 100% will affect all hairs.
Use this setting to define the Displacement effect in 3 dimensions along the entire length of the hair. In the following images, only the X Curve setting was varied.
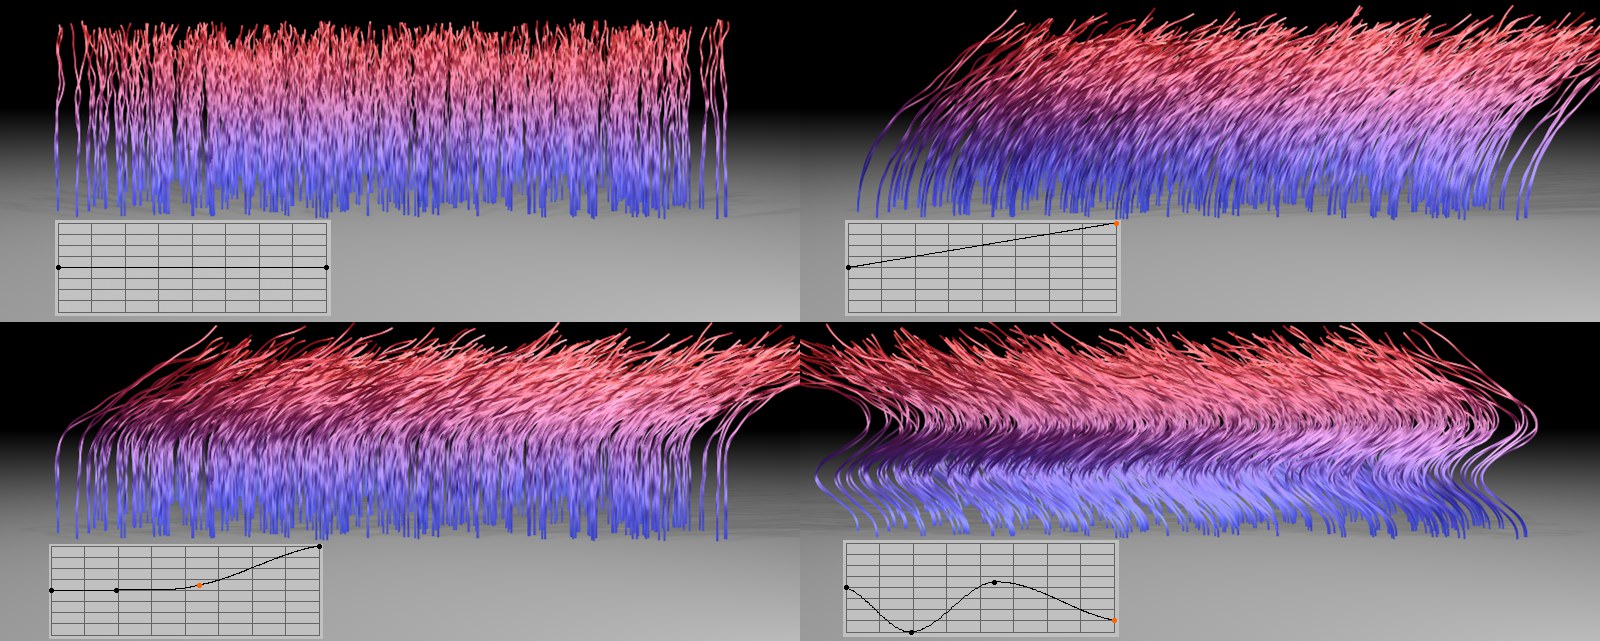 Various X Curve variations. In each image, the X axis runs from left to right.
The curves can also have a negative value, which will cause the Displacement effect to reverse direction.
![]() Advanced
Advanced
If this option is active, Displacement can also be used to move the hair root. This will, though, uproot the hair and the hair will no longer be attached to the object surface. This will lead to problems when using SPD and normal material displacement because the hair will then no longer be arranged correctly on the object’s surface.
If this option is active, an additive amplification of the Displacement effect will take place (if From Tip is not active). Each displacement of a respective hair point will be added to the previous hair point, over the entire length of the hair.
The Additive option should be activated if you want to load a texture into the Direction field, otherwise the hair will not be bent.
This option, when active, will ensure an equal amount of displacement for each hair point (when Additive is active).
The resulting effect is similar to Additive being deactivated, only weaker.
Use the Strength curve to define the displacement strength (Displace setting) over the length of the hair. The curve can also be given a negative value, which will cause the Displacement effect to reverse direction.
A texture loaded into this field will use its grayscale values to define the Displace setting across an entire surface (an exception to this rule is the next setting, Direction).
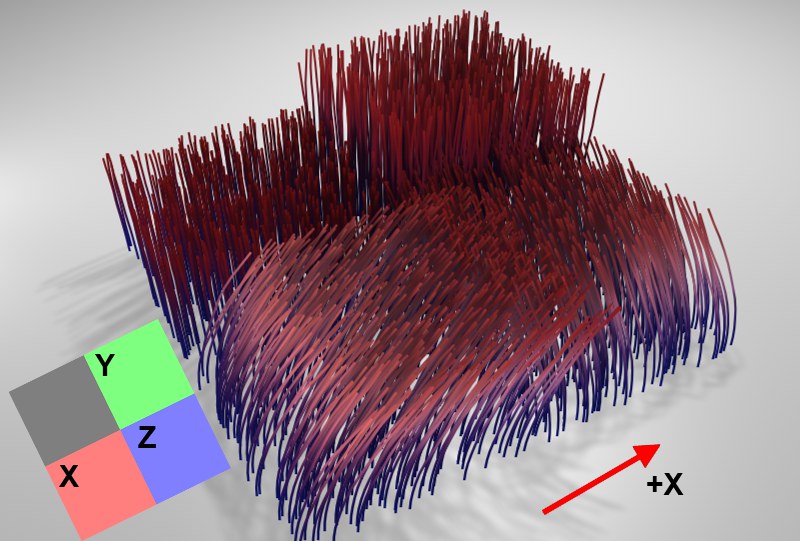 The displacement shown is a result of using the texture at the lower left of the image (insert).
A texture loaded into the Direction field will use its RGB values to define the direction of the Displacement effect. The RGB values affect the direction of the hair as follows:
- Red - X
- Green - Y
- Blue – Z
RGB values can affect the direction of the hair in either a positive or negative direction. Color values up to 127 will have a negative effect, whereas color values greater than 127 will have a positive effect. An equal RGB value of 127, 127, 127, for example, will result in a neutral effect and no displacement will be applied.