
Configuring Lights
Quick Navigation
The Lights List
In the Scene section of the layout, you'll find the Lights List, an area designed to help you manage the visibility and organization of Redshift light sources. Especially if you've added new light sources later using Redshift's built-in Light Tool, it makes sense to name them and, if necessary, group them together to maintain a clear overview. All the settings you need for this can be found in this section.
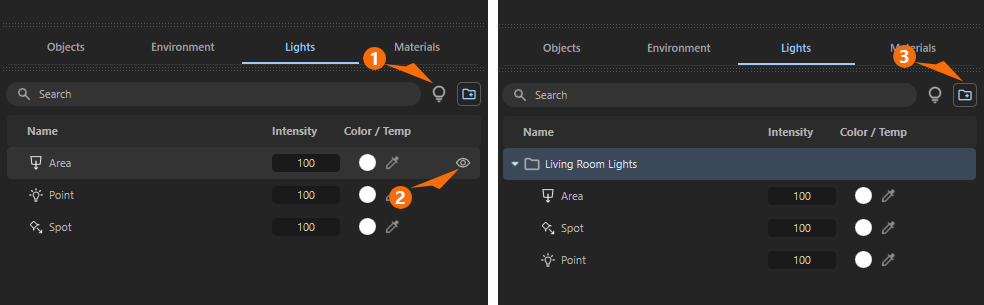
1Next to the search field for finding light sources by name, you'll find the light source icon. Clicking this button toggles the display of the circular icons for all light sources in the viewport on or off. On the one hand, the additional markers make it easier to estimate the placement and number of light sources in the scene; on the other hand, they can be distracting when viewing the scene. You can toggle this display on or off at any time. The effect of the light sources in the scene remains unchanged.
2When you hover the mouse pointer over a row for one of the listed light sources, an eye icon appears on the right edge, indicating the current visibility of that light source. Clicking this icon grays out the row and deactivates the light source in the scene. The light’s effect disappears as a result, even though its icon remains visible in the viewport. Since this information is also saved in the Stored Views, you can use this feature to create different lighting scenarios within the scene.
3Clicking the folder icon creates a group in the Lights List. If light sources were already selected when you clicked, they are automatically added to the group. Otherwise, you can add light sources to the group or remove them from it at any time by dragging them manually. Groups also feature an eye icon for turning them on and off. This allows you to turn a large number of light sources on or off all at once. In addition, collapsing the group and giving it a custom name helps keep things organized and clear.
Please note that, unlike with geometric objects, you cannot create direct groups by dragging a light source entry onto another one.
Unlike with geometric objects, you cannot create direct groups by dragging a light source entry onto another one.
But let's also take a look at the entries for the light sources themselves:
-
Clicking on a light source in the list selects it. Among other things, this causes additional guides or handles to appear for it in the viewport (also see Light Tool). In addition, all parameters for this light source are displayed in the Attribute Manager, allowing for custom configuration. There, for example, you can change the light source type at any time.
-
The Name of the light source appears next to the icon for the light type being used. Double-clicking on it allows you to edit it.
-
The Intensity or brightness of the light source can be adjusted directly here. Please note, that there is also a global Light Intensity setting available in the Environment tab.
-
In the Color/Temperature section, you can adjust the color value of the light. Clicking the color swatch opens a color selection dialog (see Color Options), and clicking the eyedropper icon allows you to select a color value directly from another area on your monitor with a second click.
The Light Parameters
The Lights List already provides the basic properties of intensity and color for light sources. However, selected light sources offer additional settings in the Attribute Manager—located directly below the Lights List—some of which depend on the selected light source type. We’ll discuss these settings one by one, sorted by light source type. Inevitably, there will be some overlap in settings that apply to all types of light sources.
Point Light Parameters
Point light sources emit light evenly in all directions. They are therefore ideal for simple light bulbs or whenever a room needs to be brightened overall, for example, by a centrally placed light source. However, since the resulting shadows are cast in a radial pattern from the position of this light source, caution is advised. Spot lights or Area lights are often the better choice, as they allow for targeted illumination of a specific area.
General Settings
Type
This allows you to switch the type of a light source that has already been selected at any time, for example, from a Point light source to an Area light source. Just keep in mind that this does not change the default names assigned to the light sources.
Intensity Settings
Intensity
Specifies the intensity of the light or the number of physical units (see Units setting below). Please note that the Environment tab also includes a global setting for light intensity, which you can use to control the overall intensity of all light sources in the scene.
Exposure (EV)
Specifies an f-stop value that allows you to intuitively increase/decrease the light's intensity when matching to a plate, or rendering large/tiny scenes without using huge/miniscule Intensity multiplier numbers. A value of 0.0 means the intensity does not change.
For example, an Exposure value of 1.0 means the light doubles in Intensity and a value by 2.0 means the light quadruples in Intensity, etc.
Units
Selects which physical unit is used to drive the light intensity:
-
Image: Use non-physical units.
-
Lumens (lm): The total visible light output. Since this value is also specified for many real light sources, it allows for a 1:1 transfer of the luminous intensity from real light sources to our 3D light sources.
-
Nits (cd/m^2): This describes the perceived brightness of a visible surface, such as a display.
-
Watts (W): This describes the energy consumed or emitted by a light source. This unit was commonly used for traditional light sources, but has become less relevant in the age of LEDs and energy-efficient light sources. For example, an LED light can be much brighter than a traditional incandescent bulb even at a lower wattage.
-
Candelas (cd): This value describes the luminous flux in a specific direction. Two otherwise identical light sources may have different Candela values if one of the light sources focuses the light more intensely or scatters it more widely.
-
Luminous Exitance (lm/m^2): This unit refers to a luminous surface and indicates the luminous flux per unit area. This is particularly relevant for area lights, because the amount of light emitted can change when the surface area of the light source is scaled.
Color Settings
Mode
Here you can choose whether to use a standard color value or a color temperature measured in Kelvin. The latter has the advantage that many light sources already specify their color temperature. As a general rule, a lower color temperature results in warmer light colors (candlelight, classic incandescent bulb), and a higher color temperature results in cooler light (sunlight at noon, white LED light). When using color temperatures, please note that not all colors are available through this method. The colors follow the physically accurate progression from red and orange tones through white to bluish hues.
Color
With Mode Color, clicking on the color swatch opens the color dialog box. All the color selection options available there are described here.
Temperature (K)
With Mode Temperature, you enter the Kelvin value here.
Spot Light Parameters
General & Intensity Settings
These settings are identical to those for the Point light source and can be found here.
Color Settings
The general settings for light color are the same as those for the Point light source and can be found here.
Texture
You can import a bitmap here, either by clicking the folder icon or by loading it from the Library Browser. This image is then placed in front of the light source like a slide and colors the light accordingly. Keep in mind that dark colors in the texture will dim the light accordingly.
Shape Settings
Here you'll find the settings that control the spot's beam angle and softness.
Cone Angle
This is the outer opening angle of the spot, as indicated by the guide lines in the viewport. The handles there also control this angle.
Falloff Angle
Specifies the angle over which light falls off at the edge of a spot light cone. Lower values produce a sharper edge while higher values produce a softer edge. What is considered a low or high value is relative to the main Cone Angle because the Falloff Angle only takes effect up to half of the Cone Angle.
In the examples below, note how the Cone Angle limits the effective range of the Falloff Angle. Each example animates the Falloff Angle from 0-180° but only values from 0° up to half of the Cone Angle's range have any impact. For example, when the Cone Angle is 179° the Falloff Angle only affects up to 90°. When the Cone Angle is 90° the Falloff Angle can only affect up to 45° and so on.
| Falloff Angle: 0 - 180° Cone Angle: 179° |
0 - 180° 90° |
0 - 180° 45° |
Falloff Curve
Controls how the light intensity transitions from the Falloff Angle to the Cone Angle. Higher values result in softer transitions while lower values result in a more linear transition.
| Falloff Curve 0 - 10 |
Area Light Parameters
General & Intensity Settings
These settings are identical to those for the Point light source and can be found here.
Color Settings
The general settings for light color are the same as those for the Spot light source and can be found here.
Shape Settings
Here you'll find the settings that control the visibility and size of the Area light.
Area Shape
Here, you can choose from various shapes for the Area light. Note that the size of the selected shape (along with the Spread value) also affects how shadows are calculated. Large light sources generally produce soft shadows, while small light sources (see also Point and Spot light sources) produce hard shadows.
Unlike other light types, Area lights also use actual shapes that can be reflected on surfaces or appear as glowing objects visible to the camera.
- Rectangle/Disc: Two-dimensional shapes in which light is emitted primarily in the Y-direction of the light source.
- Sphere/Cylinder: Three-dimensional shapes that emit light in all directions.
Size / Size Z
Depending on whether you've selected one of the two-dimensional or three-dimensional shapes, the corresponding dimensions are displayed here. You can also edit the proportions and size of the selected shape directly using the handles in the viewport.
Spread
Enables directionality control for Rectangle and Disc area lights, similar to a barn door effect or spot light. The lower the Spread, the more the light is concentrated in the direction of the light normal. A Spread value of 1.0 is the default, physically correct lighting behavior, while a value of 0.0 makes the light almost a directional light.
Note that a Spread of 0.0 is close to a fully directional light, but not completely directional. This is due to a mathematical sampling limitation.
At very low spread values the light can visually disappear within a specular highlight.
| Spread: 0 - 1 |
Camera
The selected Area Shape is displayed directly in the viewport as a glowing geometry and is rendered as such. The Camera parameter controls the visibility of this shape to the camera. If the value is set to 0, the Area light remains invisible to the camera but retains its lighting properties for the scene.
Reflection
The selected Area Shape is also displayed directly in the viewport as a glowing geometry and is reflected accordingly on surfaces. If you want the Area light to remain invisible for reflections, set this value to 0. All other effects of the light source on the scene's lighting remain unchanged.
Photometric Light Parameters
General Settings
This setting is also found, among other places, on the Point light and can be found here.
Intensity Settings
IES Profile
IES stands for Illuminating Engineering Society. The IES data format describes the distribution of light from a point source. Most major manufacturers of lights provide IES profiles which can be downloaded for free.
Redshift IES lights use IES profiles to define the light's intensity and distribution. Below are some examples of different IES light profiles, note their drastically different light distribution patterns.
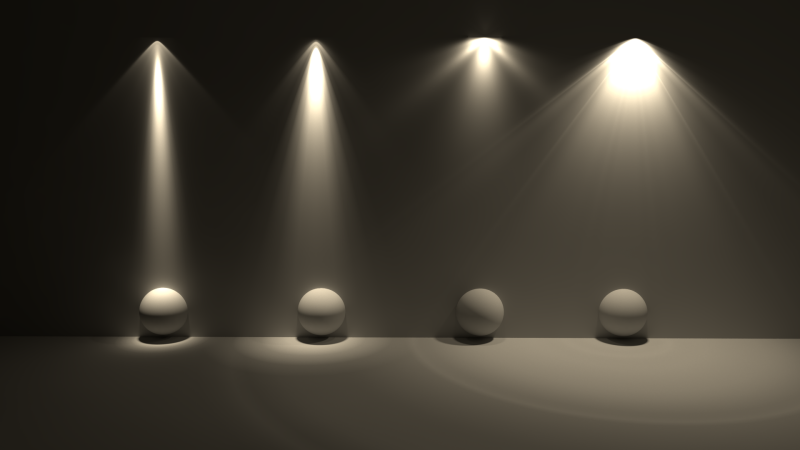
Redshift automatically creates a simple geometric shape in the viewport that roughly illustrates the IES light's distribution pattern.
Mode
IES data already includes the intensities of a light source, measured in various directions. Therefore, a separate Intensity value is not actually necessary, unless you want to manually dim or brighten the light source:
- From IES File: The light intensity is taken from the loaded IES file.
- Override: A searate Intensity parameter is provided, similar to the other light types.
Intensity/Unit
These settings are available only in override mode and allow you to specify a custom intensity using the desired unit, Lumens or Candela.
-
Lumens (lm): The total visible light output. Since this value is also specified for many real light sources, it allows for a 1:1 transfer of the luminous intensity from real light sources to our 3D light sources.
-
Candelas (cd): This value describes the luminous flux in a specific direction. Two otherwise identical light sources may have different Candela values if one of the light sources focuses the light more intensely or scatters it more widely.
Exposure (EV)
Specifies an f-stop value that allows you to intuitively increase/decrease the light's intensity when matching to a plate, or rendering large/tiny scenes without using huge/miniscule Intensity multiplier numbers. A value of 0.0 means the intensity does not change.
For example, an Exposure value of 1.0 means the light doubles in Intensity and a value by 2.0 means the light quadruples in Intensity, etc.
Color Settings
These settings are identical to those for the Point light source and can be found here.