
The Light Tool
This tool allows you to select your own light sources and place them in the scene.
These Redshift lights exist only in Redshift and do not appear, nor affect the actual CAD project.
You can choose from a Point light, a Spot light, a Area light, and a Photometric (IES) light source, which can be customized with specific lighting characteristics using imported IES files.
To learn about the settings of each light type, have a look at the description of the Lights List.
Quick Navigation
The different Light Types
After selecting the Light Tool, a small gallery opens with icon-based representations of the available light types. Here are the options:
- Point Light: A point light source emits light uniformly in all directions, similar to a candle flame or, to some extent, a traditional incandescent light bulb. Due to its radiation characteristics, the rotation of this light source is irrelevant.
- Spot Light: This simulates the light distribution of a light source inside a housing or with a reflector. The light can thus be directed precisely, allowing only specific areas of the surrounding environment to be illuminated. The softness and beam angle of the spot can be freely selected.
- Area Light: This light type closely resembles real-world light sources because the light is not emitted from a single point, as with Point or Spot light sources, but rather from an area that can be scaled to any size. Since this light source can also be visible in the scene as a bright object, it is also well-suited for simulating neon tubes or monitors, for example. You can choose between rectangular, disc-shaped, cylindrical, and spherical area lights. The appearance of the light source and its light emission behavior differ accordingly. While rectangular and disc-shaped light sources emit light only in the Y-direction, cylindrical and spherical light sources emit light in all directions.
- Photometric Light: This light source is closely related to the Point light source, but can be individually configured using an imported IES file, allowing its light distribution to closely match that of real-world light sources. IES files are often provided by lighting manufacturers and reflect the light intensities in various directions. This makes it possible to simulate the characteristic properties of, for example, facade lighting or a specific ceiling floodlight.
Interactive Manipulation
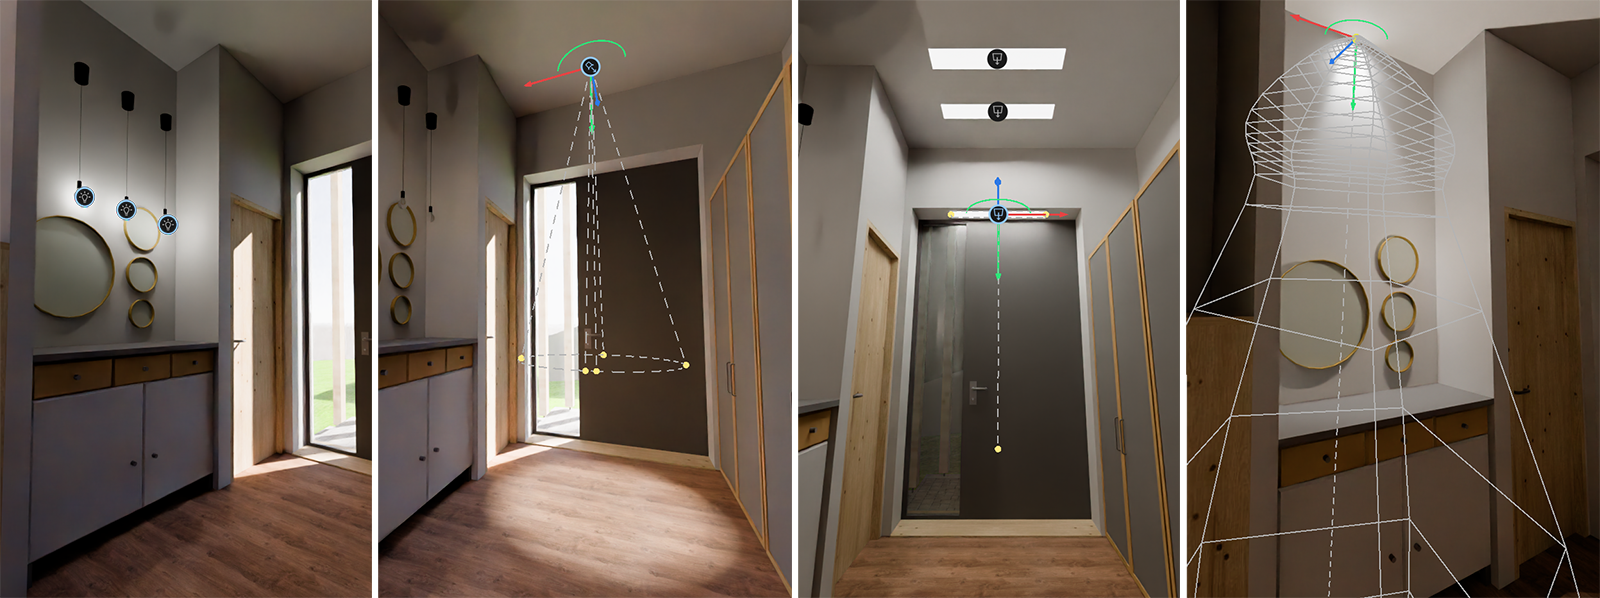
After selecting the desired light source type by clicking on its preview image, click in the viewport at the location where you want to place the light source. The light source will automatically snap to the surface you clicked on and align its Y-axis perpendicular to it. For Spot and 2D Area light sources, the Y-axis of the light source also corresponds to the main direction of light emission. For Photometric light sources, the direction of light emission is indicated by a wireframe overlay after an IES file is loaded (see right side of Figure 1). In general, you can use the Move and Rotate tools to fine-tune the light’s position and orientation.
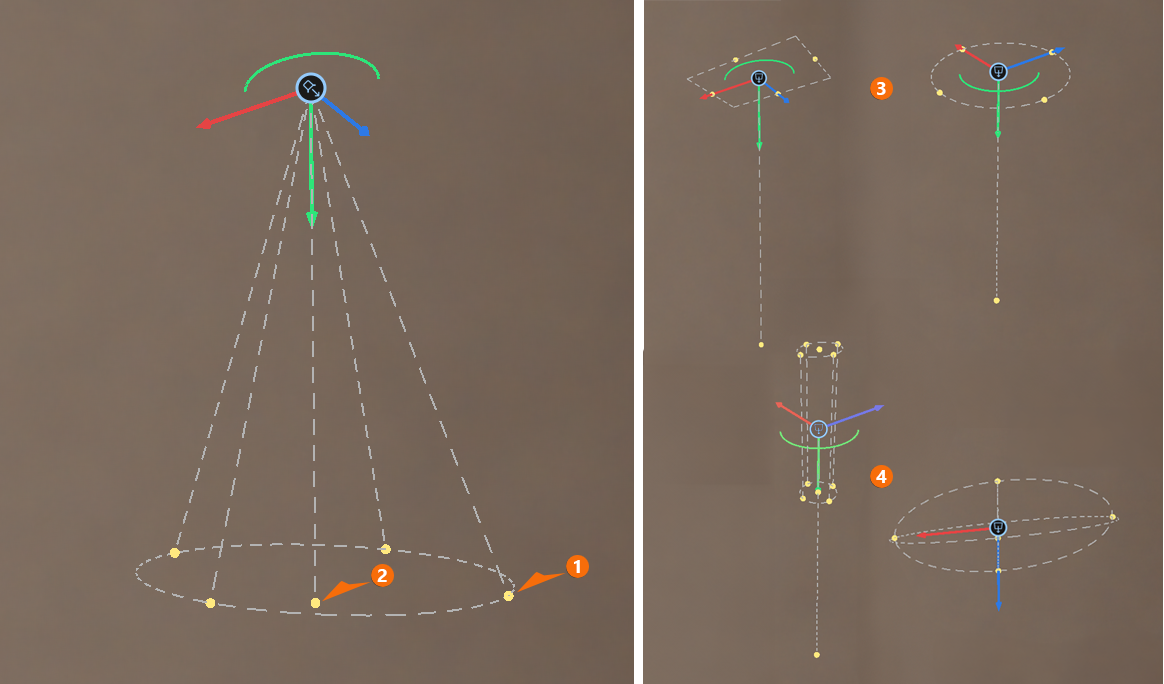
When selected, Spot and Area light sources also display handles in the viewport that allow you to interactively control their orientation and scaling (see Figure 2). You can use either the Move or Rotate tool for this:
1At the bottom of the indicated Spot light cone, there are four handles arranged in a circular path that can be dragged directly with the mouse to adjust the Spot's beam angle.
2Extending along the Y-axis of the Spot is a fifth control handle that can be used to adjust the Spot's direction. This only changes the rotation of the light source, not its light characteristics.
3The handles of an Area light source change depending on the selected Area Shape (see Light Source Settings). For rectangular and circular shapes, you can configure the proportions and area size of the light source shape by dragging these handles.
4Handles are also available for cylindrical and spherical Area lights to adjust the radii of these basic shapes. For cylindrical Area lights, there are also handles at the ends of the cylinder to adjust its height.
Please not that the icons of the lights are only visible in the viewport while the Lights tab of the Scene panel is open.