
Depth Generator
Interface and Usage
Begin with Depth Generator as you would any other Red Giant plug-in:
-
Open or create a composition that contains the video or image layer you wish to analyze.
-
Select your source footage layer in the timeline.
-
From the menu bar, navigate to and select Effect > RG VFX > Depth Generator.
-
Alternatively, drag and drop Depth Generator from the Effects & Presets panel onto your selected asset.
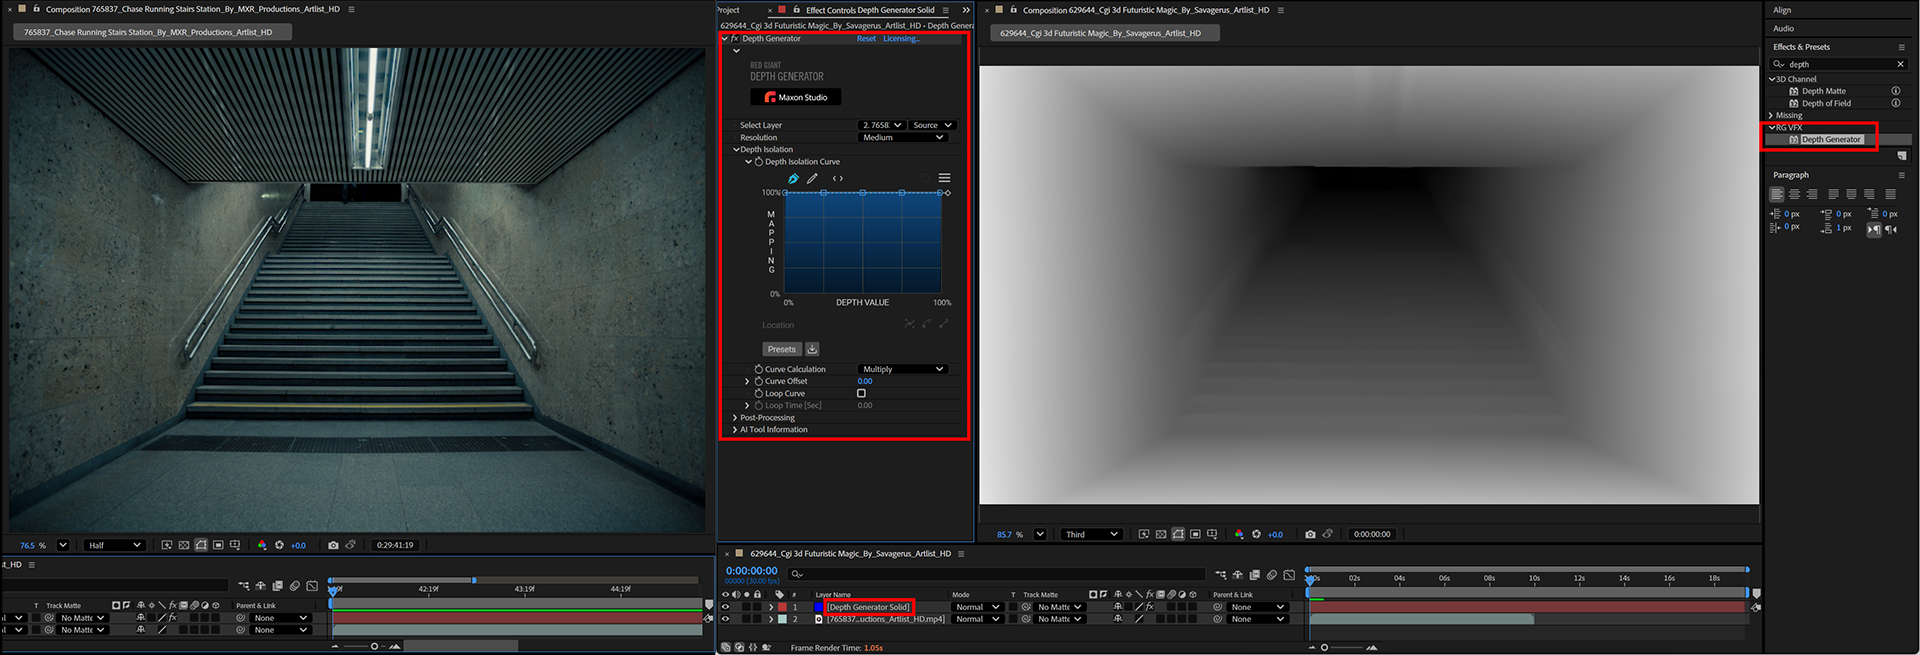
After applying the effect, you will notice a new solid layer named "DepthGenerator Solid" on the top of your composition. The Depth Generator effect resides on this solid layer, and your composition viewer now displays the generated grayscale depth map.
Main Controls
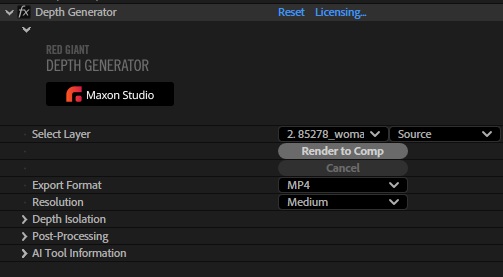
Select Layer: This drop-down menu specifies which layer in your composition the AI model should analyze to create the depth map. This defaults to the footage layer you had selected. If your composition contains multiple footage layers, use this menu to switch the source without needing to re-apply the effect.
Render to Comp: This button bakes the currently live, AI-generated Depth Generator result into rendered media and brings it back into the composition as footage (a depth-pass render). It renders only the current work area, not necessarily the full comp duration. The feature is aimed at users who only need a finished depth pass to drive other effects. With this output render in hand, you can save on Depth Generator's compute overhead (incurred while running "live") and work instead with a fixed rendered result.
Set your work area to the range you want rendered.
Click Render to Comp.
Choose a save location/name.
Let it render; it imports the rendered depth pass back into the comp.
Optionally disable/delete the live Depth Generator solid and use the rendered pass moving forward.
Use Cancel if you start the render and decide to stop it.
Export Format: This option determines the target file format for your Render to Comp output. MP4 delivers smaller, compressed video with lower fidelity. PNG delivers higher quality with less compression, but there is a trade-off. PNG creates one image per frame and will consume more total storage.
Resolution: This setting determines the level of detail and precision used by the AI model during the depth estimation process.
-
Low (250 pixels): Provides the fastest processing and is ideal for quick previews and setting up your scene.
-
Medium (500 pixels): This default setting offers a balance between detail and performance.
-
High (1000 pixels): Delivers the most detailed and accurate depth map. We recommend High for final renders, but it does have the longest processing time.
Depth Isolation Subgroup
The Depth Isolation section provides powerful controls for remapping the grayscale values of your depth pass. The primary purpose is to isolate specific depth ranges, allowing you to create precise mattes for targeted visual effects, color correction, or compositing tasks.
Suggestion: If you're new to the curve controls in Red Giant, consider skipping ahead to the Using Curves page later in this guide.
-
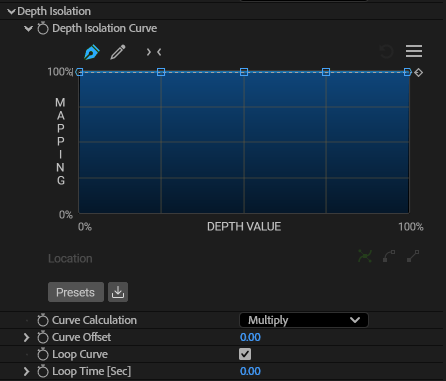
Depth Isolation Curve: This curve graph is the main interface for remapping depth values. The horizontal axis (X-axis) represents the input depth from the original map, with 0% being black/far and 100% being white/near. The vertical axis represents the new output brightness value. By shaping this curve, you can selectively brighten or darken specific ranges of depth.
Note: For a detailed explanation of using the curve UI, including working with points, presets, and the hamburger menu, please see this guide's Using Curves page. -
Curve Calculation: This drop-down menu selects the mathematical operation that applies the curve to the depth map.
- Multiply: The default mode. It multiplies the brightness values of the curve with the existing brightness values at that point on the depth map. This is useful for making more subtle adjustments and enhancing existing depth information.
- Replace: This mode completely replaces the original depth map's brightness values with the values defined by the curve. Replace provides more direct and absolute control, making it ideal for creating high-contrast mattes where you need pure black and pure white values.
To show the difference between Multiply and Replace, examine the following comparison. The original image of a long stairway is shown at left. In the center, we see how Multiply combines the image's "true" depth (see the map of this near the top of this page) with our selected double-peak curve pattern. This results in a "softening" of the curve's output, if you will. In contrast, Multiply ignores the clip's native depth and relies entirely on the curve graph's pattern.
-
Curve Offset: This parameter allows you to shift the entire curve shape horizontally (positive or negative). This helps animate the isolated depth region, allowing you to move your "slice" of focus forward or backward through the scene's depth over time. Curve Offset might come in handy if you know your curve's desired shape but not where exactly to place it on the graph. In the example below, you see our original curve and map (using Replace) on the left. We follow this with Curve Offset values of -0.25 (center) and 0.25 (right), neither of which involve changing the graph.

-
Loop Curve: When you animate the Curve Offset parameter, checking Loop Curve allows the curve shape to perpetually wrap around the graph when there is sufficient offset. This is perfect for creating continuous, cyclical effects. Loop Curve also applies to the Loop Speed parameter.
-
Loop Speed: This parameter becomes active with Loop Curve enabled. Loop Speed controls the automatic looping animation rate. Higher values (measured in seconds) create a faster loop. A 0 value means the curve remains motionless.
To see these two parameters in action, watch the following clip. We created a depth isolation curve in the shape of a narrow bell (establishing a narrow, bright band in the map), set Curve Calculation to Replace, enabled Loop Curve, and set a Loop Time of 5 seconds.
Post-Processing Subgroup
While the AI model provides an excellent starting point, the raw depth estimation can sometimes exhibit temporal artifacts or spatial artifacts (e.g., flickering between frames or banding, respectively). The Post-Processing section contains a powerful set of tools designed to address these artifacts and improve the final depth map.
Deflicker Controls
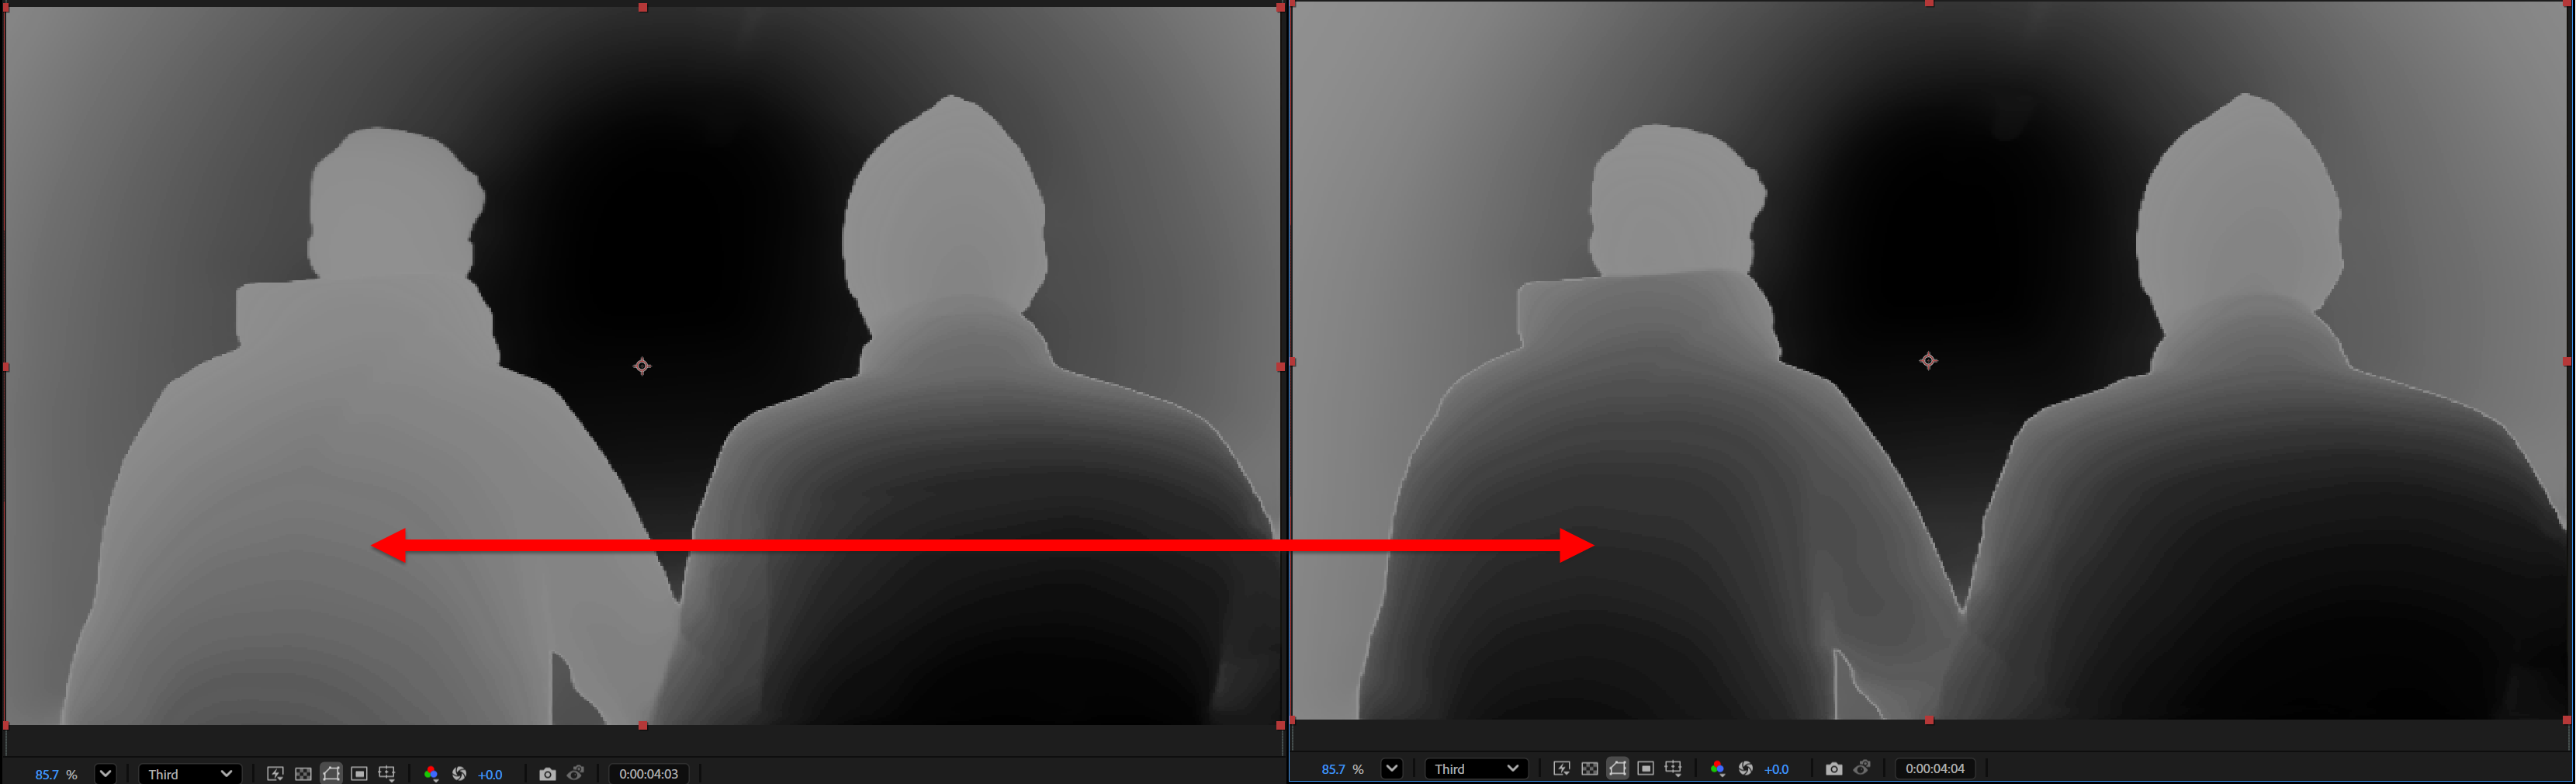
Because Depth Generator's integrated AI analyzes footage on a frame-by-frame basis, minor inconsistencies in the depth estimation can appear as a subtle "flicker" during playback. For example, you might see a gray patch of wall be dark in one frame, then noticeably lighter in the next. The side-by-side image below shows flicker in the left figure's sweatjacket across two consecutive frames. Deflicker tools are designed to smooth out these temporal variations.
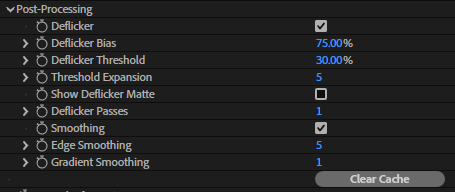
Deflicker (checkbox): Enables or disables the deflickering process.
Deflicker Bias: This controls the blend between the current frame's depth map and that of the previous frame. A value of 1% will bias the calculation almost entirely towards the previous frame, while 99% will bias it almost completely toward the current frame. The default of 75% creates an even blend between the two.
Deflicker Threshold: This sets a sensitivity level for the deflicker. Deflicker Threshold will only blend frames if the depth difference is less than this threshold. This can be useful for preventing unwanted blurring during fast motion while still smoothing out subtle flickers in more static areas.
Threshold Expansion: This control widens or narrows the selected areas affected by Deflicker Threshold. It acts like a dilation, expanding the mask created by the threshold so that more (or fewer) regions are included for deflickering. This helps fine-tune which parts of the image receive flicker reduction, especially useful for controlling ghosting or repeated strokes at edges. Below, you can see our depth map (left) followed by Deflicker Threshold set to 3 (center) and then 20 (right).

Deflicker Passes: This determines how many times the deflickering algorithm runs for each inter-frame interpolation. Each pass further refines the result. Higher values produce a smoother result but will increase processing time.
In the side-by-side comparison below, we show the original Depth Generator effect on the left. On the right, we have Deflicker enabled with all other parameters at their defaults, save for setting Deflicker Passes to 3.
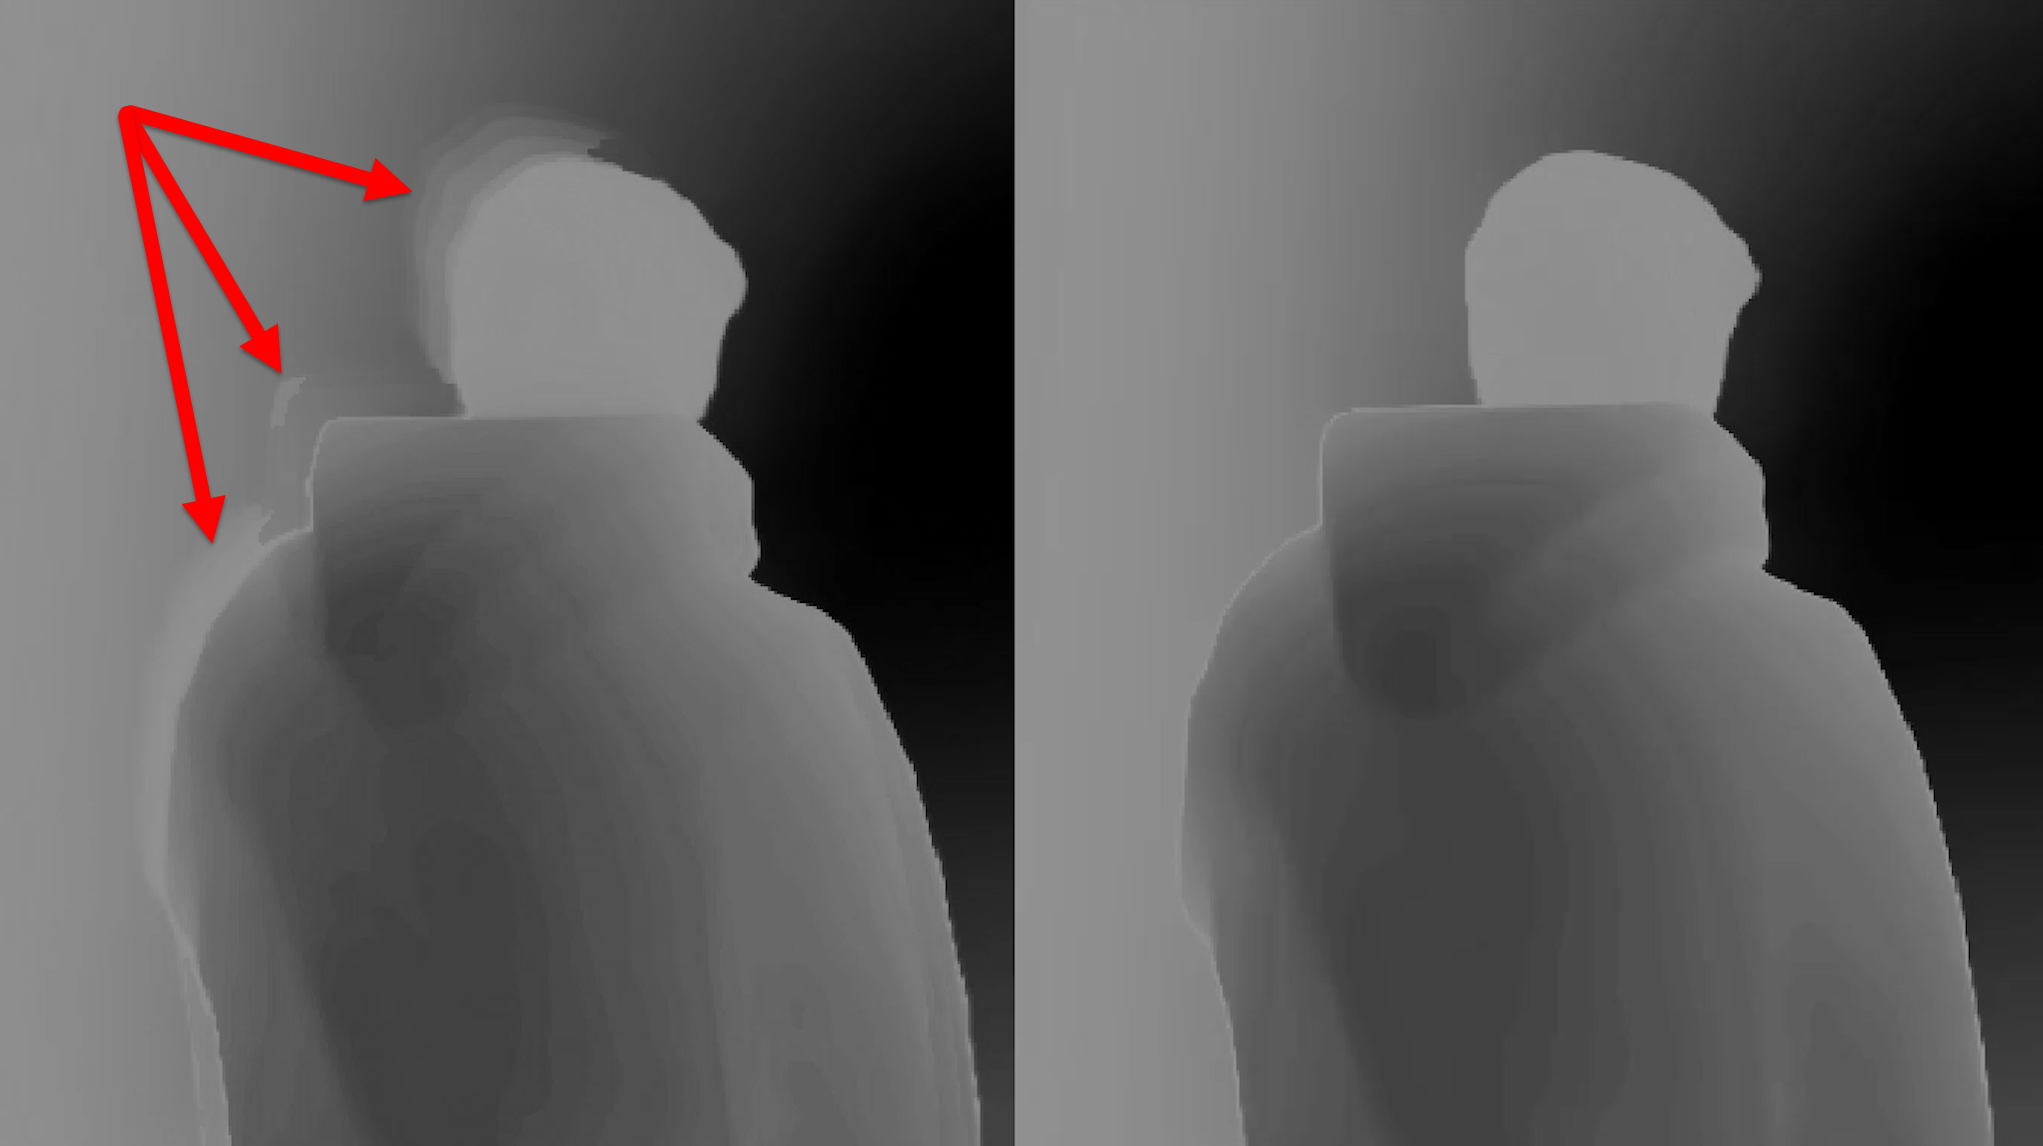
Also be aware that deflickering can produce softness or ghosting artifacts, particularly on high-contrast edges when an object rapidly changes distance from the camera. (We show this in the comparison below, with Deflicker enabled on the left image.) The benefits of deflickering may entail trade-offs, so experiment accordingly.
Smoothing Controls
Smoothing addresses spatial artifacts within the depth map, such as aliasing on edges and banding in gradients (both shown below). This is especially useful after implementing a depth isolation curve, which can exaggerate these issues.
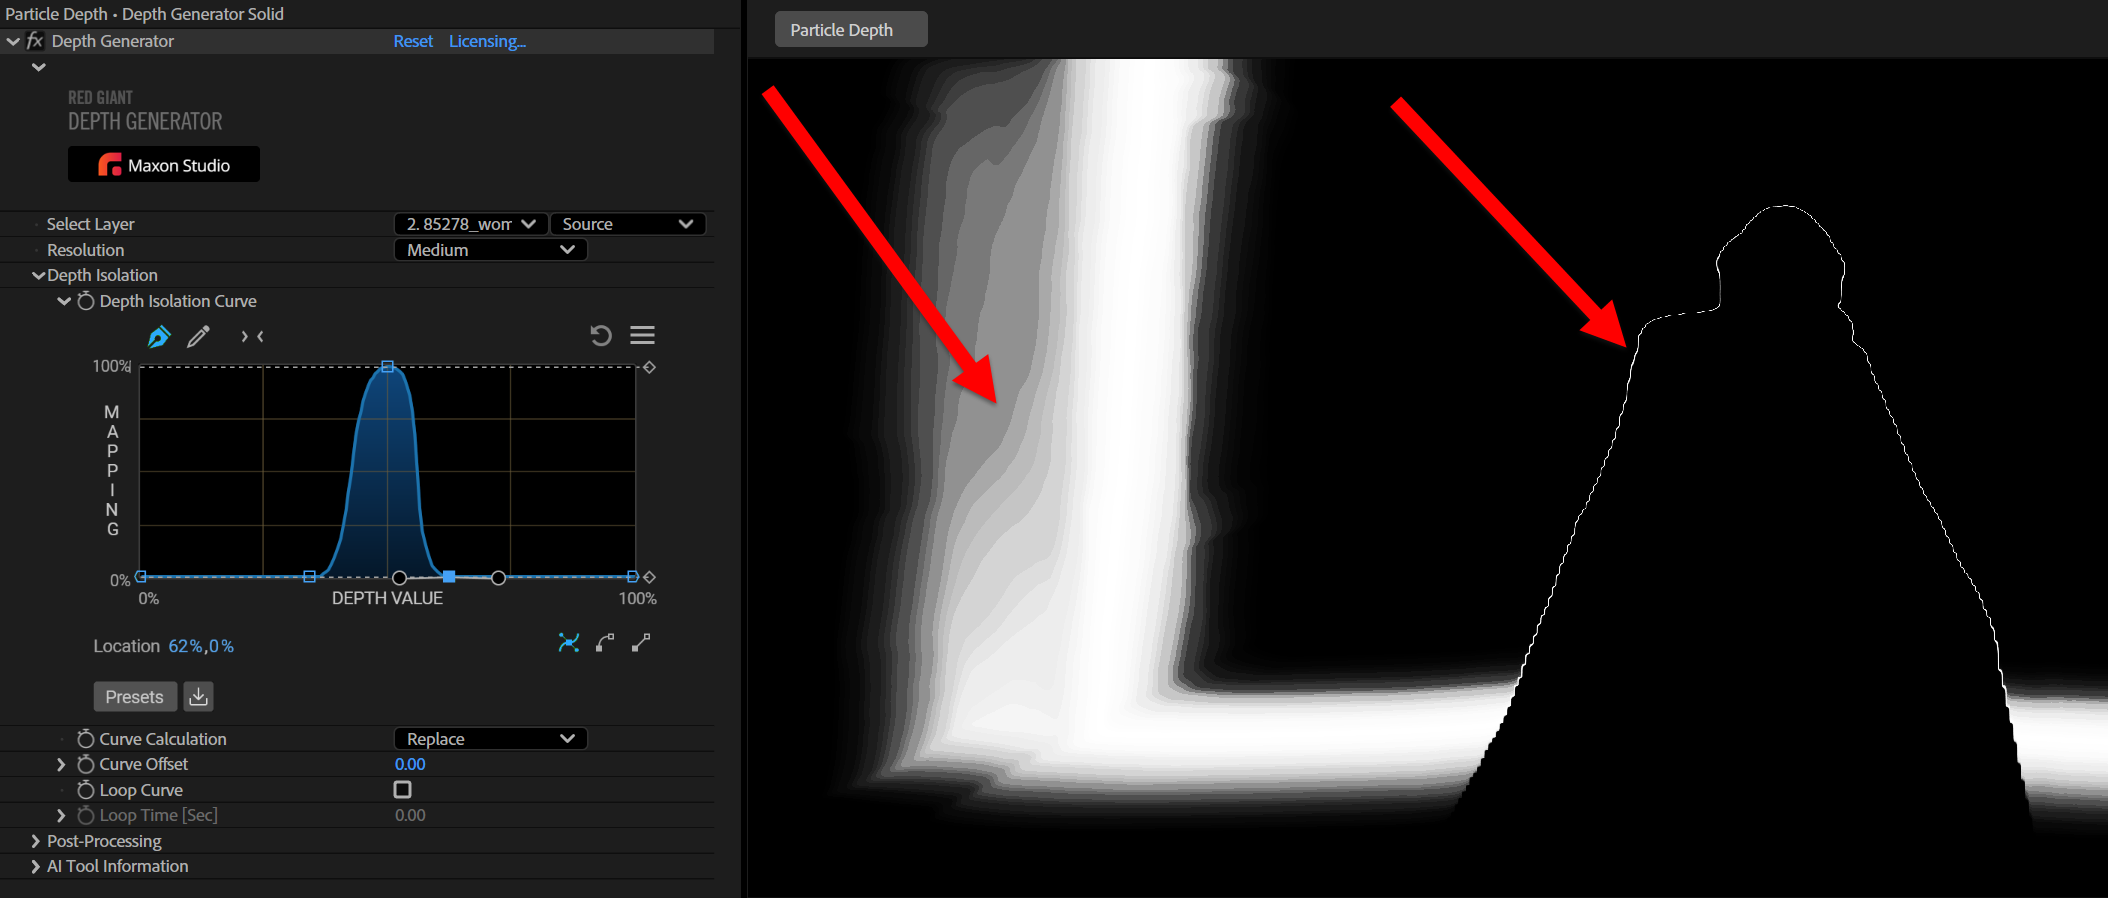
Note that our foreground figure is outlined in white because the values of her edge pixels match those of the isolated region beyond them.
Smoothing (checkbox): This acts as a master on/off switch, enabling or disabling both the Edge Smoothing and Gradient Smoothing parameters below. Simply checking this box with no other parameter changes (including leaving Edge Smoothing at its default value of 5) is sufficient to remove our figure's unwanted outline.
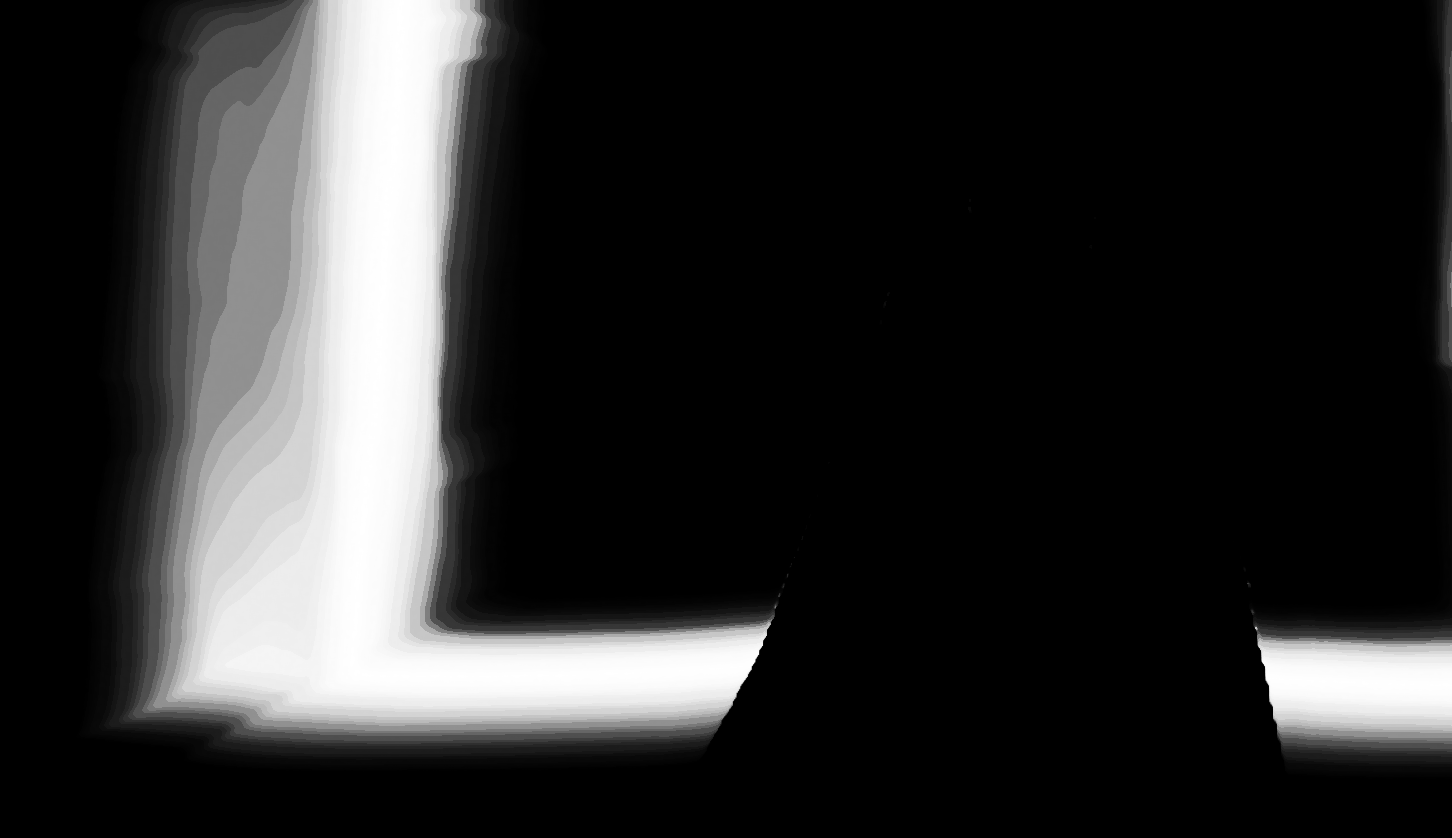
Edge Smoothing: This parameter reduces aliasing, or the "jagged" appearance of edges on objects within the depth map. It's also useful for eliminating the pesky border that can persist around foreground objects for certain depth isolations. Under the hood, Edge Smoothing uses a median blur, which smoothes while preserving general edge sharpness. Higher values result in a softer, more anti-aliased edge.
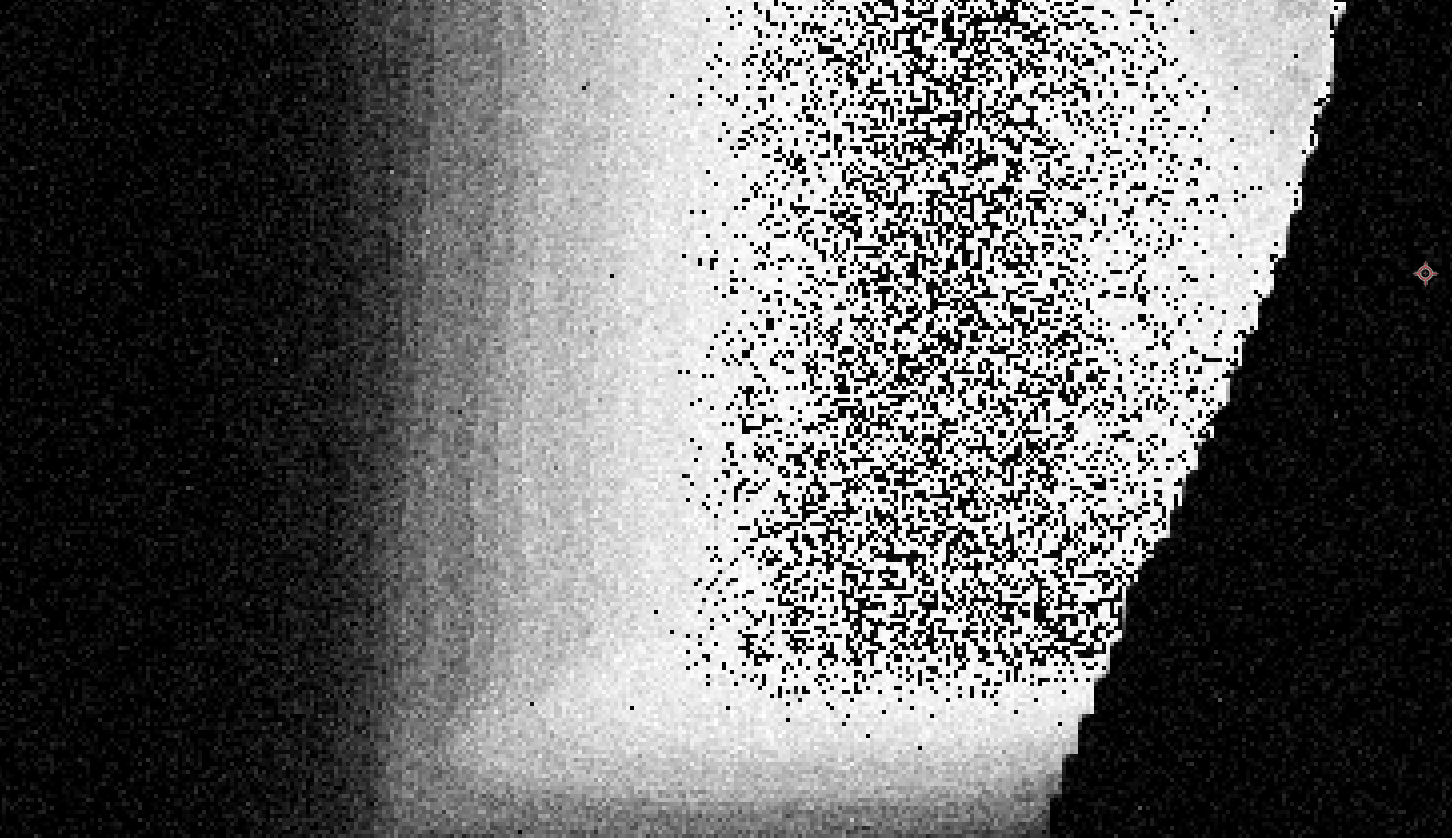
Gradient Smoothing: This control is specifically designed to combat banding, the visible stepping of shades in what should be a smooth gradient. It works by introducing a fine layer of noise into the depth map before Edge Smoothing applies. This dithering process breaks up the distinct bands, resulting in a much smoother tonal transition.
If we set Edge Smoothing at 1, max out Gradient Smoothing to 200, and zoom in 400 percent, it becomes obvious how this noise/dithering behaves (below).
For a more practical illustration, see the following comparison. Still at 400% zoom, the left image shows our depth map with Smoothing disabled. The right image enables this and applies values of Edge Smoothing: 20 and Gradient Smoothing: 60.

AI Tool Information: This note offers transparency on how the AI model within Depth Generator operates locally on your machine. All processing happens on your system. The tool does not learn from your content, nor does it send any of your project data over the Internet. A provided link leads to a full description for users who want to learn more.
Workflow Tip: Order of Operations
For the best results and most efficient workflow, we recommend applying Post-Processing as a final step.
First, achieve the general depth map you want using the Main Controls and Depth Isolation curve.
Assess your animated playback for any temporal flickering and adjust Deflicker settings to smooth it out.
Finally, examine individual frames for aliasing or banding and use the Smoothing controls to refine the spatial quality of the depth map.