
Trapcode 3D Stroke
Overview
Trapcode 3D Stroke can reference preexisting paths within your project, or you can use preset shapes and paths within the plug-in, arrange them, and rotate or move through them within 3D space.
3D Stroke uses the path from one or more masks or a set of built-in SVG shape presets to render strokes that can be rotated and moved freely in 3D space. Below are the Trapcode 3D Stroke effect controls as they appear when the plug-in is applied in After Effects or Premiere.
- Shape (Premiere only) allows you to load an SVG file for 3D Stroke to reference.
- Path (AE only) allows you to select a mask within the current layer to reference as the shape used for your 3D Stroke. This parameter cannot be selected if Use All Paths is enabled.
- Presets contains an assortment of ready-to-run presets. You can preview these in the preset gallery.
- Use All Paths (AE only) toggles 3D Stroke, allowing it to reference all available paths in the current layer to which the plug-in is applied.
- Scale X and Scale Y (Premiere only) adjusts how much of the canvas you'd like your imported SVG file to occupy.
- Stroke Sequentially only works if Use All Paths (see above) is checked. If checked, it means that the Start and End sliders (see below) will affect the paths sequentially. This is handy for a "text reveal" effect.
-
Set Color
contains a drop-down with six options for setting 3D Stroke's color:
- Solid Color: Gives the stroke a solid color.
- Over Path: Maps the color gradient from the Color Ramp (below) over the entire path whether or not the entire stroke is visible.
- Follows Offset: Maps the entire color gradient's range from the Color Ramp (below) only over the stroke's visible area as it appears on the path.
- Over X, Y, or Z: Maps the color gradient from the Color Ramp (below) over the entire x, y, or z axis of the layer to which 3D Stroke has been applied.
- Color affects the color of the stroke using a color swatch as a reference.
-
Color Ramp
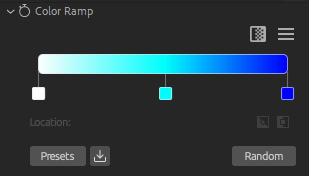
twirls down basic color gradient controls and presets that affect the Over Path, Follows Offest, and Over X, Over Y, and Over Z options of the Set Color parameter above. For more information about the Color Ramp gradient and its use, see the Color Gradient section of the Trapcode Particular Particle Group page.
- Thickness adjusts the width of the stroke. Note that because your stroke can appear in 3D space, thickness may appear to adjust depending on distance from the camera.
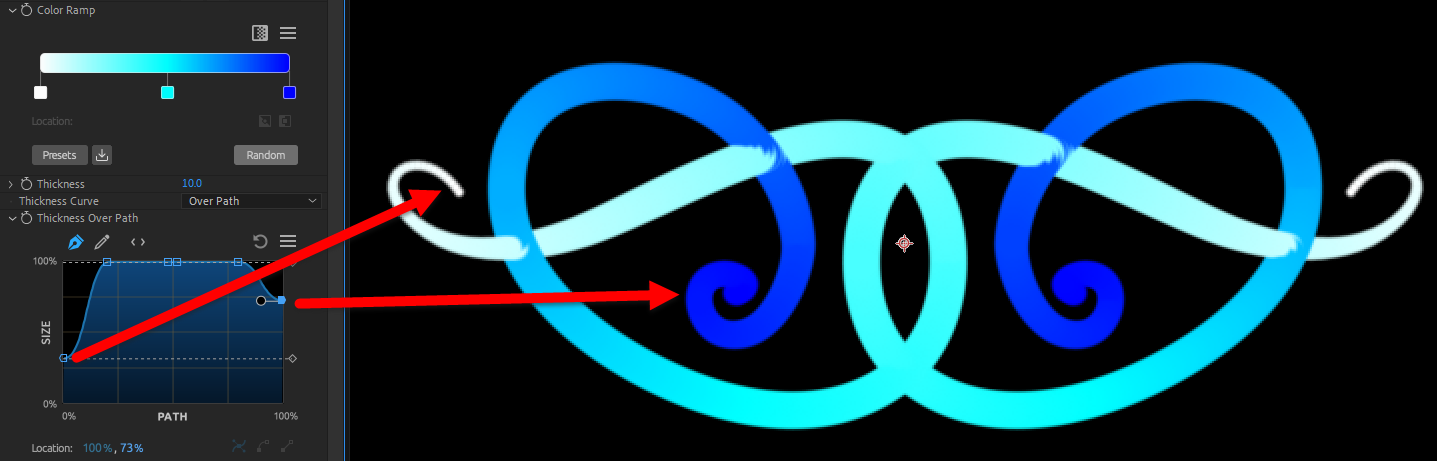
- Thickness Over Path establishes the stroke thickness over course of its length. In the following image, you can see how the strokes begin thin at the start of their curl, spend most of their length at maximum thickness, then taper back to about 75% before their end. For a deep dive into using the curve tool, see the Trapcode Particular's Using Curves page. For our purposes here, just keep in mind that in 3D Stroke, the curve affects the size of the stroke over the path; curve implementations in Particular and elsewhere will affect other attributes.
- Feather adjusts the softness between the stroke and its edges.
- Start and End both adjust where the stroke's appearance starts and ends, in terms of percentage, along the path(s) to which it has been mapped.
- Offset will offset (as a percentage) the starting point from the Start point created above. This value can exceed 100% to accommodate multiple paths or strokes within your project.
- Loop toggles whether or not the stroke will loop back around the paths to which it has been mapped when it reaches past the end point. Negative values for the Offset parameter (above) can reveal or hide the stroke when Loop is on.
-
Taper
- Enable toggles whether tapering is on or off.
- Compress to fit toggles whether your tapering adjustments will restrict themselves within the Start and End parameters set above.
- Start and End Thickness determines the thickness at the Start or End of the stroke. A value of 0 means the stroke tapers to a point while a value of 1 would result in a rounded edge that approximates the stroke's width.
- Taper Start and End controls where on the stroke tapering begins on the Start or End points. A value of 0 will result in tapering beginning at the Start or End, where 100 begins more toward the midpoint.
- Start and End Shape controls the shape of the tapering on the Start or End sides.
- Step Adjust Method contains a drop-down of two choices which affect the steps of your stroke (meaning the individual points upon which the 3D stroke is generated). The Dynamic option means step size adjusts to lesser or greater values along your tapered stroke. This gives a precise falloff to zero without revealing any individual stamps. The None option means step size is fixed, which can result in the appearance of individual steps/points.
-
Transform
- Bend will curve your path around the Bend Axis set below. At 1.0, the path forms a half circle, and 2.0 results in a full circle. Settings up to 100 can create numerous looping strokes.
- Bend Axis adjusts the center for rotation that dictates how the Bend parameter affects your 3D stroke. When set to 0, it has no effect. At low Bend settings, this can offset the stroke considerably.
- XY position controls the center point location for your stroke. By default, this is centered with the layer to which it is applied.
- Z Position controls the absolute distance of the stroke from the camera. Negative values result in being closer to your camera; positive values increase the distance.
- X, Y, Z Rotation sets the rotation of the strokes about their x, y, and z axes, respectively.
- Order controls the 3D Stroke's order of operations. The default (Rotate, Translate) is useful when synchronizing with a 3D layer. Translate, Rotate is useful when offsetting the stroke's rotation center.
-
Repeater
- Enable toggles the repeater on or off, which allows access to the below controls.
- Symmetric Doubler makes two symmetrical repetitions of the stroke(s) on opposing axes . For example, a value of 2 in the Instances parameter results in four repeated strokes.
- Instances sets the number of repeated strokes generated.
- Opacity adjusts the transparency that remains for each repetition.
-
Scale
contains a drop-down with two options:
- XYZ Linked: Keeps your scaling options for repeaters linked between the x, y, and z axes. Any scaling change affects all axes simultaneously.
- XYZ Individual: Decouples the x, y, and z axis scaling controls, allowing you to adjust them separately.
- Scale XYZ or Scale X/Y/Z: These controls toggle based on the option selected in the Scale menu above and scale the stroke along its designated axis or axes.
- Factor adjusts the Displace and Rotate values set below. Use this to create exponential growth or decay for each repetition. A value larger than 1 will create growth while less than 1 creates decay.
- X/Y/Z Displace controls the displacement in pixels on the x, y, and z axes for each instance.
- X/Y/Z Rotate controls the rotation in degrees on the x, y, and z axes for each instance.
-
Advanced
- Adjust Step: Since the stroke is made up of filled circles executed in steps, this will adjust the step length between circles. Steps are calculated using the stroke Thickness and Feather settings. This value represents the percent of the calculated step length actually used. This setting normally stays at 100, but in special situations it can be adjusted to produce a different result to your liking. For instance, if you find you can see your stroke's circles, try decreasing this value to reduce that effect.
- Exact Step Match toggles whether 3D Stroke calculates the length of the stroke and then tries to find a step size that allows the last circle drawn to exactly match the path's endpoint. This can remove the endpoint flickering that sometimes appears with animated paths.
- Internal Opacity controls the opacity of the circle stamp used to draw the stroke. Lowering this can give a volumetric or unfocused appearance. It can also increase feathering if set between the values of 85 to 100.
- Low Alpha Sat Boost will boost saturation in areas of low alpha. For this to have any effect, the Color parameter should have a desaturated color, and either Feather must be close to 100 or Internal Opacity must be low.
- Low Alpha Hue Rotation controls the change in hue within areas of low alpha. For this to have any effect, the Feather must be close to 100 or Internal Opacity must be low.
- Hi Alpha Bright Boost will boost brightness in areas of high alpha. This appears best when the Feather is close to 100 or Internal Opacity is low.
- Animated Path is a toggle that, when checked, animates paths normally. If unchecked, paths will only animate along with the Path Time parameter below.
- Path Time sets the time for the path. This is useful if you have a path that takes up a number of shapes and you would like to switch/morph between them freely.
-
Camera
- Comp Camera (AE only) will enable whether you utilize the built-in composition camera or 3D Stroke's camera.
-
View
contains a drop-down list of angles from which to view 3D Stroke. This setting overwrites whichever camera controls you've currently set, and it can be used to (temporarily) see the relationships between strokes in 3D space.
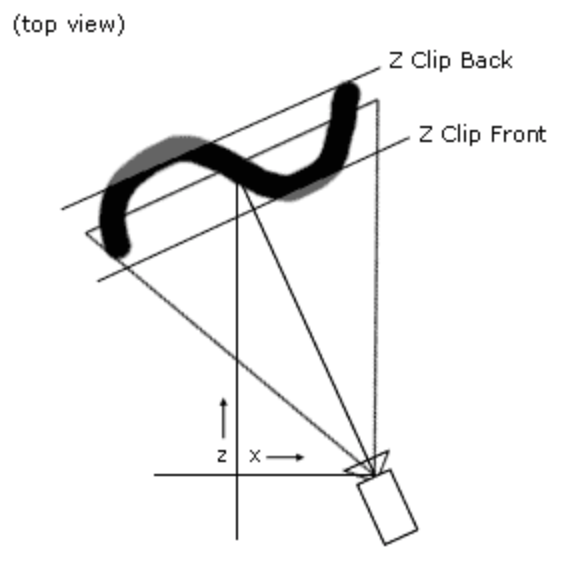
- Z Clip Front controls where the plane clips close to the camera.
-
Z Clip Back
sets the clipping distance far from the camera.
Note: Clipping can be inspected in the ortho views available in the View parameter (above). It is typically used to make or give the appearance of intertwinings and intersections. Clipping only occurs in View space, which means you'll want to take care when moving the camera. - Start Fade, when set to a value lower than the Z Clip Back parameter (above), affects the position at which the stroke fades out in opacity.
- Auto Orient toggles whether 3D Stroke's camera always points to the center regardless of its position. Note that this cannot be interacted with if Comp Camera is enabled and that this setting is still affected by the Rotation settings (below), allowing you to do things like always orient the camera 30 degrees left of center. Typically, Rotation parameters are left at 0 when using Auto Orient.
- XY Position and Z Position both determine 3D Stroke's built-in camera position along its x, y, and z axes, respectively.
- Zoom sets 3D Stroke's built-in camera's zoom and therefore its field of view.
- X, Y, and Z Rotation affects the camera's rotation around its x, y, and z axes.
-
Motion Blur
- Motion Blur contains a drop-down selection for whether you want motion blur Off, On, or Comp Setting (AE only): If On is selected, you can use the controls below to adjust the shutter.
- Shutter Angle controls how long the virtual shutter stays open to capture one frame; 360 would mean it's open the entire duration of the frame, while 180 means it's open for half the duration. The maximum value is 720, allowing you to go up to twice the frame time, resulting in exaggerated motion trails.
- Shutter Phase controls when the shutter opens. A value of 0 represents the frame's start. If this is set to negatives while using the Comp Camera toggle above, then your camera layer needs to start one frame before the layer that 3D Stroke is applied to.
- Levels sets the number of samples generated per frame for the motion blur. Higher values create a smoother blur but can result in longer render times. If the stroke movement is very fast, this value should be high so you get smooth images. If movement is slow, this should be set low (or set Motion Blur to Off ) to reduce render times. Keyframing this can help optimize performance.
- Opacity sets how transparent the stroke appears.
- Transfer Mode contains a drop-down with standard options for how the 3D Stroke blends over whatever it's been stacked upon or is currently in front of within 3D space.