
King Pin Tracker
Modify the Effect
-
View Options
- Show determines which pins are displayed in the overlay controls, From Pins , To Pins , or both the From & To Pins.
-
Render
sets the output of the plug-in:
- Original leaves the original image unmodified. This mode is useful in conjunction with Show: From Pins when setting up the From Pins.
- From Pins Warp renders the unwarping effect of the From Pins only. It maps the From Pins to the layer bounds.
- To Pins Warp renders the entire source frame through the To Pins area, as if the From Pins were at their default settings.
-
From & To Pins Warp
warps the From Pins to the To Pins. This is typically the production rendering mode, and it’s the only option that supports motion blur.
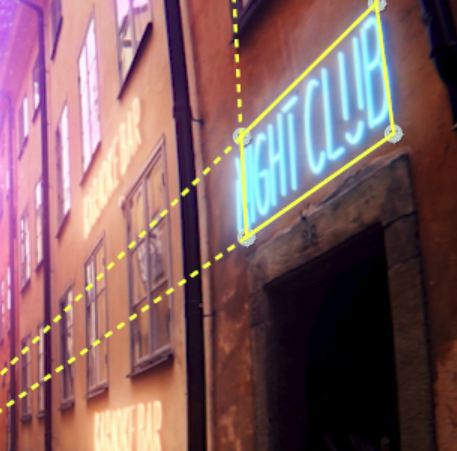 Enable Overlay
toggles the pin reticles and area controls on and off over the frame. Use the perspective lines extending from the pin areas to help match one area to the other
.
Enable Overlay
toggles the pin reticles and area controls on and off over the frame. Use the perspective lines extending from the pin areas to help match one area to the other
.
-
To Pins
contains parameters that affect the
To
Pins.
- Reset To Pins reverts To Pin positions to their default locations on the outer corners of the layer.
- Upper Left , Upper Right , Lower Left , and Lower Right define the coordinates for the To area's quadrilateral corners.
- Offsets contains adjustable parameters that offset the image from the X or Y axis coordinates of each of the corners defined above.
- Wireframe Color defines the color of the To Pin’s non-rendering overlay.
-
Tracking
- Layer to Track defines which layer is used for tracking.
- Varying Illumination toggles whether the tracker accounts for brightness changes, which may increase tracking times but will help increase accuracy when brightness varies between frames.
-
Tracker Controls
These standard tracker controls record tracker data between frames. Buttons include First Frame ( ), Previous Frame (
 ), Next Frame (
 ) and Last Frame (
 ). Use these to monitor and adjust the tracker position.
-
From Pins
contains parameters that affect the
From Pins
non-rendering overlay.
- Reset From Pins reverts From Pins to their default locations at the outer corners of the source.
- Copy from To Pins matches the coordinates of the To Pins directly with the From Pins.
-
Upper Left
,
Upper Right
,
Lower Left
, and
Lower Right
define the coordinates for the
From
area's quadrilateral corners.
- Tip: You can move all To Pins at once by hovering over their bounding box.
- Offsets contains adjustable parameters that offset the image from the x or x axis coordinates of each corner defined above.
- Wireframe Color defines the color of the From Pins.
-
Transform Pins
contains parameters that allow you to transform the pinned layer in perspective space.
- Translate X and Translate Y offset the output on the perspective x and y axes.
- Scale controls the size of the layer.
- Uniform Scale toggles whether Scale affects both width and height in unison, or provides options to Scale Width and Scale Height separately.
-
Rotate
- Angle sets the output's angle of rotation.
- Set Aspect Ratio determines how the aspect ratio used in the Scale and Rotate transforms is determined. Select Match From Pins if you want King Pin Tracker to estimate the aspect ratio from the From Pins (best when the From Pins region is close to perfectly rectangular), or Manually to enable the Aspect Ratio parameter below. Then set the aspect ratio manually.
-
Rendering & Motion Blur
- Crop to Pins toggles whether the output is cropped to the pin coordinates.
- Smooth/Sharp controls the sampling method used to render the corner pin effect. The default value is a good compromise between smoothness and sharpness. If you have fine detail in your layer that might exhibit a moiré effect, you may wish to reduce this setting to bias the sampling toward smoothness. If you desire more detail in the rendered image, you can increase this value to bias the sampling toward sharpness..
- Motion Blur has options to turn the motion blur On (using King Pin Tracker’s own Motion Blur), Off , or the current Comp Settings .
- Shutter Angle adjusts the amount of motion blur, using the same angle controls as After Effects.
- Shutter Phase controls the start time of the motion blur sample. At zero, the motion blur starts at the frame time and streaks forward in time. Typically, a value of half of the Shutter Angle is desirable.
- Samples adjusts the number of motion blur steps. Higher settings may increase render time, but will result in smoother motion blur.