
Magic Bullet Colorista V
The Keyer
The Keyer is a powerful, easy-to-use tool that allows you to isolate and adjust individual colors or ranges of colors. A custom interface window gives you a variety of tools to sample colors intuitively. Create your key and then soften, choke, or invert it. The Keyer operates in HSL (hue, saturation, and lightness) space.
The Keyer can be used a variety of ways, from fine-tuning flesh tones to boosting the look of trees to adding subtle, midtones-based saturation for increased vibrancy. By default, the Keyer looks at skin tones, which means it’s perfect as a skin retouching tool.
Note:Once a key is created, all color correction affects the keyed area only.
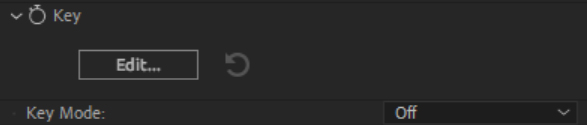
Edit Button
Click the Edit button to open the Keyer in its own window. You will not be able to access other Colorista controls while the Keyer window is open.
Mode Drop-Down Menu
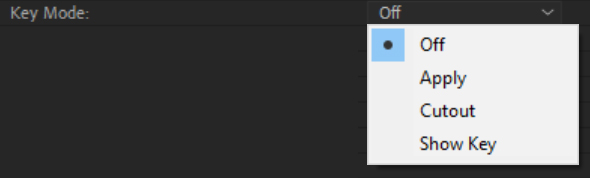
There are three mode choices:
- Off: Turns off the Keyer. This option is selected by default so that the default key, which selects skin tones, does not affect color adjustments. Toggling a key on and off can be a useful way to quickly make sure your key is producing the desired effect.
- Apply: Turns on the Keyer. This option is automatically selected when exiting the Keyer's modal window. This option must be chosen to have the key affect the image.
- Cutout: Uses the Keyer to create layer transparency in areas affected by the key.
- Show Key: Shows the alpha matte overlay for the key in the main preview window in your NLE.
Keyer Window
This area has four panel sections: Result View, Source View, Matte View, and Tools.
The Keyer defaults to selecting a standard range of correct skin tones in your image. You don't select anything in the main Colorista interface; the Keyer will automatically decide for itself what to choose. If your skin tones are incorrect, then the key will initially be off.
The Tools panel contains the Color Cube, Vectorscope, and Hue/Lightness Parade, all of which are interlinked. These controls give ample flexibility in how you can define your color range, because each tool allows you to select color in a different way. Combine these options with the Select, Add, and Minus tools and you’ll have very powerful choices. There are 99 levels of undo in the Keyer.
Here is how you can approach the Keyer tools:
- Use the Select tool to drag along a range of colors — for instance, the purple in our model's sweater.
- Use the Add tool to add to the range of colors. Use the Subtract tool to remove from the range of colors.
- Notice how the Color Cube has changed to show the hue, saturation, and lightness ranges of the selected colors.
- Use the Color Cube, Vectorscope, and/or Color Parade to further define the target color and its softness value.
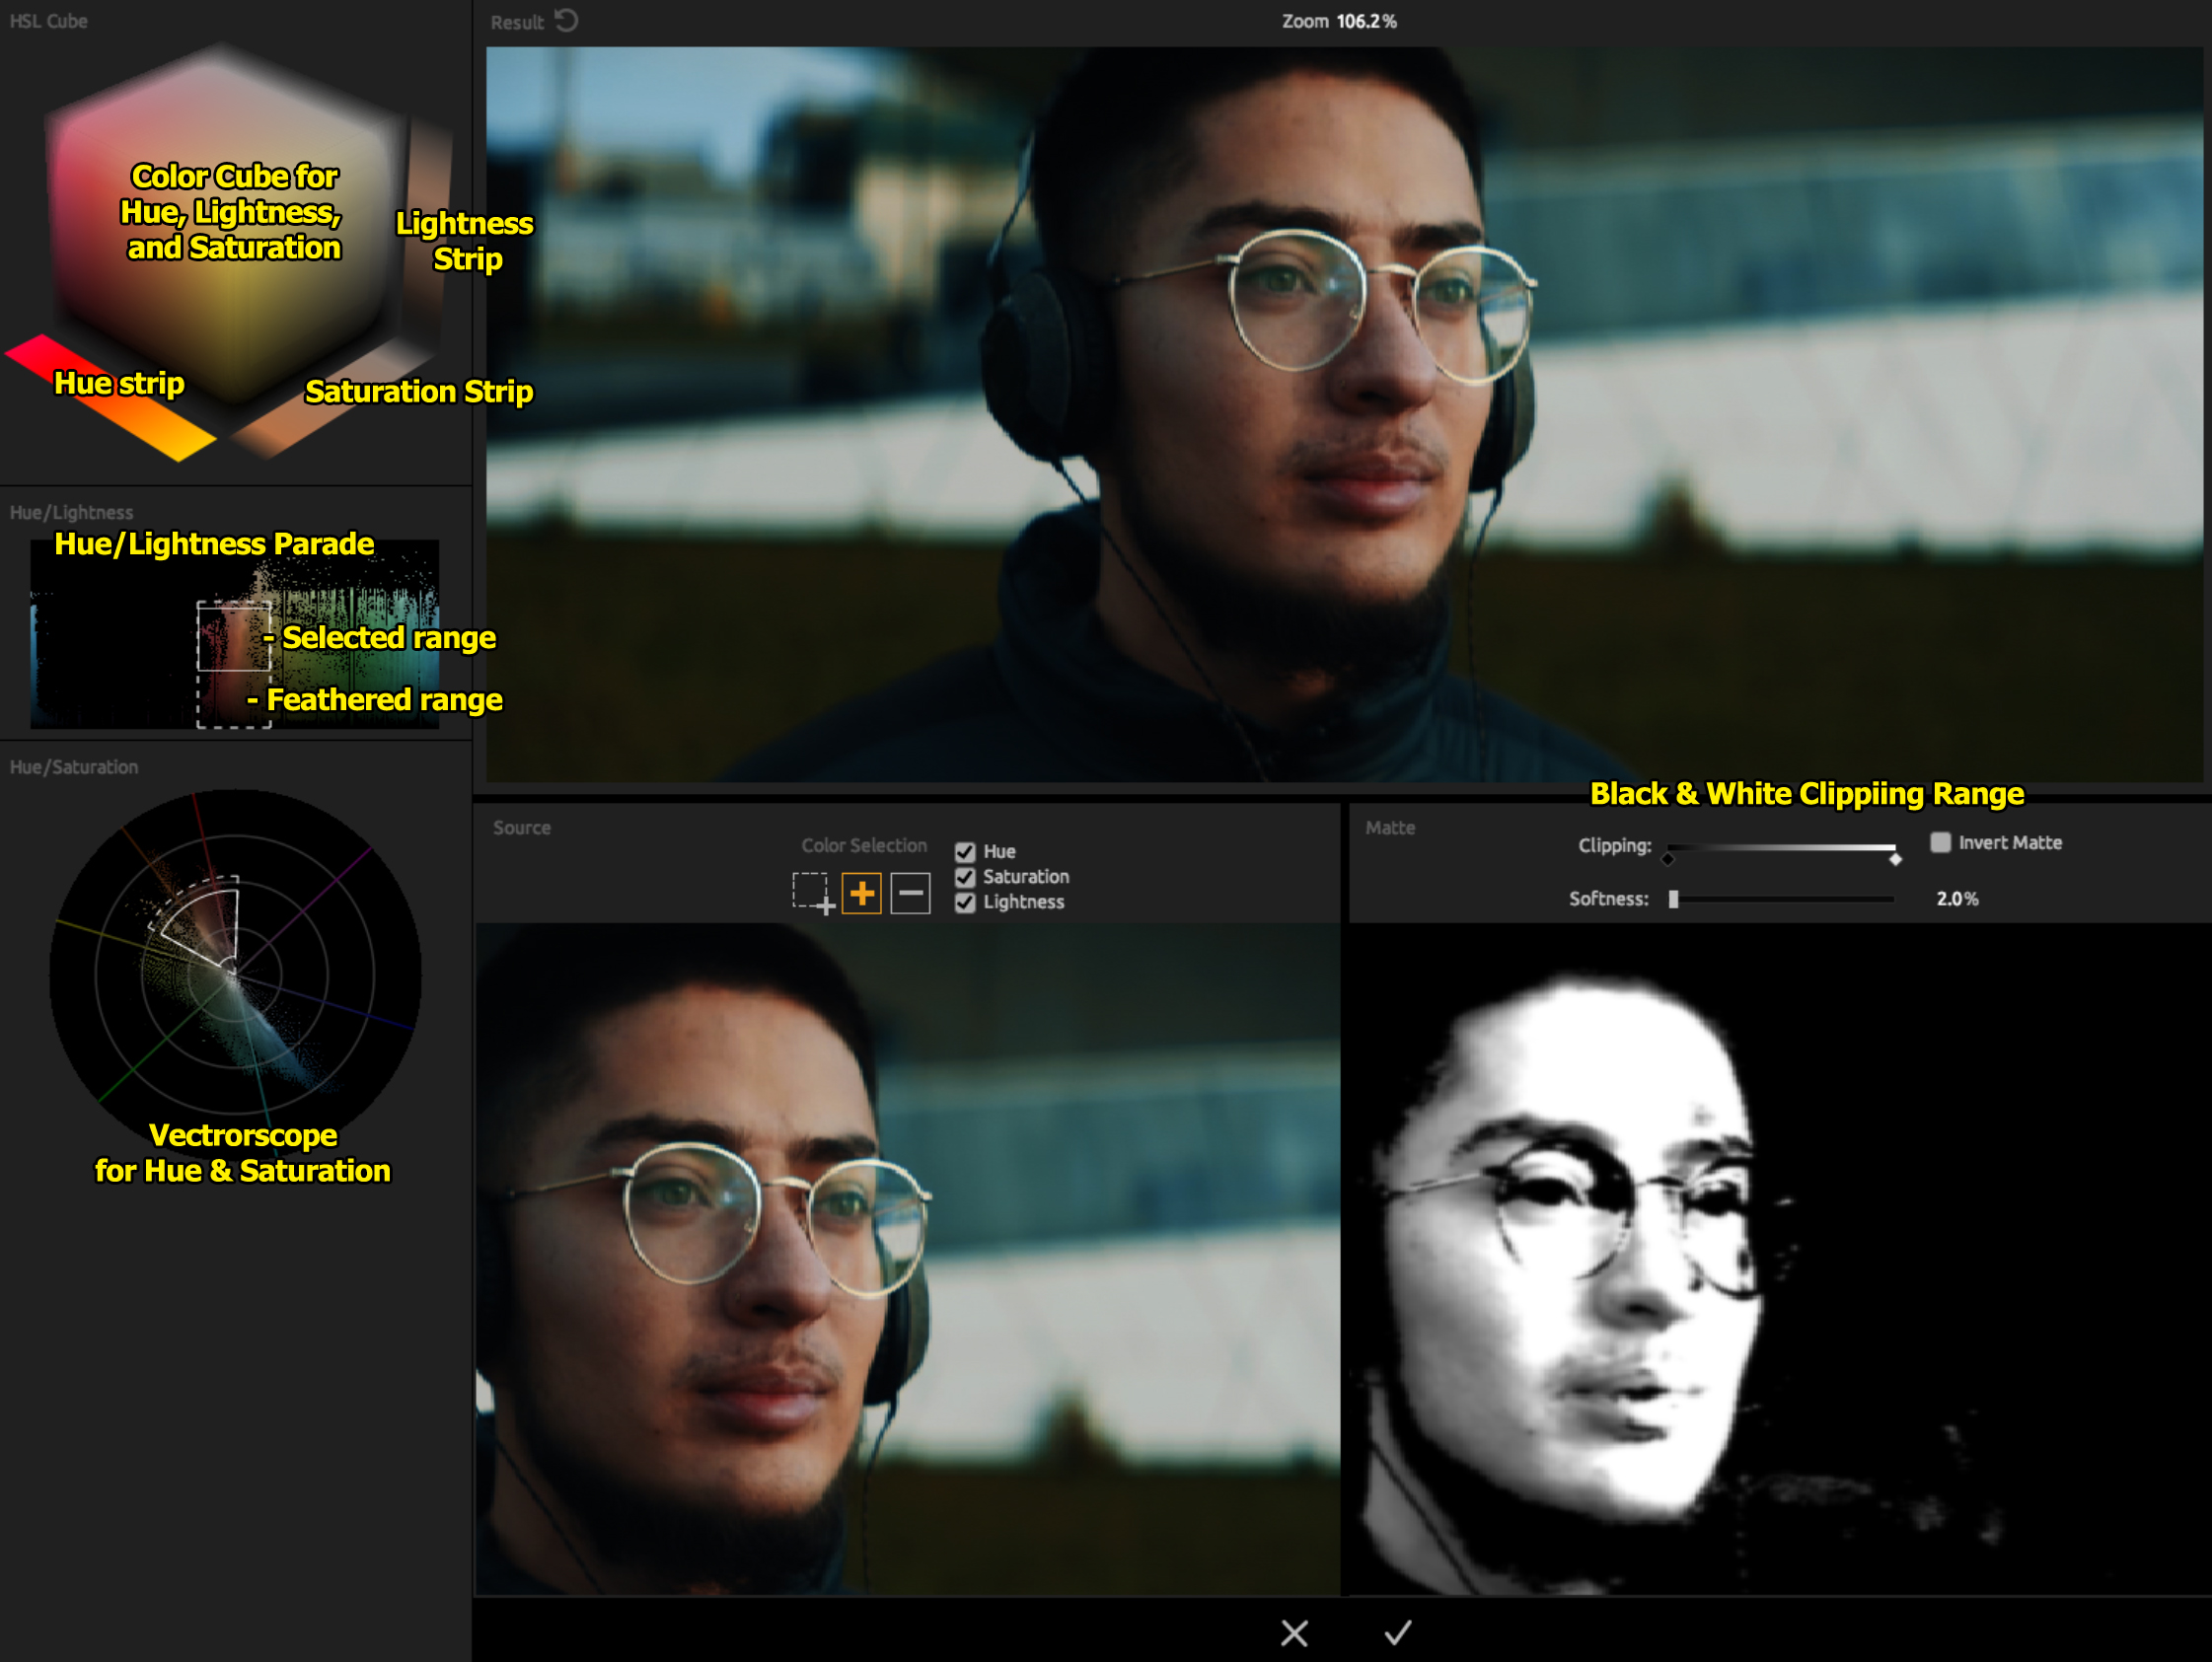
The View Panels
There are three View panels: Result, Source, and Matte.
- Result View: Shows any color correction applied to the key over the source image.
- Source View: Shows your original image. The Keyer always looks at the source image and ignores any color correction imposed by Colorista.
- Matte View: Shows the grayscale image that is the resulting key.
The panels are locked together for their preview, zoom, and pan.
- To preview, sample in any panel with the Select, Add, and Subtract tools. The key will update its preview in all panels.
- Zoom in and out of the panels with a roller mouse or a two-finger touch on a laptop touchpad. The zoom goes directly to your cursor point.
- To pan, hold down the Spacebar and click-drag to pan the image. Move the cursor without holding the mouse button down to exit pan mode.
Select, Add, and Subtract Tools
These three tools let you select, add to, or subtract from the base-color range. Perform these functions by clicking and scrubbing any of the View panels. We call this the “scratch 'n sniff” sampling method. These tools work in all three dimensions at once. Each mouse click will increase or decrease the range and feather slightly to expand or contract the target range of colors in the key.
- Select tool: Drag a rectangular region that selects a range of colors, such as the purple in our model's sweater.
- Add tool: Add to the target color range.
- Subtract tool: Remove from the target color range.
Hue, Saturation, and Lightness (HSL) checkboxes
The HSL checkboxes let you restrict color selection to one, two, or three dimensions.
By default, the checkboxes select for hue, saturation, and lightness. You can uncheck lightness, for instance, and only select for hue and saturation. When you deselect an HSL dimension, the Tools and View panels will shift their display, sometimes quite radically. Turning on/off the HSL checkboxes can be a powerful way of getting very specific about controlling the color and softness in your key.
Color Cube
The Color Cube is an indicator of the color and softness values selected in the Keyer. The Color Cube is two-dimensional because it adjusts both the target color range and the softness.
There are three faces to the Color Cube:
- Hue face: This adjustment centers on the Cube’s left face. If you drag up, you are increasing the color range and the feather. If you drag down, you decrease the color range and the feather. If you drag right or left, you offset the color selection, but the color range and softness remain the same.
- Saturation face: This adjustment centers on the Cube’s top face. If you drag toward the left face, you increase saturation. If you drag away from the left face, you decrease saturation. If you drag left, you decrease saturation and the feather. If you drag right, you increase saturation and the feather.
- Lightness face: This adjustment centers on the Cube’s right face. If you drag up, you offset the lightness range and the feather to select brighter values. If you drag down, you offset the lightness range and the feather to select darker values. If you drag toward the left face, you decrease the lightness range and feather. If you drag away from the left face, you increase the lightness range and feather.
All these offsets are reflected in the Vectorscope and Lightness Parade as you drag and change values.
Click and drag the center point to change the target (this does not affect the range). In the arrow that appears, solid lines indicate the target color while dotted lines indicate the softness. Color range and feather are tied together with any Color Cube adjustment.
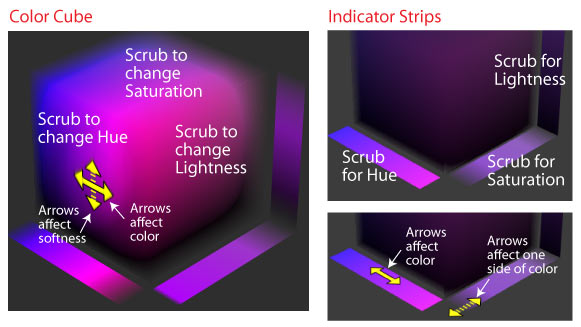
Hue, Saturation, and Lightness Strips
Each Color Cube face has an associated Indicator Strip. There is a Hue Strip, a Saturation Strip, and a Lightness Strip. The Indicator Strip has interactive areas that execute the same HSL color offset as moving along the Cube.
To change hue with the Hue Strip, for instance, drag along the interior part of the strip. A solid arrow line will indicate your movement. To change only one side of the hue range, drag along the strip’s edge. A dotted arrow line will indicate this movement.
The difference between Cube faces and Indicator Strips is that strips only change in one dimension (e.g., hue) while Color Cube faces each work in two dimensions (e.g., hue and saturation). Additionally, an Indicator Strip will change only the color range and not the feather, while the Color Cube affects both.
Vectorscope
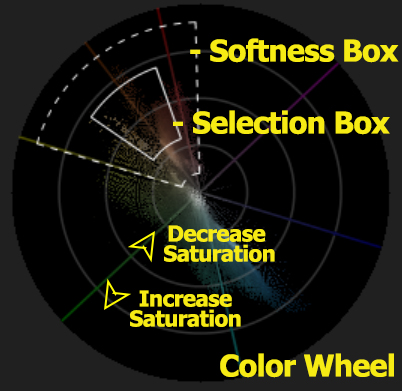
The Vectorscope shows the overall distribution of color in your image against a circular scale. This is a two-dimensional graph (hue and saturation).
The Vectorscope wheel works like a Hue wheel. The color range maps radially across red, orange, yellow, green, cyan, blue, purple, magenta, and back to red. The saturation of colors in the image maps from the wheel’s center to its edge, with unsaturated gray at the center and fully saturated colors at the edge. Bands show the resolution for different colors along the saturation vector, from no saturation to full saturation.
The box drawn over the Vectorscope has two indicators:
- Selection Box: The solid line shows the color region that is completely selected.
- Softness Box: The dotted line shows the region of softness (or feather) around the color selection.
Both indicators are interactive along the Vectorscope.
- Drag along one side of the Selection Box to increase or decrease the selected color range.
- One side will collect more values of that color toward white, or lower saturation.
- Click-and-drag along the other side to add more color values with greater saturation.
As you create softness in the Vectorscope, you correspondingly create softness in the Color Cube. The Color Cube is an indicator of the color range and the key softness superimposed on the Vectorscope. You also correspondingly create lightness in the Lightness Parade.
Lightness Parade
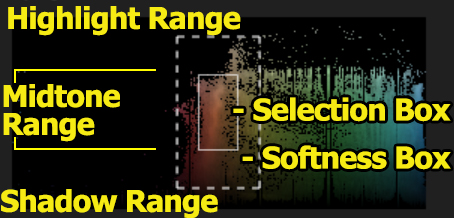
The Lightness Parade indicates lightness values associated with the color range shown in the Vectorscope. This is a one-dimensional graph (lightness only).
The box drawn over the Lightness Parade has two indicators:
- Selection Box: The solid line shows the lightness region that is completely selected.
- Softness Box: The dotted line shows the region of softness (or feather) around the lightness selection.
Both indicators are interactive along the Lightness Parade.
- Click-drag in the center of the Selection Box to shift the lightness range.
- Click-drag the edge of the Selection Box to increase or decrease the lightness range of the selection.
- Click-drag in the center of the Softness Box to shift the softness of the lightness range.
- Click-drag the edge of the Softness Box to increase or decrease the softness of the selection's lightness range.
Softness Slider
This is one of three controls that further refine the key. Softness is simple blurring with a twist. The softness operates directly on the key that results from the color range selection and blurs the key as a percentage of the image size. If a Black Clip or White Clip is set, then softness results in more of an edge feather around the clipped values.
Black Clip, White Clip
Two other controls further refine your key. The Clips operate directly on the key and force the values above or below the indicator to clip at that value or choke the map. If you move the White Clip indicator toward the middle of the scale, it will clip all values above the indicator toward white, making everything indicated as light gray turn white. Move the Black Clip indicator toward the middle of the scale to clip all values below the indicator toward black. In either case, the control forces gray values to become white or black, depending upon which indicator you use.
Invert Button
This button inverts the key. White areas become black, black areas become white, and the gray values flip in between.