
Primatte Keyer
ALL-IN-ONE, FAST AND ACCURATE CHROMA KEYING.
Getting Started
- Drag the Primatte Keyer 6 effect onto the clip that needs to be keyed.
- If you have background footage, position its layer beneath the clip being keyed.
Modify the Effect
Once Primatte is applied to a clip, define the key next, then make any adjustments to the matte.
Define Key contains an assortment of tools that help define, tweak, and customize both the background and foreground clip components.
Auto Define Key removes your green/blue screen with the touch of a single button. Auto Define Key runs a smart algorithm that figures out and eliminates the background color. This Primatte function analyzes the original image, determines the background screen color (typically blue or green), and sets it as the central color. Auto Define Key uses that information to eliminate the background color and clean any noise in the foreground object and back screen areas.
If the initial result is not giving the results desired, click the Reset button and start Primatte over using the standard four-step operation (Select BG, Clean BG, Clean FG, and Spill).
Sample Style
Select an area of the composite with the mouse pointer. You can click once to select a single pixel or click and drag the mouse to select multiple pixels in a single operation. Choose between the following two sampling modes.
 Point:
This is the default setting. When you drag the point, it creates a dot trail, so you can more flexibly and accurately custom-sample a specific area and obtain a broader spectrum.
Point:
This is the default setting. When you drag the point, it creates a dot trail, so you can more flexibly and accurately custom-sample a specific area and obtain a broader spectrum.
 Rectangle:
This function lets you drag out a rectilinear shape to establish the sample area. Each point is the result of taking a 3x3 region around the point the user clicked. A median filter is then applied to the area. This is a median sampling option that can potentially reduce and filter out noisy pixels.
Rectangle:
This function lets you drag out a rectilinear shape to establish the sample area. Each point is the result of taking a 3x3 region around the point the user clicked. A median filter is then applied to the area. This is a median sampling option that can potentially reduce and filter out noisy pixels.
 Select Background
adds the key colors to the matte by sampling the frame. Position the tool over the background key area and click-drag to select a range of pixels to define the key colors. Use this mode as an alternative to Auto Define Key.
Select Background
adds the key colors to the matte by sampling the frame. Position the tool over the background key area and click-drag to select a range of pixels to define the key colors. Use this mode as an alternative to Auto Define Key.
|
 Clean Background
removes the noise from the background area of the matte. To remove the noise, click-drag to sample pixels in the background that look like noise. If you are viewing the image in Matte View, unwanted noise areas will look white in the black and white area of the matte.
Clean Background
removes the noise from the background area of the matte. To remove the noise, click-drag to sample pixels in the background that look like noise. If you are viewing the image in Matte View, unwanted noise areas will look white in the black and white area of the matte.
|
 Clean Foreground
removes noise from the foreground areas of the matte. To remove the noise, click-drag to sample pixels in the foreground that look like the noise. Sample the darker areas in the foreground area until they are completely white.
Clean Foreground
removes noise from the foreground areas of the matte. To remove the noise, click-drag to sample pixels in the foreground that look like the noise. Sample the darker areas in the foreground area until they are completely white.
|
|
 Spill Sponge
removes background color spill from the foreground. To remove reflected colors from the background, click-drag to sample pixels in the foreground that are contaminated with the key color.
Spill Sponge
removes background color spill from the foreground. To remove reflected colors from the background, click-drag to sample pixels in the foreground that are contaminated with the key color.
|
 Restore Detail
is useful for restoring lost detail in semi-transparent objects like hair, translucent cloth or smoke. Click-drag in areas that have been fully keyed out by the sampling process. Black background pixels (100% transparent) sampled in the image window become translucent.
Restore Detail
is useful for restoring lost detail in semi-transparent objects like hair, translucent cloth or smoke. Click-drag in areas that have been fully keyed out by the sampling process. Black background pixels (100% transparent) sampled in the image window become translucent.
|
 Matte Sponge
moves colors corrected for spill into the foreground, while maintaining the spill correction.
Matte Sponge
moves colors corrected for spill into the foreground, while maintaining the spill correction.
|
 Decrease Opacity
is useful for the subtle tuning of foreground objects which are otherwise entirely obscured, like smoke, clouds, or other wispy semi-transparent items. Click-drag to sample pixels to make opaque foreground areas slightly transparent.
Decrease Opacity
is useful for the subtle tuning of foreground objects which are otherwise entirely obscured, like smoke, clouds, or other wispy semi-transparent items. Click-drag to sample pixels to make opaque foreground areas slightly transparent.
|
Spill Correction
adjusts how much of the key's color to remove from the matte.
Deartifact Mode
removes any blocking around the edges of the image caused by compression algorithms in the source format. Choose
DV (4:1:1)
if the footage was shot on an HDV or DV Cam. Choose
Compressed (4:2:0)
if the footage was shot into a compressed format.
Deartifacting Strength adjusts the strength of the deartifacting process applied to the footage.
View Options contains parameters that dictate Primatte's output:
-
Show
contains a twirl-down menu with the basic options for what Primatte relays:
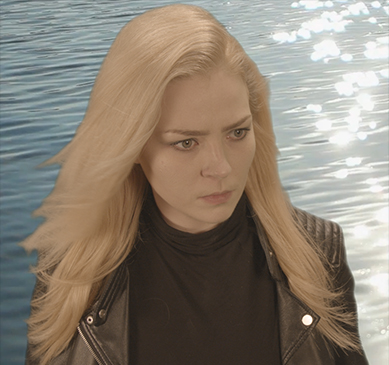
Comp displays the current composite with the keyed foreground element over the background element. 
Matte shows just the matte generated, providing a detailed look on what is and isn't being keyed. Solid white represents areas that will be opaque. All other shades between black and white are varying degrees of transparency, with the brighter tones depicting opaque areas, and darker tones depicting transparent areas. 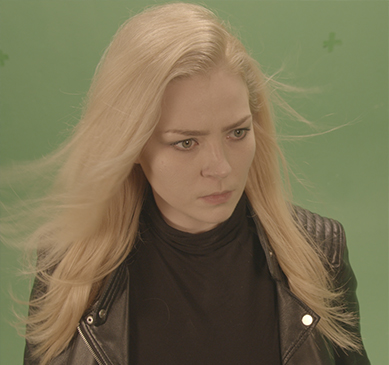
Foreground shows the unkeyed, original foreground element. This is useful for verifying areas of the unkeyed foreground that are to be transparent or to identify an area for spill removal. 
Background displays the unadjusted background image or the background color if no image has been selected under BG Defocus Layer . 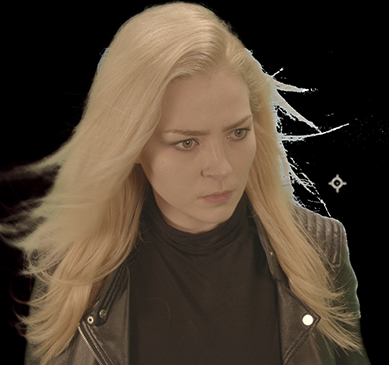
Processed Foreground shows the keyed foreground subject with spill suppression applied. 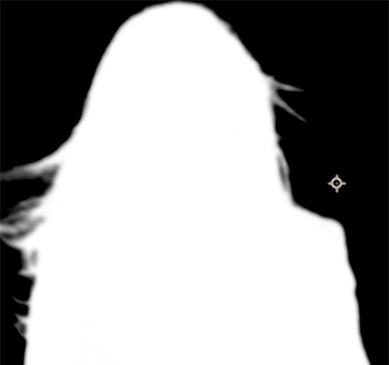
Core Matte shows the internal secondary Core Matte if it has been enabled within the Matte group (see below). - Split Screen toggles a vertical divide through the output, enabling view options for the right side (Right Side Show) as well as a control for adjusting the divide between left and right sides (Split Screen Amount).
Matte contains a subset of parameters that adjust the matte once the background has been keyed out.
- Matte Blur blurs the matte in both inward and outward directions, resulting in softer foreground object edges.
- Inward Blur forces the blur to only blur inward (instead of both directions). Disabling this can sometimes cause a halo to appear around foreground objects. When enabled, the defocus starts at the outside of the matte edge and only blurs inward, eliminating the halo artifact.
- Shrink Matte chokes the foreground areas of the matte by lowering the brightness levels of the pixels that make up the matte edge. Higher values push darker pixels toward black, and lower values preserve darker pixels. Pure white pixels are left unchanged by this parameter.
-
Edge Replacement
-
Edge Color Replace
provides a few options on how to treat the matte edges.
- Complement uses the complement of the backing screen color to replace the spill by using the color of the corresponding pixels in the background element. This is best for when maximum detail must be retained.
- Color uses a solid color (Replacement Color) when replacing the spill. This is best for when the foreground object is white and replacing spill with the complement color of the backing screen introduces strange colors or artifacting.
- BG Defocus uses a defocused copy of a background image (BG Defocus Layer) to determine the spill replacement colors, which are then selected from an area on the blurred background image that corresponds to the selected area on the foreground image. This works best on diffuse, transparent objects like glass.
-
Edge Color Replace
provides a few options on how to treat the matte edges.
-
Core Matte
can help solidify the center of the subject while still maintaining the edges pulled in the original key. A compositing technique commonly done on tricky shots, this can keep good edge results while filling holes that may be caused by foreground areas similar to the keyed color. Core Matte is off by default, but once enabled it gets mixed on top of your original key.
- o Use Core Matte in the Show menu within View Options to review the Core Matte by itself.
- Core Matte Blur adjusts a blur around the Core Matte's edges.
- Core Matte Erode eats away at the Core Matte's area from the outside in. At high values, it erodes the edges and shrinks the matte inward, leaving a solid interior.
- Matte Black Point adjusts what brightness values the matte considers black, turning them transparent the closer they are to the black point set. Lower values result in transparency starting with the darker areas of the matte, while higher values ebb the transparency into brighter values of the shot. Raising the Black Point makes the semi-transparent pixels more transparent by crushing up the darkest end of the scale.
-
Matte White Point
adjusts what brightness values the matte considers white, leaving them opaque the closer they are to the white point set. Lower values result in transparency starting with the darker areas of the matte, while higher values ebb the transparency into brighter values of the shot. Bringing down the White Point lowers the threshold to accept more semi-transparent, “gray” pixels in our matte as fully opaque whites.

|
Here's an area of hair within a matte, with the Matte White and Black Points set to their default values. |

|
With Matte Black Point adjusted to 50%, notice how areas with strands of hair that weren't completely keyed out start ebbing into transparency. |

|
With Matte White Point adjusted to 50%, notice how areas that weren't completely keyed out are now strengthened into the matte. |
-
Gamma
lightens, darkens, or adjusts the gamma curve of the matte using a standard Levels interface.
- Histogram displays the amount of pixels with each luminance value in the matte. The transparent pixels are represented as black at the left end of the grayscale chart. The opaque pixels that make up our foreground image are represented as white on the right of the grayscale.
-
Gamma
changes the distribution of the values in the matte by altering the exponential power curve when you change the numerical control. The Gamma strength is divided by its number, which means a higher numerical value will display less strength.
Gamma affects the contrast of the matte on the grayscale. When the control is at 0.0, the Matte will display the highest level of contrast between black and white, making the semi-transparent pixels "black," or totally transparent.
Changing the Gamma control to a higher number will show more variance within the grayscale of the matte, leading to more semi-transparent pixels. - Set Output Black to its maximum of 100% to raise the transparent pixels in the luminance scale to opaque, revealing the RGB straight channel and no transparencies.
- Set Output White below 100% to make the opaque pixels in the matte transparent. A value of 0% makes the pixels completely invisible.
- Invert Matte swaps the transparency and opaqueness of the entire key.
Spill Killer contains parameters which control Primatte's additional spill suppression.
- Enable Spill Killer toggles a supplemental spill suppression tool that preserves the transparency of pixels within the matte, and adjusts the colors that closely match the key color. This is useful for removing matte areas where light has bounced off the key and onto the subject.
- Color Mode determines which color (between red, green, and blue) the Spill Killer tool searches for to remove from the matte.
- Strength adjusts how much of the original colors of the foreground element are spill-corrected. A value of 100% means that foreground colors are completely corrected.
- Bias widens the range of values around the color suppressed for spill removal. Lower percentages result in only removing values that closely match the color selected.
- Advanced contains sets of sliders that adjust the color correction done by the spill removal among the red, green, and blue hues. Each slider controls the value amount within its given descriptor (e.g., Red-Red, Red-Green, or Red-Blue) that are either preserved (higher values) or removed (lower values) from the matte. Lower values result in darker colors while higher values result in brighter colors and potentially a halo effect.