
TITLE MOTION

Title Motion features a gallery of animated, customizable presets for you to bring titles on and off screen.
Getting Started
-
Drag the effect onto your clip.
- Resolve Users: Depending on what you're looking to do with this effect, you may need to review some notes about Resolve and Text Effects here .
Modifying the Effect
- Browse Presets… brings up an animated gallery of presets. You can apply these either by double-clicking the preset or highlighting your preset and clicking Select.
-
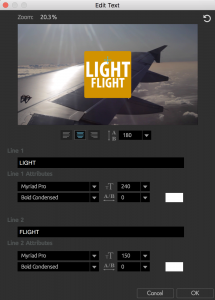
Edit Text...
brings up a window allowing you animate various properties of the text within Title Motion:
- Three different icons under the preview determine justification:
left
(
 ),
center
(
),
center
(
 ), and
right
(
), and
right
(
 ).
).
-
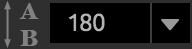
Find controls for the spacing between lines on the right.
- Line 1 edits the text appearing in the top line.
-
Line 1 Attributes
contains controls for the font used in Line 1, the font size(
 ), style, spacing between letters(
 ), and a color swatch to select your font's color.
- All of these modifications are directly available for Line 2 (see below).
- Click OK to commit changes or Cancel to cancel changes.
-
In the top right is an Undo button(
 ) to undo any changes you've made within the
Edit Text
window.
) to undo any changes you've made within the
Edit Text
window.
- Three different icons under the preview determine justification:
left
(
- Composite Over Original toggles whether the Title will composite on top of the clip to which you've applied it or render against a black background.
- Text Position determines where on the screen the text's reference point is located.
- Justification controls whether your text lines are aligned to the Left, Center, or Right.
- Line Spacing adjusts how far apart the lines of your text are spaced.
-
Line 1
and
Line 2
Attributes:
- Font1 Size adjusts the text size in Line 1.
- Font1 Color controls the text color in Line 1.
- Opacity1 determines how transparent the text is in Line 1.
- Tracking 1 changes how far apart the letters are in Line 1.
-
Drop Shadow
- Distance adjusts how far the title is from its drop shadow.
- Offset Angle controls the position to which the drop shadow extends relative to the title.
- Softness determines how blurry or sharp the shadow appears.
- Shadow Opacity adjusts how transparent the shadow is against its background.
- Shadow Color controls the color of the shadow.
- Shadow Contrast adjusts how much the shadow builds from its source.
-
Shape
- Shape contains a drop-down menu of preset shapes to choose from. The shape will go behind your title. Options include Burst, Circle, Polygon, Rectangle, and None .
- Shape Position Offset controls the shape position relative to the text.
- Color lets you select if you'd like the shape to be in a Solid Color, Radial Gradient, Linear Gradient, or None.
- Color 1 determines the color of your text or the first color of your gradient.
- Color 2 is the color your gradient builds toward from Color 1.
- Gradient Adjust controls the position of the gradient within the shape to which it's applied.
- Size 1 adjusts the size of the shape outward or inward from its current state. If you have Rectangle as your shape, it only adjusts the horizontal axis of the rectangle.
- Size 2 adjusts the vertical axis of your Rectangle shape. This setting does not affect any of the other shapes.
- Num Sides only affects the Polygon shape and controls how many sides appear for your shape.
- Stroke Width adds an optional stroke around the shape.
- Stroke Color determines the color of the stroke.
- Shape Angle adjusts the angle of the shape around a 360-degree rotation.
- Shape Opacity controls how transparent the shape is over its background.
- Rounding rounds the corners of the shape used (if any).
- Randomize Poly Points distorts the location of the points of your Polygon shape.
- Shape Aspect controls the shape's x:y ratio.
- Random Seed adjusts the formula used to Randomize Poly Points to create different kinds of distortions.
-
Duration
- Transition Duration controls how long the transition of your animation lasts from off- to on-screen. (Note: This does not work if Use Clip Length is enabled.)
- Idle Duration adjusts how long the title stays on screen between transitions. (Note: This does not work if Use Clip Length is enabled.)
- Idle Animation Speed controls how fast the animation plays during the title's idle state.
- Match Start & End Values lets the plug-in use the Start and End positions of the clip to which it's been applied to determine when to start and stop its transition animations.
- Use Clip Length lets the plug-in use the length of the clip to which it's been applied to determine the length of the animation's duration.
-
Start Properties
- Position Start determines where the title is when the animation starts.
- Scale Start controls the title size at the start of the animation.
- Rotate X/Y/Z Start adjusts the rotation of the title at the start of the animation.
- Opacity Start determines the transparency of the title at the start of the animation.
- Blur Start controls how blurry the title appears at the start of the animation.
-
Idle Properties
- Idle Animation Preset contains a drop-down list of preset animations for the title to utilize during its idle state between transitions. Options include Springy, Springy Fast, Wobble X/Y, Pivot Y, Pivot Z, and Hover.
- Position Idle determines the title's location when the animation is idle.
- Scale Idle controls the size of the title during its idle state.
- Rotate X/Y/Z Idle adjusts the rotation of the title during the animation's idle state.
- Anchor Offset controls where the title appears relative to its anchor position.
-
Idle Animation
- Idle Preroll Adjust controls how much the animation has already completed from its idle start forward. The default value is 0.
- Spring Amplitude adjusts the amplitude of the random pattern used to spring the title in its idle state. Higher values means more springiness further from the source. Lower values mean less springiness closer to the source.
- Spring Frequency adjusts how frequently the springy animation occurs within its given duration.
- Spring Decay controls how much tapering occurs during the spring animation.
- Wiggle Amplitude X/Y controls how much wiggling occurs among the x and y axes.
- Wiggle Frequency adjusts how frequently wiggling occurs within its given duration.
- Pivot Amplitude X/Y/Z adjusts the amplitude of pivoting on a given axis. Higher values mean more pivoting farther from the source. Lower values mean less pivoting.
- Pivot Frequency controls how frequently pivoting occurs within the given duration.
- Hover Amplitude determines how amplified the hovering animation is within the idle state. Higher values mean more extreme hovering. Lower numbers mean less extreme hovering.
- Hover Frequency controls how rapidly the hovering animation animates within its given duration.
-
End Properties
- Position End determines where the title is when the animation ends.
- Scale End controls the size of the title at the end of the animation.
- Rotate X/Y/Z End adjusts the rotation of the title at the end of the animation.
- Opacity End determines the transparency of the title at the end of the animation.
- Blur End controls how blurry the title appears at the end of the animation.
- Position Offset controls how offset the title is from its anchor point within the composition.
- Scale controls the size of the effect.
- Anchor X/Y controls where the anchor for the title is positioned within the frame on its x or y axis.
-
Motion Blur
- Motion Blur enables whether the effect renders with motion blur set at Off, Low, Medium, or High.
- Motion Shutter controls the shutter speed for the motion blur.
- Motion Blur Phase adjusts what phase the motion blur is in, letting you adjust how blurry the effect appears.
- Refresh: In the event your effect didn't automatically update its appearance when adjusting things like the duration, click Refresh Length to refresh the effect and update the current frame.