Universe
ECTO

Universe Ecto gives text a ghostly, electric, or fiery appearance, right down to the animated glow and dancing flames.
Getting Started in DaVinci Resolve
-
In Resolve, you'll need to follow a few extra steps:
-
Have your text on a video track above your footage's video track.
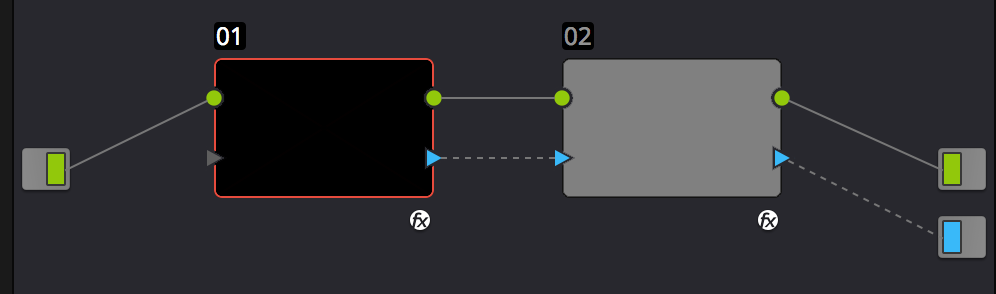
- Create a Compound Clip from your text, select it, and head into the Color view of Resolve's interface.
- Within the Node window of Resolve, sever the default link between the text's node and the output.
- Add a new Corrector node and Alpha output within the Node interface.
- Create links from the Text's RGB and Alpha outputs to the newly created Corrector node's RGB and alpha inputs
- Then create links from the Corrector node's RGB and Alpha outputs to the final outputs for RGB and alpha, respectively.
- Right-click in the Node interface and select Use OFX Alpha.
- Apply Ecto to your Text node and enable the Unmult option.
- Apply uni.Unmult to your Corrector node.
-
Have your text on a video track above your footage's video track.
Presets
Ecto's presets make quick work of applying eye-catching color schemes or complete animated effects to your text. Find Ecto's presets in the Red Giant Universe Dashboard (accessible via the blue Open Dashboard... button or the Choose a Preset... button below it).
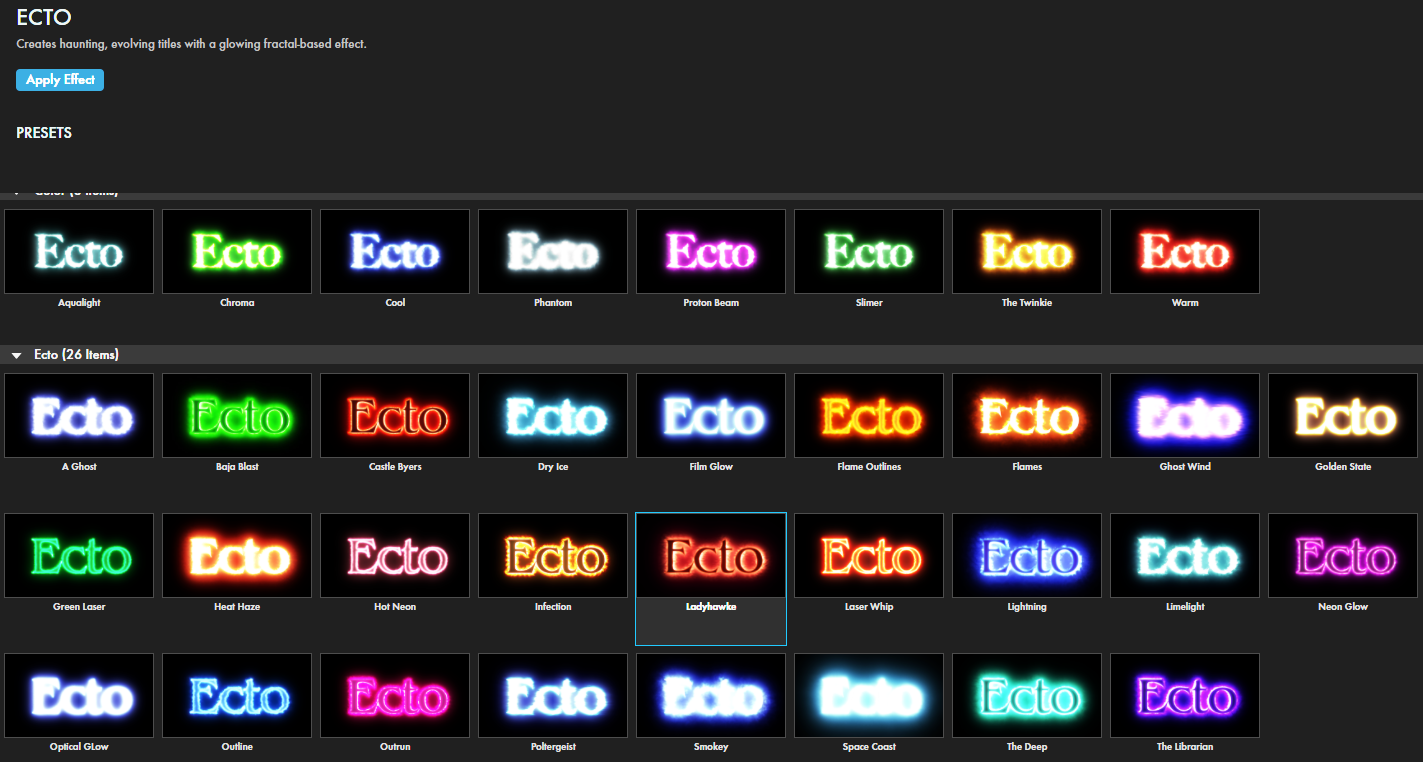
As with all other Universe tools, you can modify or create an Ecto look and then save it under its own name by pressing the Save Preset... button.
Source
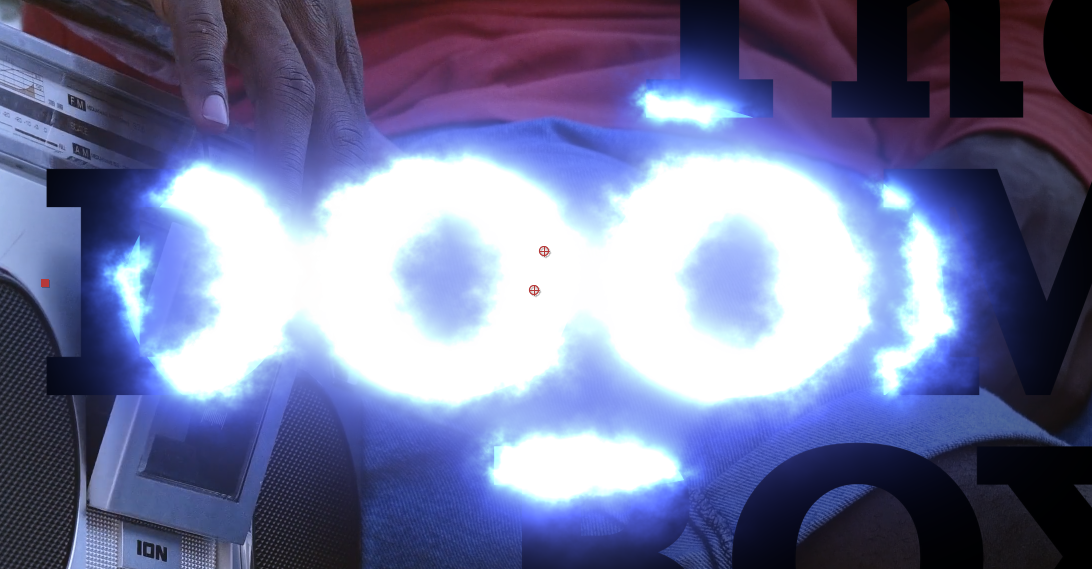
In Ecto, the "source" refers to the text or image elements from which Ecto effects are based. Consider the illustration below. We took a clip of a man with a portable stereo in After Effects and added a text layer. We then dragged the Ecto effect onto the text layer. Here are the results with the default settings:

The letters of the text layer form the effect source. That said, let's explore the Source sub-menu controls.
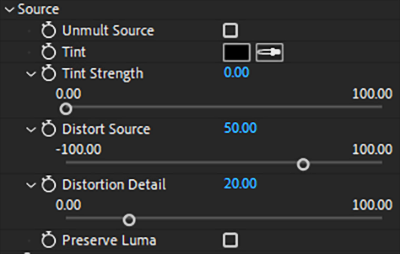
Unmult removes all black from the background of your source. If you have text on a black layer, checking this box will make your text vanish, even though the text layer and its contents remain.
Tint lets you adjust the source's color with either a color eyedropper tool or the color picker pop-up. This works in conjunction with Tint Strength. For example, we could pick bright red for the source tint, but with a Tint Strength of 0, the source will still appear its original color.
Distort Source adjusts how much an overlaid invisible fractal field distorts the source. Distort Detail adjusts the amount of detail within the invisible fractal field created from the Distort Source parameter. A value of 0 results in no detail in the fractal field (resulting in no distortion) while a value of 100 results in maximum detail (distortion) within the fractal field.
To illustrate, examine the DOOM BOX capture above. That image reflects Ecto's defaults of Distort Source: 50 and Distortion Detail: 20. Now, compare that with these adjustments:

The Preserve Luma checkbox will maintain the source's luma (brightness) channel, which can be useful if you don't want tint adjustments to overwhelm the source's native coloration.
Glow Intensity and Color
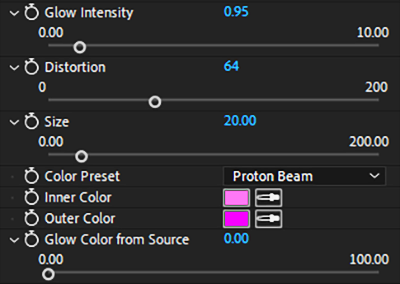
Glow Intensity adjusts how heavily the Ecto effect builds from the source outward on a scale from 0 to 10. Because the scale is exponential, it doesn't take long for intensity to become overpowering and deliver diminishing returns with further increases.
Distortion will distort the effect along an invisible fractal field the size of your composition. This control impacts the glow, not the source. At first glance, distinguishing between Distortion and Distort Source can be tricky, so let's zoom in on these two.
Examine the three images below. The leftmost image has a Distort Source of 0 and a Distortion Detail of 100 (the maximum). Why is there no visible distortion detail? Because you can't see distortion detail in something (Distort Source) that has zero distortion. In the center image, we increased Distortion from 0 to 100. Notice how the text source remains sharp-edged; only the effect has distorted into noise that looks like blue flames.
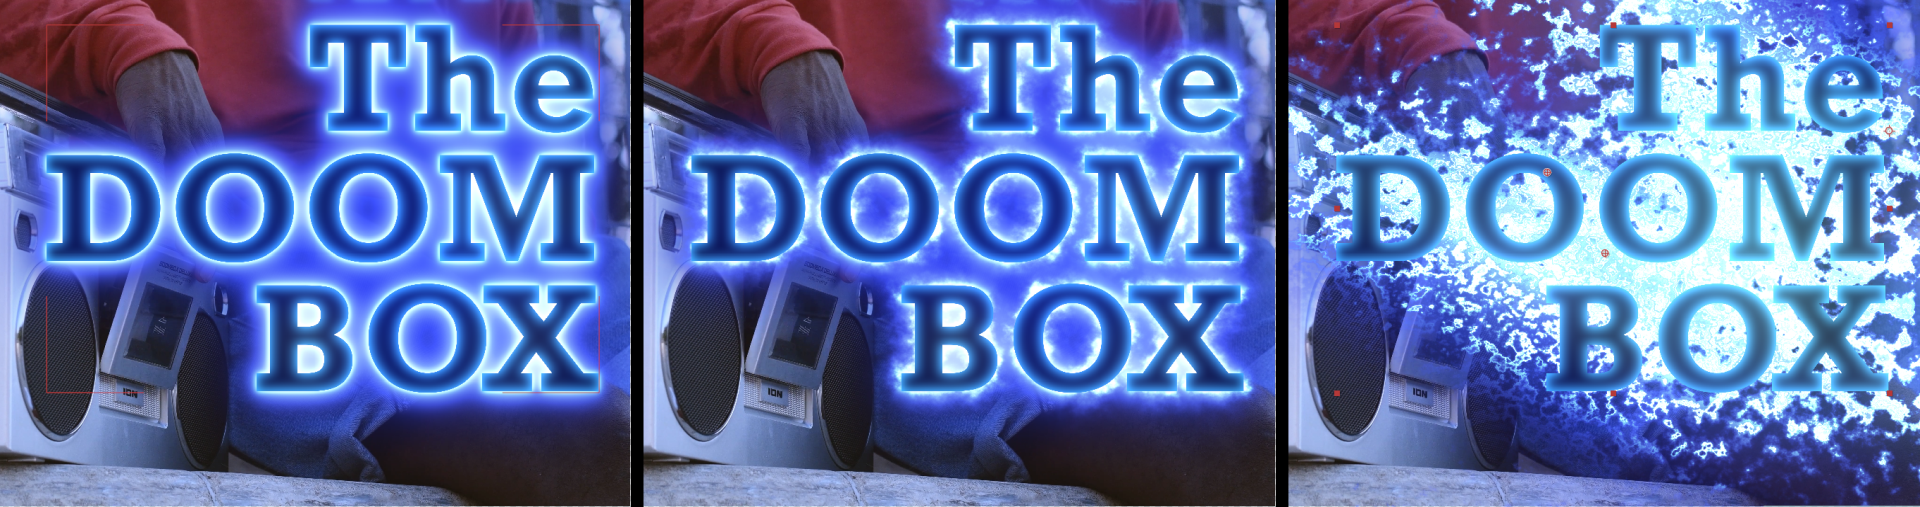
In the triptych's last image, we increased Size, which adjusts the effect's scale from the source outward. In other words, we're adjusting the size of the effect's distortion. However, Size also impacts the source. If you go back and change Distort Source to a moderate setting, such as 10, you'll see that changing Size now also warps source shapes.
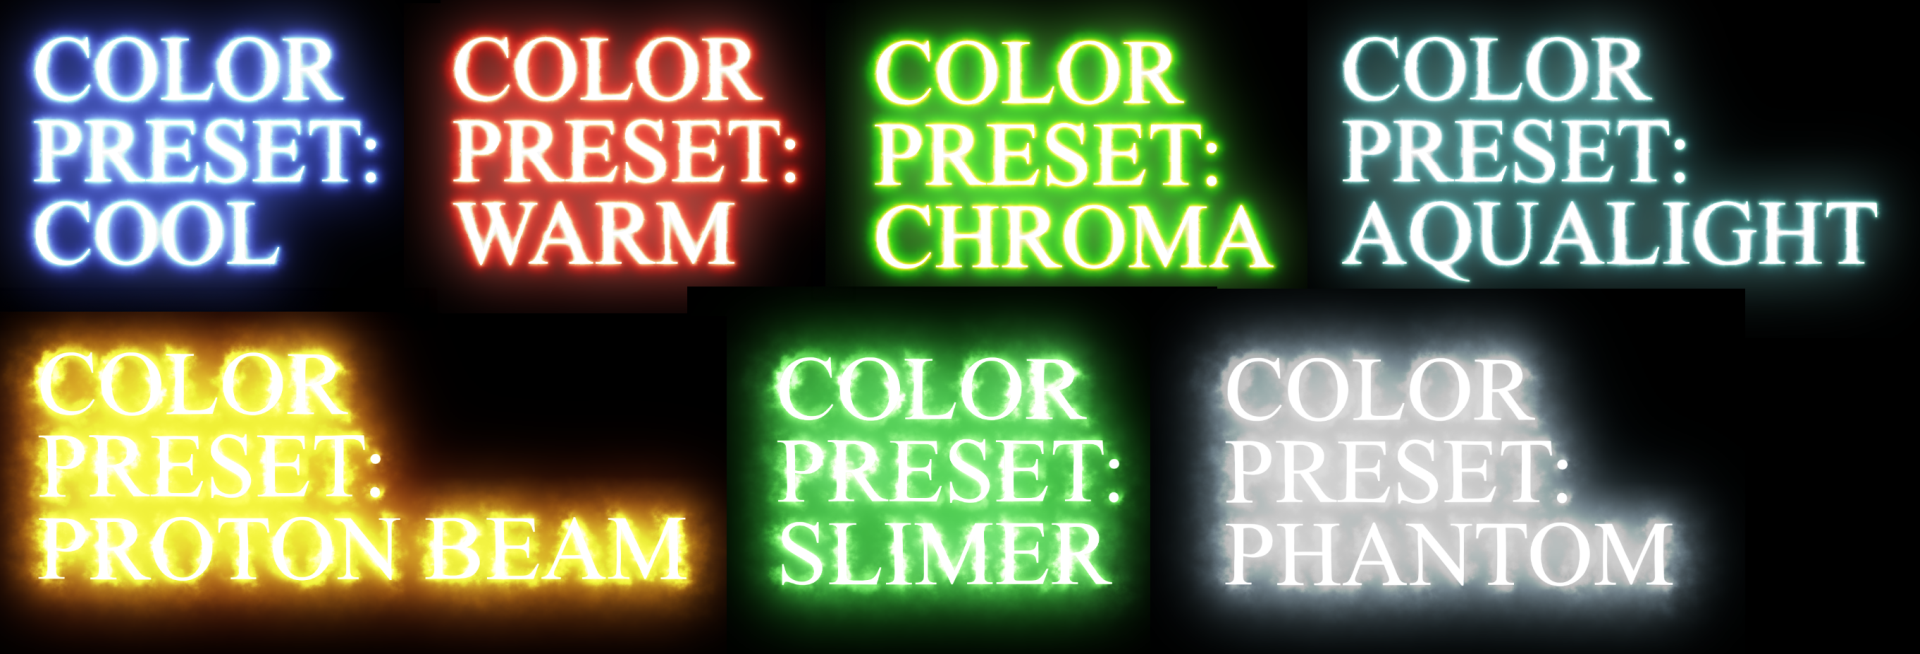
Color Preset contains presets that, when selected, apply as a gradient between the next two modifiable fields, Inner Color (which is closest to the effect's source) and Outer Color (where the effect tapers off).
Glow Color from Source
determines how much of the glow’s coloring is inherited from the source versus the effect’s color swatches.
For example, if your source is entirely white, then setting Glow Color from Source to 100 will result in an entirely white glow effect.
Glow Settings
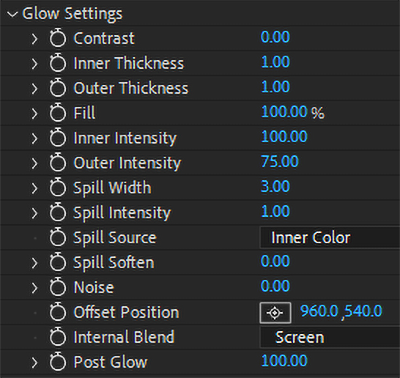
Glow Settings includes various parameters to help adjust the glow’s appearance. For a bit of fun, let's revisit a project from Trapcode Particular's Emit From Parent System tools and combine that with Ecto. Here is our emitted field of interstellar daisies with default Ecto settings applied:

- Contrast adjusts the range of levels from the brightest and darkest colors within the glow. Depending on your color selections and other settings, contrast changes may be tricky to spot.
- Inner Thickness modifies how heavily the glow builds from the source outward using solely the Inner Color setting. With the Proton Beam Color Preset selected, and a Contrast of 50, study how an Inner Thickness of 0 (left, below) compares to the maximum Inner Thickness of 2 (right). A higher setting can provide a softer glow, but it can also obscure some details.
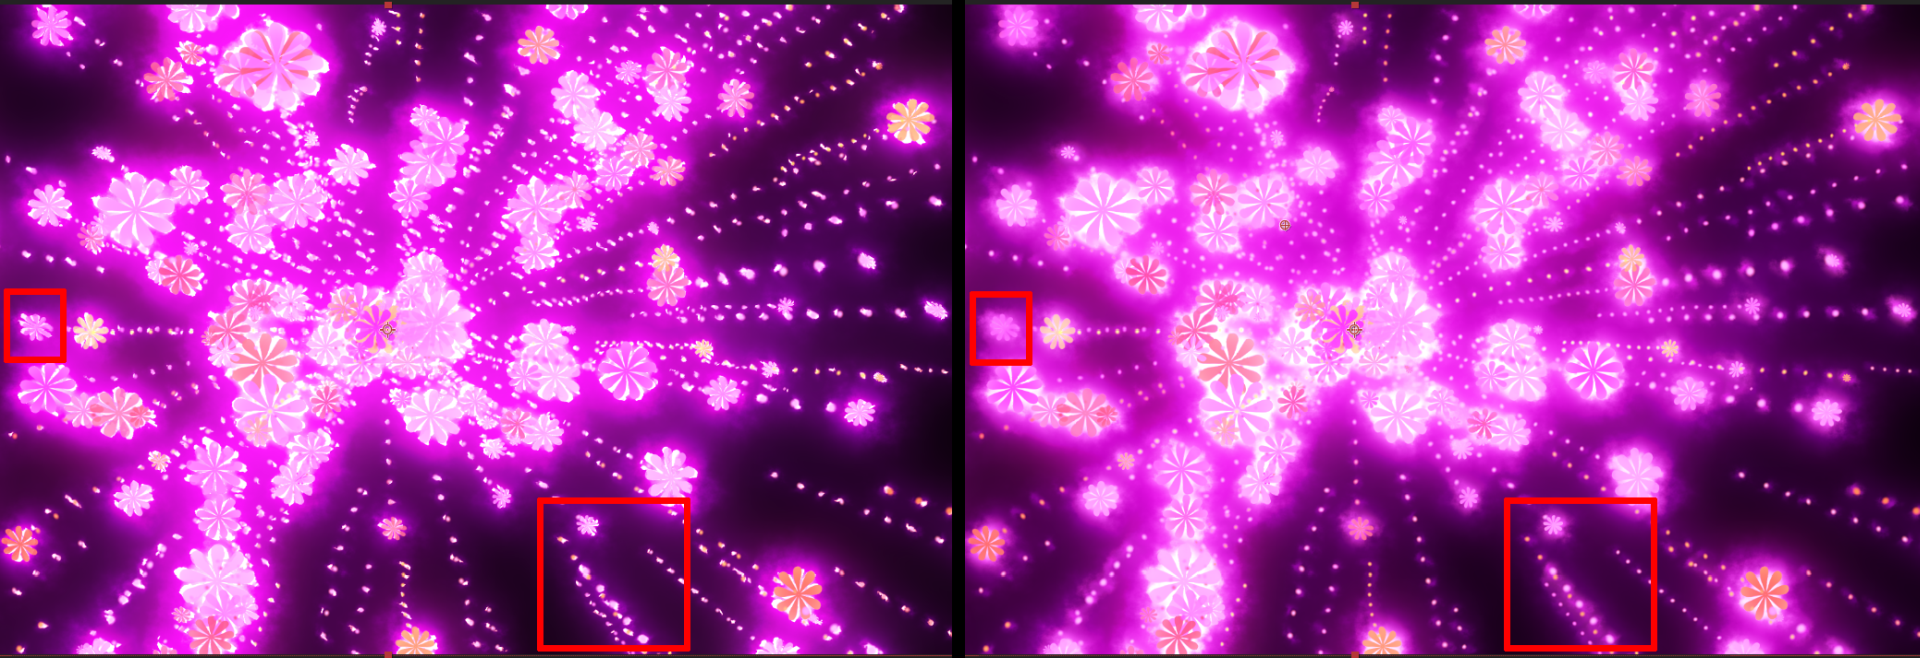
- Outer Thickness adjusts how heavily the glow builds from the taper inward using the Outer Color setting. As the following side-by-side shows, the results of changing Outer Thickness from 0 (left) to 2 can be quite obvious. No other settings were changed in this example.

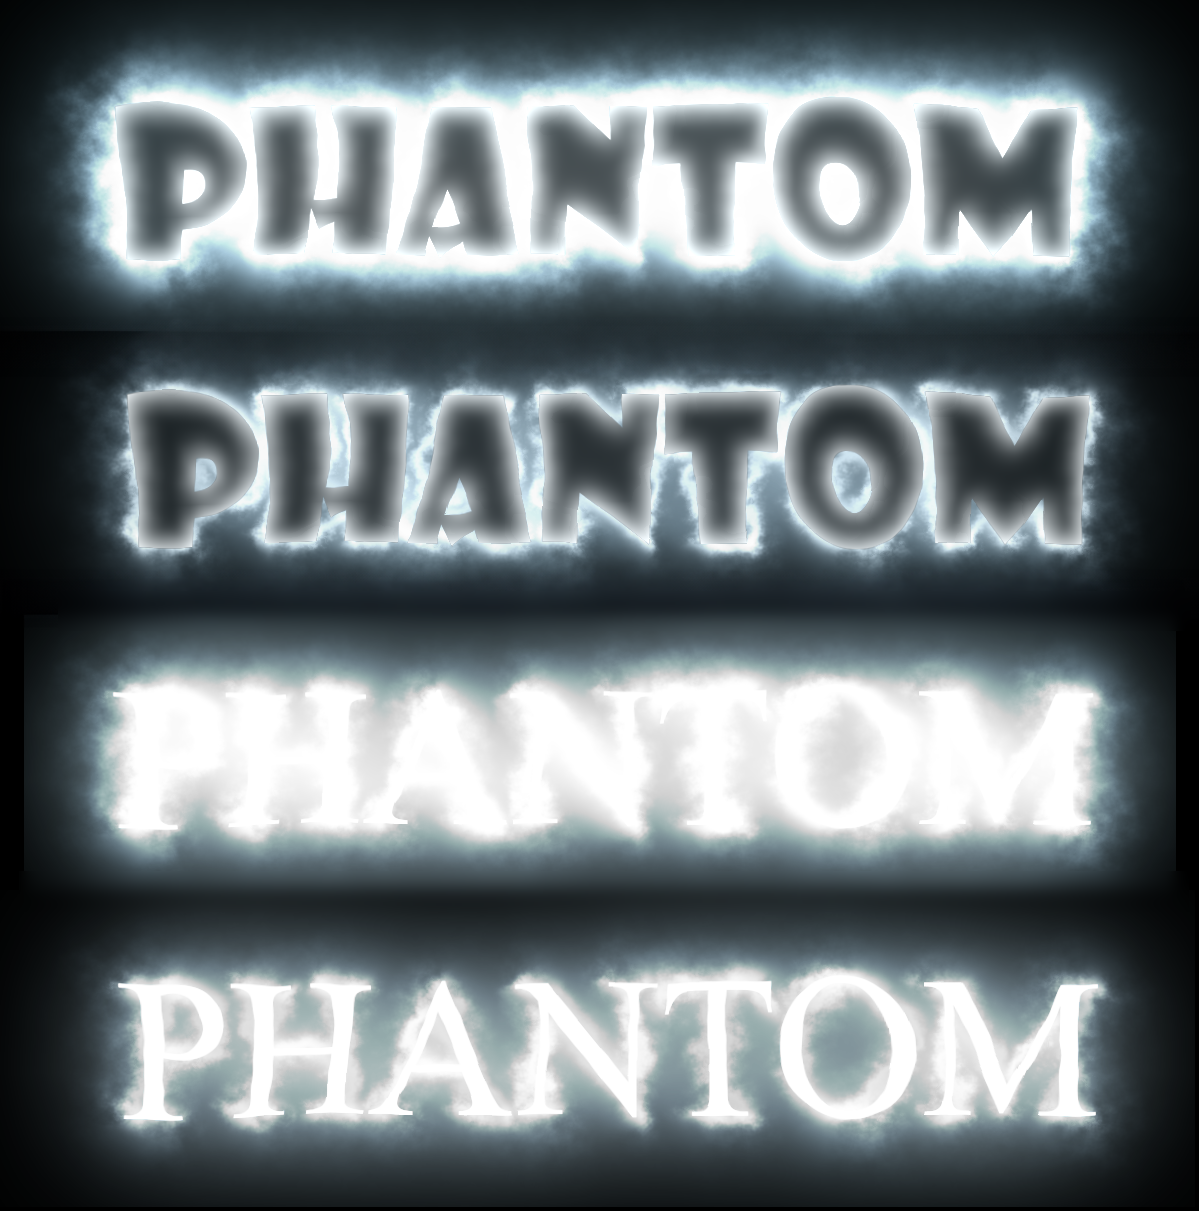
- Fill is a global glow intensity setting that encompasses the inner and outer intensity settings (see below) as well as some overlap with the source. Thus, Fill is a one-stop control when you don't need greater glow precision. This can be handy when you find yourself with overpowering Ecto effects. You might run into this with presets. In the following illustration, we show the Phantom preset on a text layer. Phantom defaults to a Fill setting of 100% (first and third examples). Notice how the third line, with its skinnier Times New Roman font, is blown out and nearly illegible. With a Fill of just 10% (second line) or even 5% (last line), the text becomes much clearer and the effect is still quite apparent. Setting Fill to 0% will eliminate the glow effect.
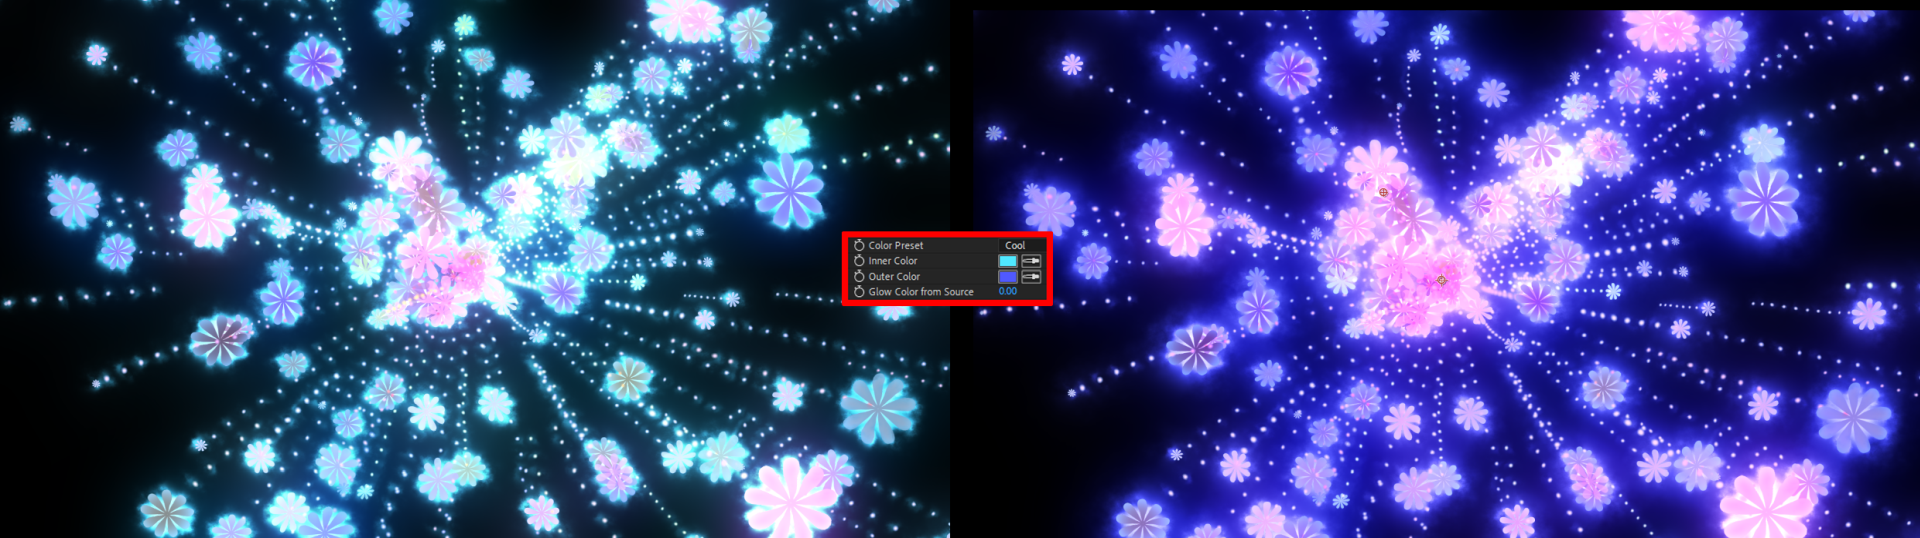
- Inner Intensity adjusts the levels and contrast of the glow's innermost coverage area, including its assigned color. Outer Intensity does the same for the glow's outer area and color.
In the following illustration, the left image shows Inner Intensity at 100 and Outer Intensity at 0. The right image reverses these values. You can see how the results tie directly to the inner and outer color selection.
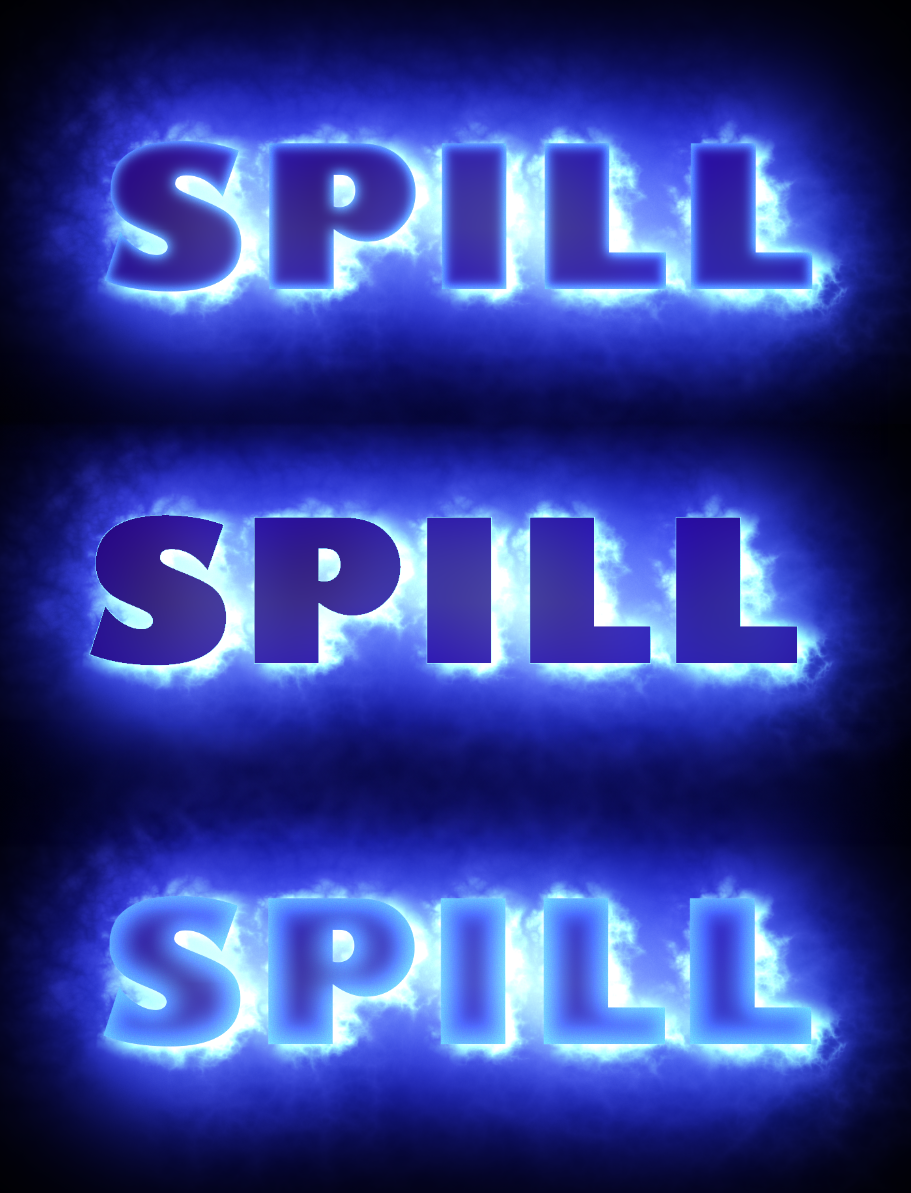
- Spill Width controls how far the glow spills over the source, and Spill Intensity adjusts the brightness of that spill over the source. Consider the following comparisons. The top image shows the Lightning preset applied with its default values of Spill Width: 2 and Spill Intensity: 1. The center capture has a Spill Width of 0 and a Spill Intensity of 10. Why is there no spill intensity in this image? Exactly — because zero width remains zero no matter how much you multiply it. Finally, the last capture has a Spill Width of 5 and a Spill Intensity of 1.5, creating an almost embossed effect.
- Spill Source controls whether the spill color comes from the Inner Color, Outer Color, or Source.
- Spill Soften relates to source edges and how glow light bleeds around them. A 0 value conveys the most bleed and edge softness; a 100 value keeps those edges hard and bleed-free.
- Due to some coding constraints, Noise produce a result akin to "Displacement." As you can see in the following image, a Noise setting of 0 (left) places the glow directly behind the source while a setting of 100 displaces the glow at its maximum offset (right). You can set the location of the displacement with the Offset Position control.

That said, Noise does actually produce noise in the source and glow effect. The next image shows a 400% zoom to illustrate the 0 (left) and 100 (right) settings. Note the fractal noise pattern visible especially in the daisy tips and pale glows.
- Internal Blend adjusts how the spill onto the source is interpreted using standard Blend parameters, such as Normal, Darken, Multiply, etc.
Distortion Settings
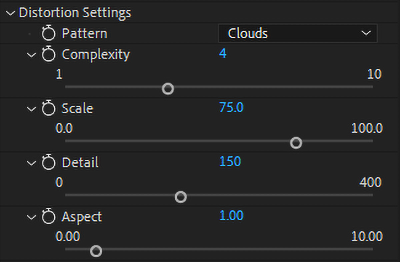
Distortion Settings contain the following parameters that adjust the glow's distortion.
- Pattern includes four presets for the invisible fractal field. Don't get too literal about their names. Instead, examine the following two capture strips, which show (from left to right) the Clouds, Plasma, Electric, and Brimstone patterns. Some presets (like the Infection preset used below) show Pattern differences more than others.
Zoomed out: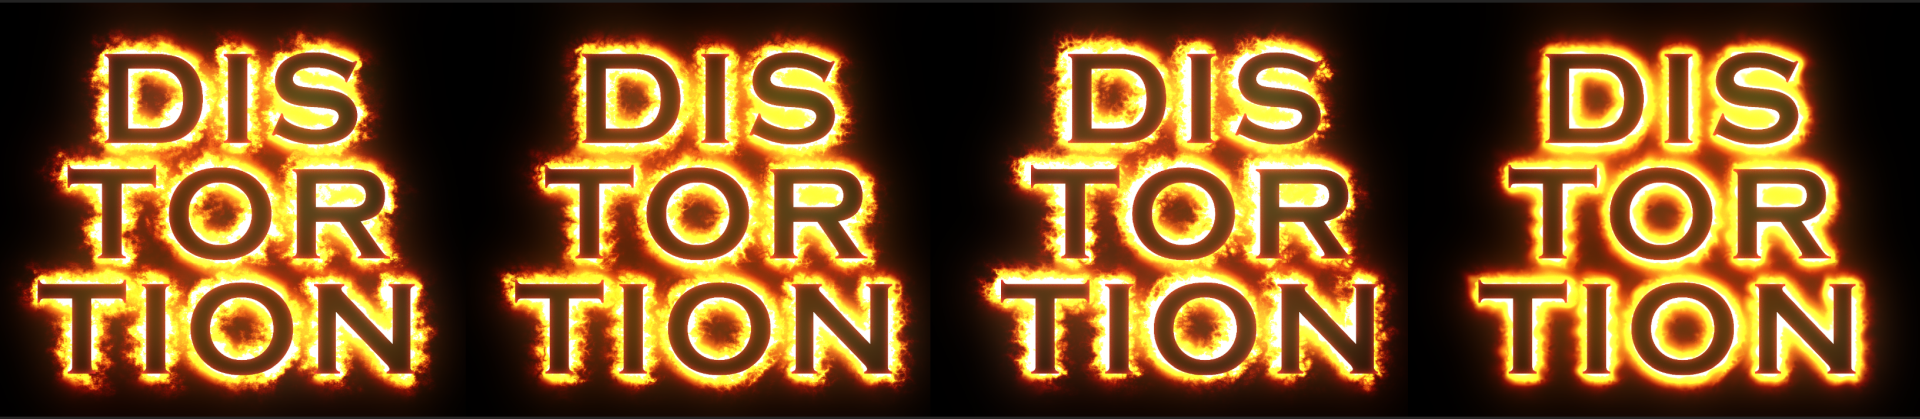
At 200 percent:
- Complexity adjusts the calculations performed to create the fractal field, with a high complexity (10) resulting in more complex fractals and a lower complexity (1) resulting in simpler fractals.
Particularly with lower values, and with some effects, you can see the impact of Complexity's impact on effect appearance. Take this example of the Outline preset with values (from left to right) of 1, 2, and 3, and notice how that lowest setting might remind you of lightning or plasma beam effects from the 1980s.

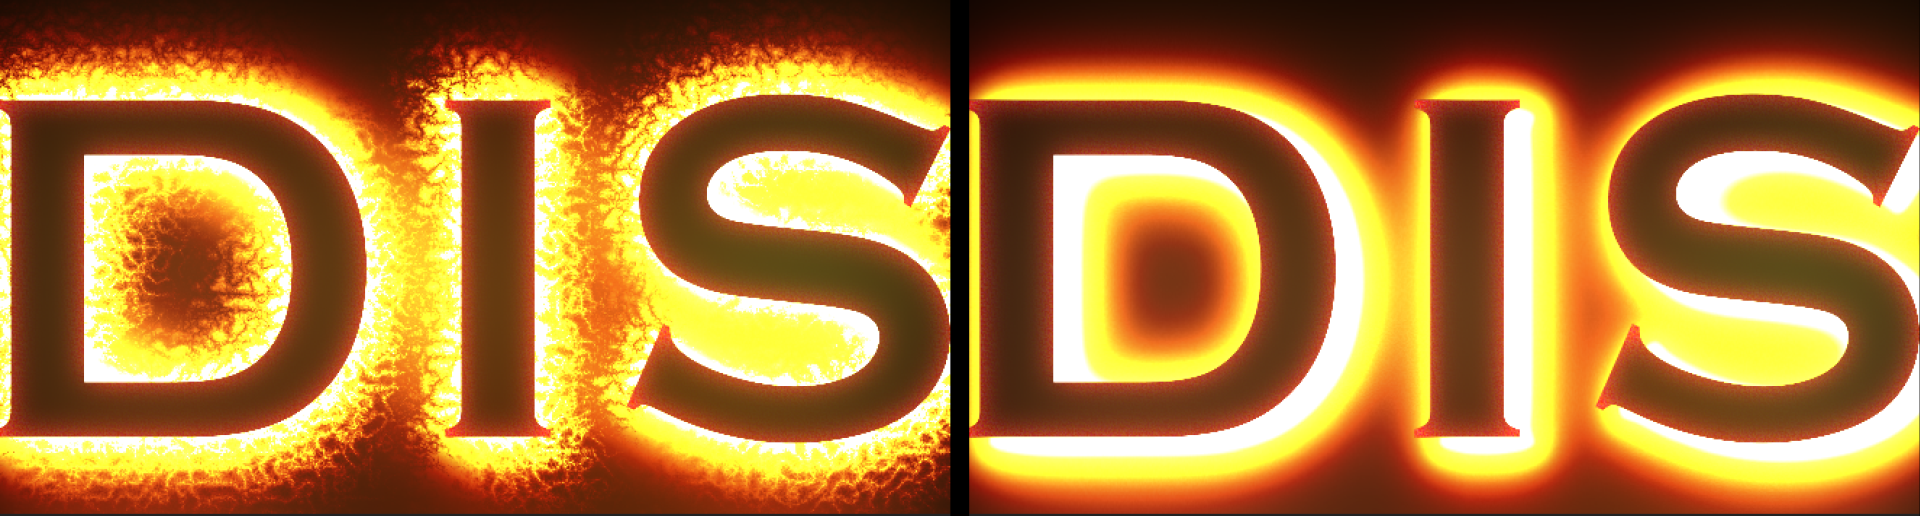
- Scale adjusts the grid of the fractal field distorting your image. A high scale value (100) zooms into the grid, and fewer fractals appear on the screen. Low scales result in smaller, more numerous fractals.
This example with the Infection preset beautifully demonstrates the point with 1 (left) and 100 values.
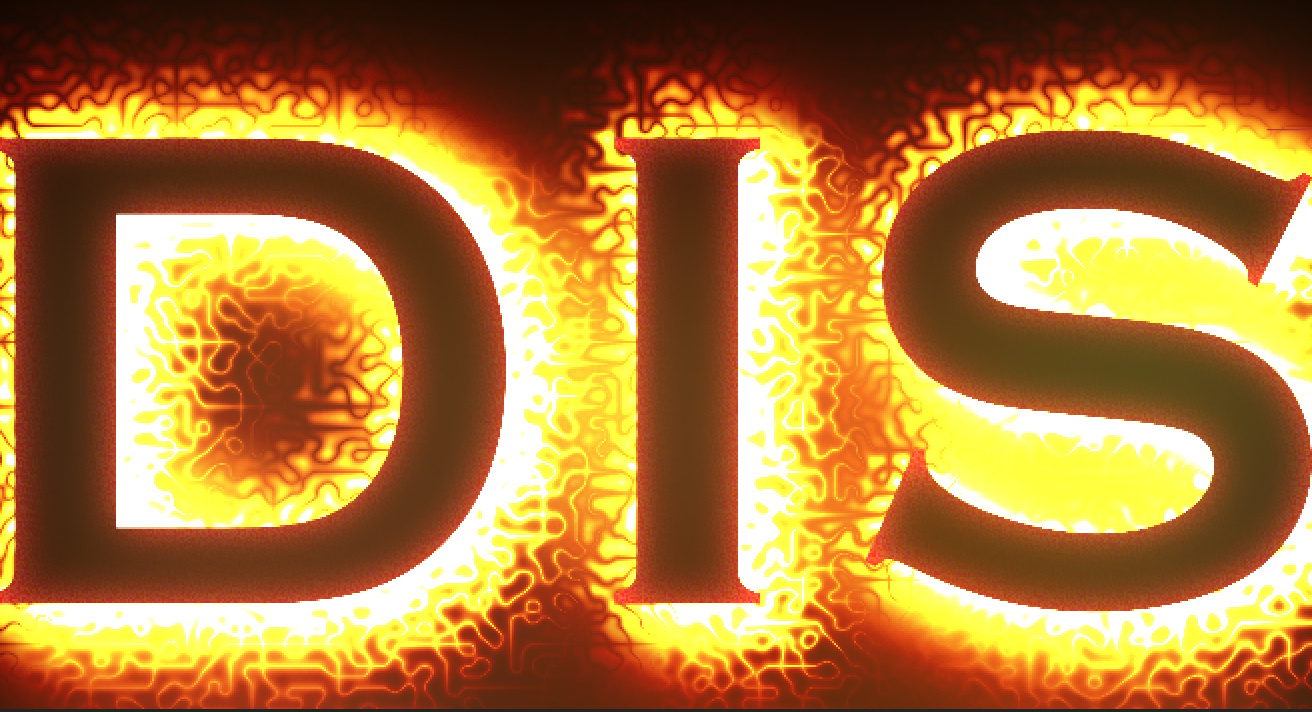
- Detail modifies the granularity of the fractals, resulting in finer details. This parameter is more noticeable with increasingly complex fractals.
Look at what happens when we tweak the prior Scale: 1 image and change its Detail from the default of 231 down to 1.
- Aspect adjusts your distortion's aspect ratio. To illustrate, we applied values of 0 (left), 2, and 10 to the Ghost Wind preset.

Animation
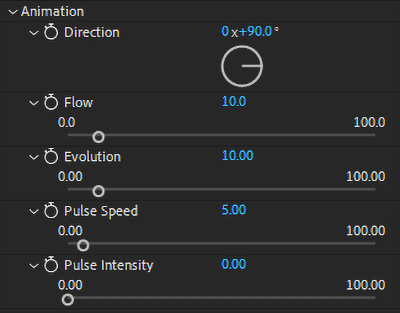
Animation includes parameters that adjust the distorting, invisible fractal field’s movement.
- Direction controls which way the fractal field travels.
- Flow adjusts how fast the fractal field travels.
- Evolution affects the calculations performed to create the fractal field. Adjusting this extrapolates the fractal in place.
- Pulse Speed adjusts the frequency of a pulsating color effect with a tapered opacity from the source outward using the Inner Color settings.
- Pulse Intensity controls the brightness of the pulsating effect.
To showcase how these animation controls might be used, we offer two clips below. Both apply the Flame Outlines preset to the letter X. This first clip uses all default values: 0x90⁰, Flow: 24, Evolution: 71, Pulse Speed: 5, Pulse Intensity: 0.
The second clip uses the following values: Direction: 0x37⁰, Flow: 10, Evolution: 10, Pulse Speed: 20, Pulse Intensity: 50.
Mask
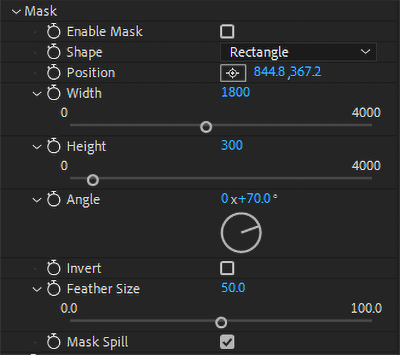
The Mask sub-group can provide a useful alternative to performing effect masking in the host application. If this is your first exposure to masking in Universe, some of the feature's aspects may not be immediately obvious, so let's start with the controls and then see them in action.
-
Enable the Use Mask checkbox to constrain the glow to the masked area.
-
Select an option from the Shape drop-down menu to set an elliptical or rectangular mask shape. See below for how to make the mask (at least temporarily) more visually obvious.
-
Use Position to control the mask's location either by typing in or mouse-dragging values or using the cross-hair control.
-
Width and height establish the mask's dimensions.
-
Angle controls set the mask's tilt.
-
Feather Size increases mask edge translucency along a gradient, resulting in a "spread" effect from the mask's center.
-
The Invert checkbox, when enabled, switches the glow effect to occur outside rather than inside the selected mask shape.
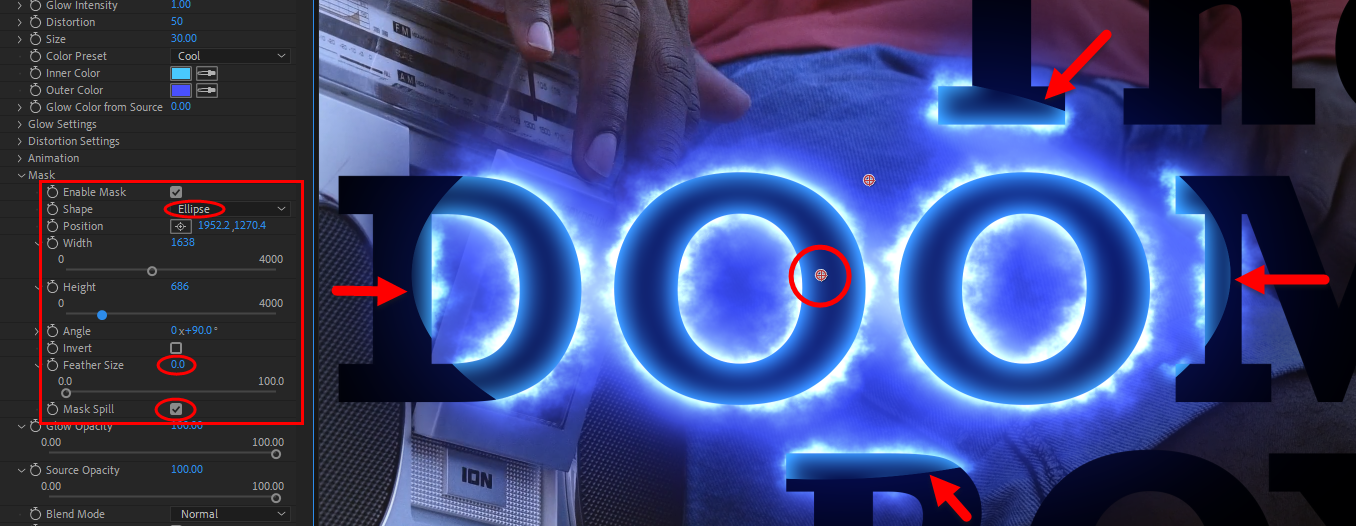
It can be tricky at first to see your mask's edges. In the above image, we selected an elliptical mask shape and then set Feather Size to 0. We also enabled the Mask Spill checkbox to make the unmasked text source fully dark for more obvious effect contrast. Collectively, this created clearly defined mask edges, as you can see from the red arrows. From there, it's easy to click-drag the mask's center cross-hair symbol (circled in red above) to wherever you please in the image.
The other draggable cross-hair (not circled) represents the Offset Position control from Glow Settings. This lets you reposition the glow effect independently from the mask. Using Offset Position here can produce cool drop shadow effects or effect animations without changing the source position.
Remaining Controls
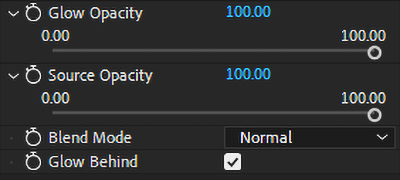
Glow Opacity and Source Opacity set the transparency of your effect and source objects, respectively.
Blend Mode includes the standard blending controls (e.g., Multiply, Screen, and Diffusion) that determine how your effect integrates with the surrounding composition.
Glow Behind determines whether your glow effect appears behind or before the source. In all of the above examples, we used the default setting (checked). The following image takes our above masking example and simply unchecks the Glow Behind box.