
Universe
TITLE MOTION

Title Motion lets you craft text and shapes into animated titles that whisk into and out of view, following your prescribed motion paths and actions.
Presets & Video Walk-Through
Title Motion features a gallery of animated, customizable presets to help you to bring titles on and off screen. Find these presets via the blue Open Dashboard... button or the Choose a Preset... button below it.
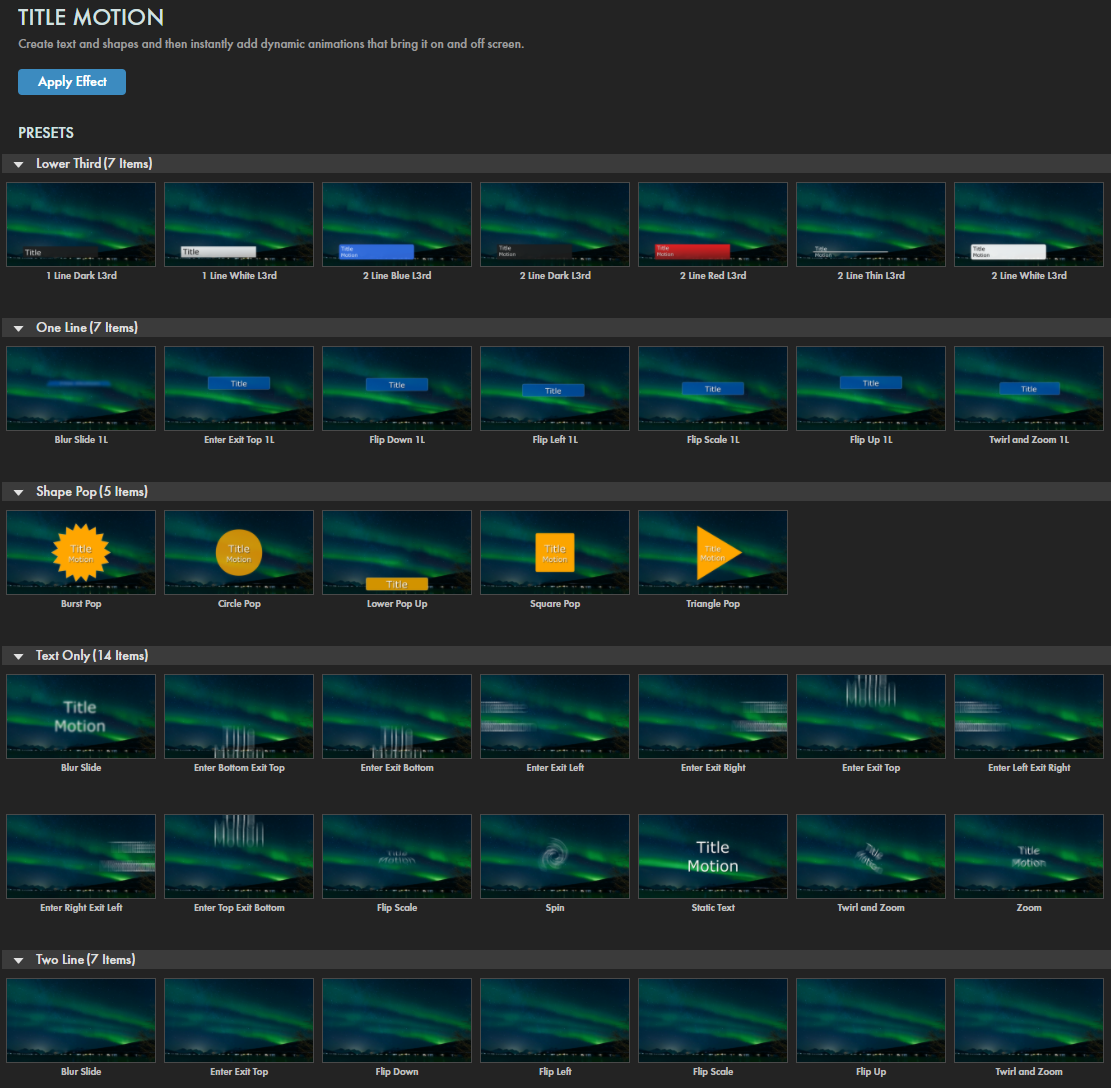
As with all other Universe tools, you can modify or create a Title Motion look and then save it under its own name by pressing the Save Preset... button.
If you'd like a video-based overview of this plugin, head over to Maxon's Cineversity site and enjoy our "Getting Started with Universe Title Motion" walk-through.
Modify the Animation
-
Edit Text...
, located below the Save Preset... button, opens a Title Motion window offering a range of controls to adjust your text's font and other attributes. Some of the controls in this window repeat controls in the ECP for your convenience.
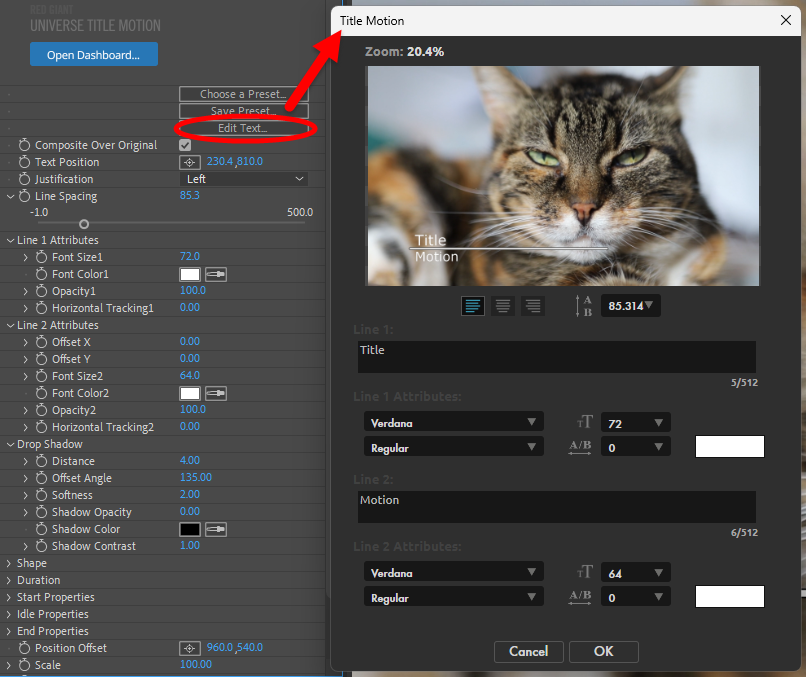
- Immediately below the preview window, three icons determine text justification:
left
(
 ),
center
(
),
center
(
 ), and
right
(
), and
right
(
 ).
).
-
To the right of the justification buttons, find the control for line spacing:
- Line 1 edits the text appearing in the top line.
-
Line 1 Attributes
contains controls for the font used in Line 1, the font size(
 ), style, spacing between letters(
 ), and a color swatch to select your font's color.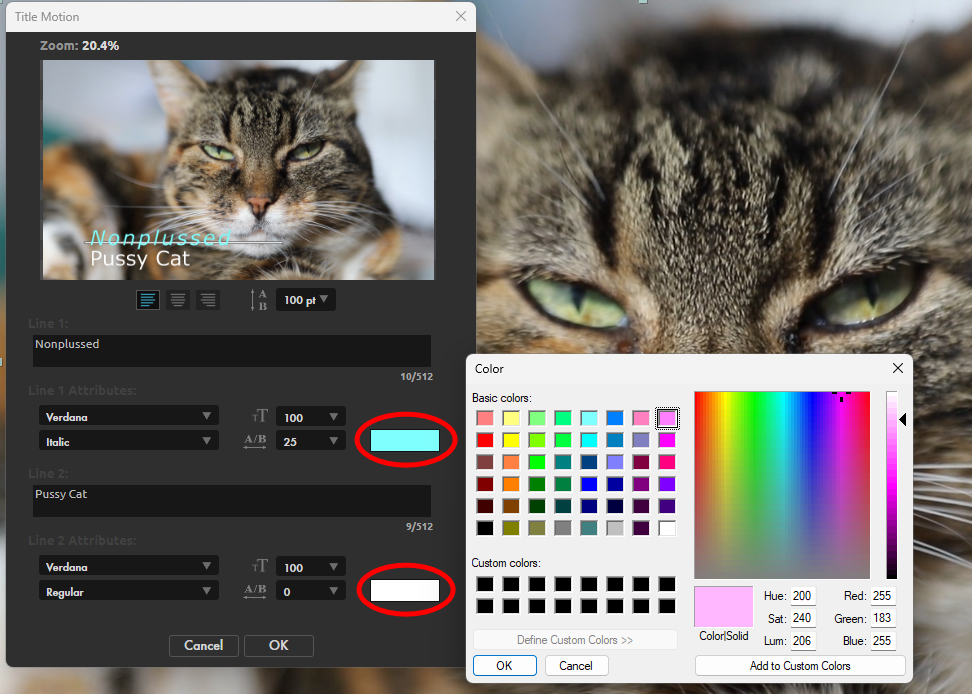
- These same modifications are also available for Line 2.
- Click OK to commit changes or Cancel to cancel changes.
- Immediately below the preview window, three icons determine text justification:
left
(
- Composite Over Original toggles whether the title will composite on top of the clip to which you've applied it or render against a black background.
- Text Position determines where on the screen the text's reference point is located.
- Justification controls whether your text lines are aligned to the Left, Center, or Right relative to the reference point.
- Line Spacing adjusts the distance between the lines of your text.
-
Line 1/2 Attributes:
- Font Size adjusts the text size.
- Font Color controls the line's text color.
- Opacity determines the text's transparency.
-
Horizontal Tracking
changes the kerning, or the distance between characters, in a line. Animating this can give your title text more life and pop. Below, we offer one such example applied to Line 2. (Note that we also keyframed Shape Opacity, see below.)
- Offset X/Y (specifically for Line 2) shifts the text's position relative to the title's position control point.
-
Drop Shadow
- Distance adjusts how far the title is from its drop shadow.
- Offset Angle controls the position to which the drop shadow extends relative to the title.
- Softness determines how blurry or sharp the shadow appears.
- Shadow Opacity adjusts how transparent the shadow is against its background.
- Shadow Color controls the color of the shadow.
- Shadow Contrast adjusts how much the shadow builds from its source.
-
Shape
-
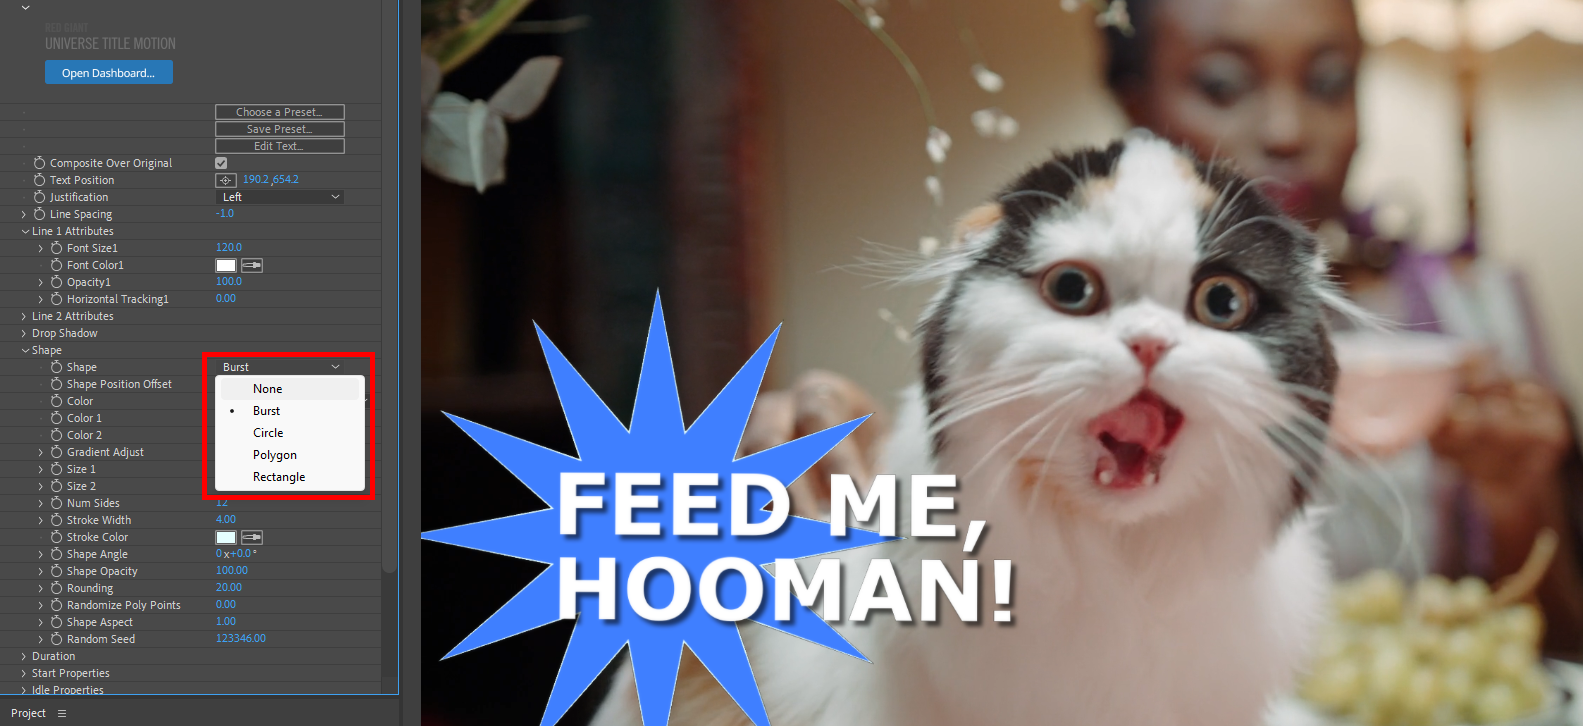
Shape
contains a drop-down menu of preset shapes to choose from. The shape will go behind your title, although you can manually separate the two. Your options are None,
Burst (shown below), Circle, Polygon, and Rectangle.
- Shape Position Offset controls the shape position relative to the text.
- Color lets you select if you'd like the shape to be in a Solid Color, Radial Gradient, Linear Gradient, or None.
- Color 1 determines the color of your text or the first color of your gradient.
- Color 2 is the color your gradient builds toward from Color 1.
- Gradient Adjust controls the position of the gradient within the shape to which it's applied.
-
Size 1/2
adjusts the x and y dimensions of your Rectangle shape. These controls exhibit different behaviors with the other shapes, and you may find the Shape Aspect control better for "squeezing" or "stretching" non-Rectangle shapes.
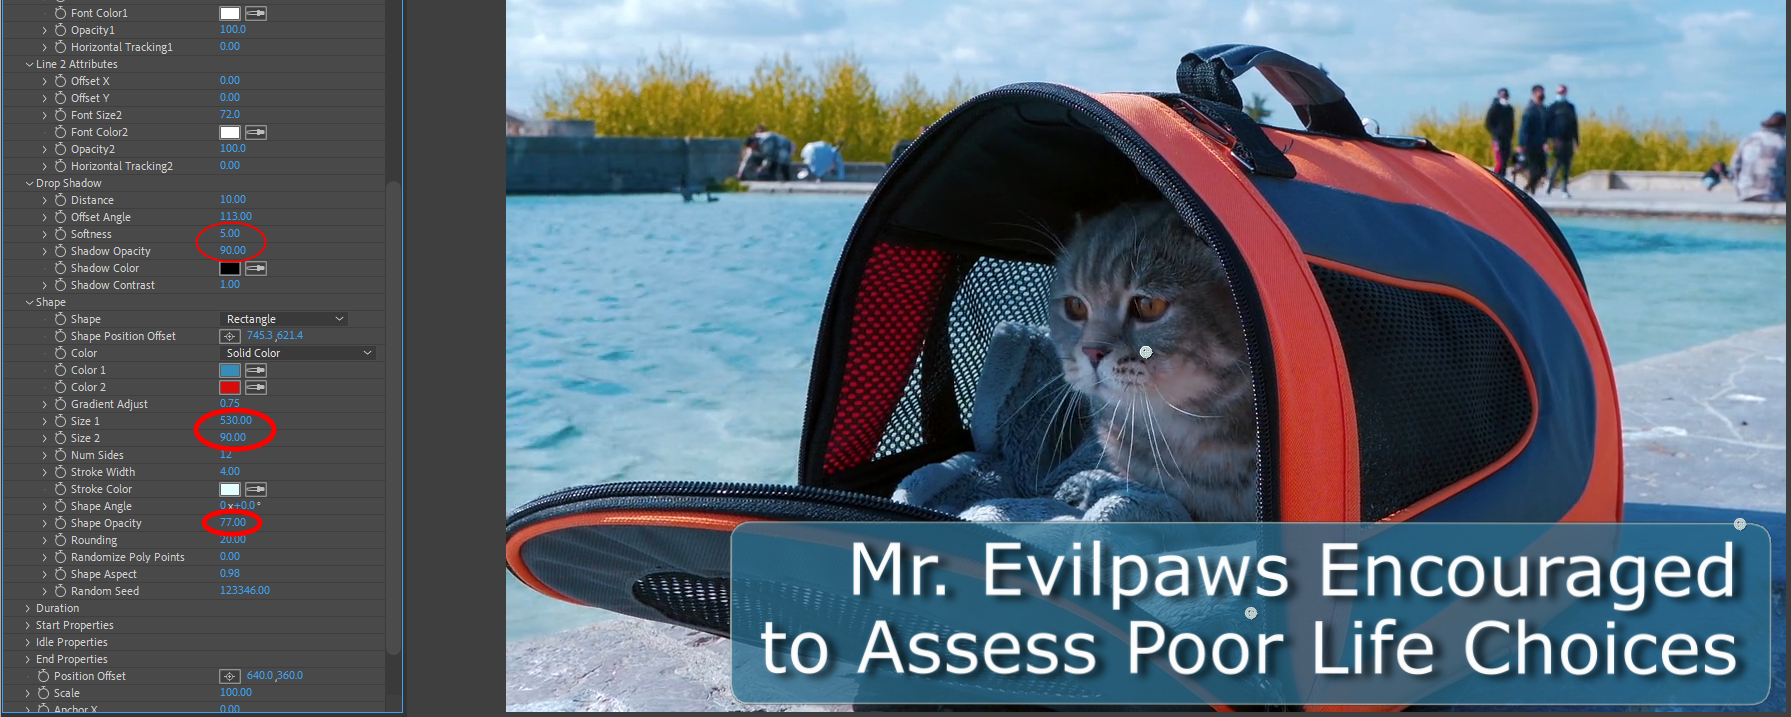
In the above image, we started with resizing the Shape to better fit our text. However, we also turned Shape Opacity (see below) down to 77 and increased the Drop Shadow Softness and Drop Shadow Opacity to compensate and make sure the text remained easily legible. -
Num Sides
primarily affects the Polygon
shape and controls how many sides the shape has.
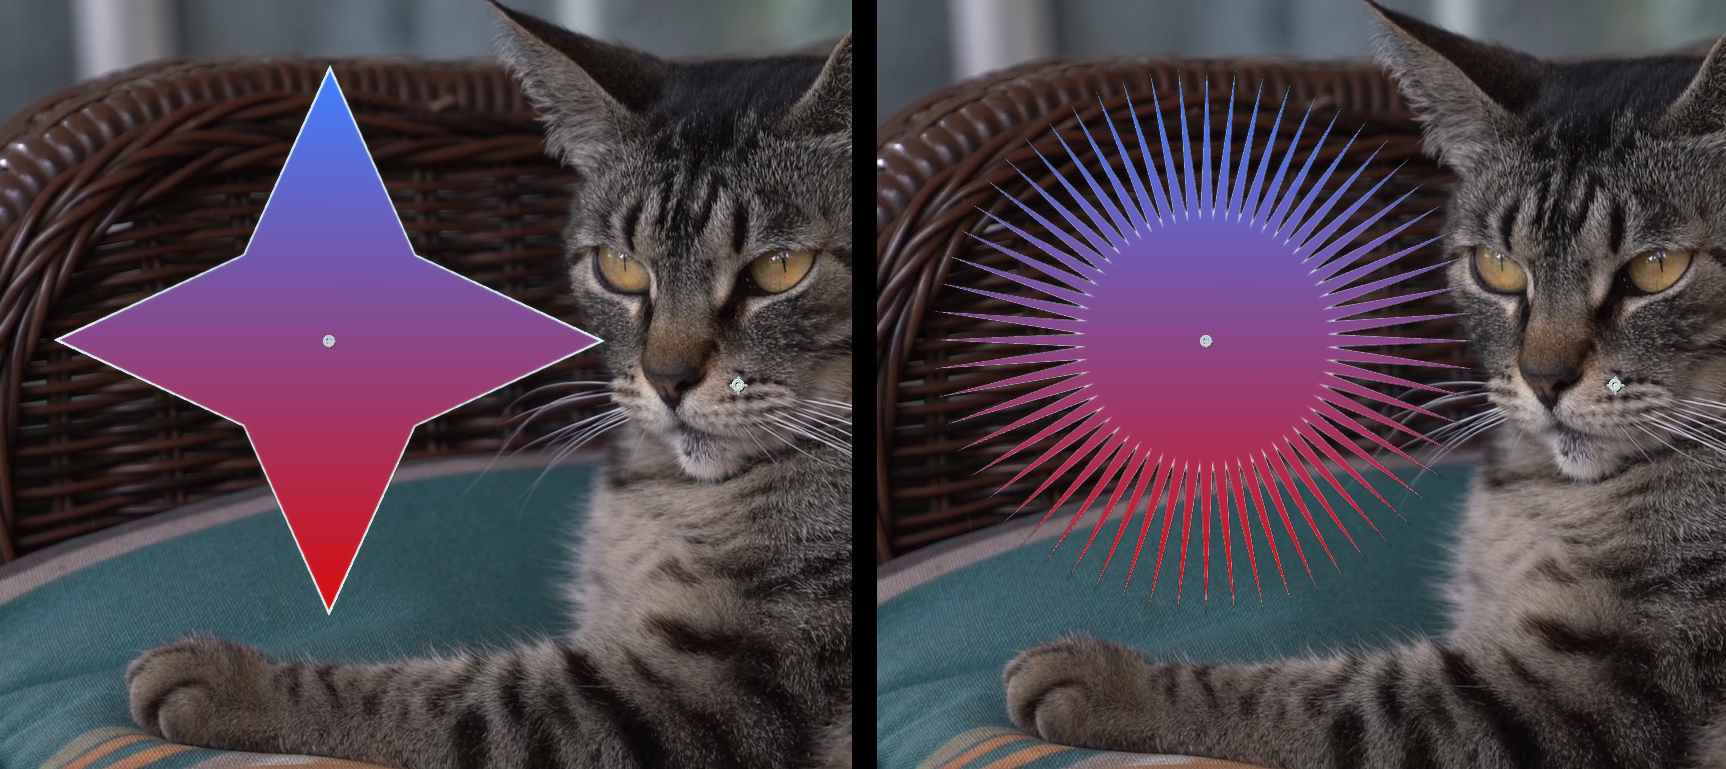
However, it can also set the number of points on a Burst form. Below, we show values of 4 (left) and 60 (right).
- Stroke Width adds an optional stroke around the shape.
-
Stroke Color
determines the color of the stroke.
In our example here, we wanted the stroke to match the cat's eye color.
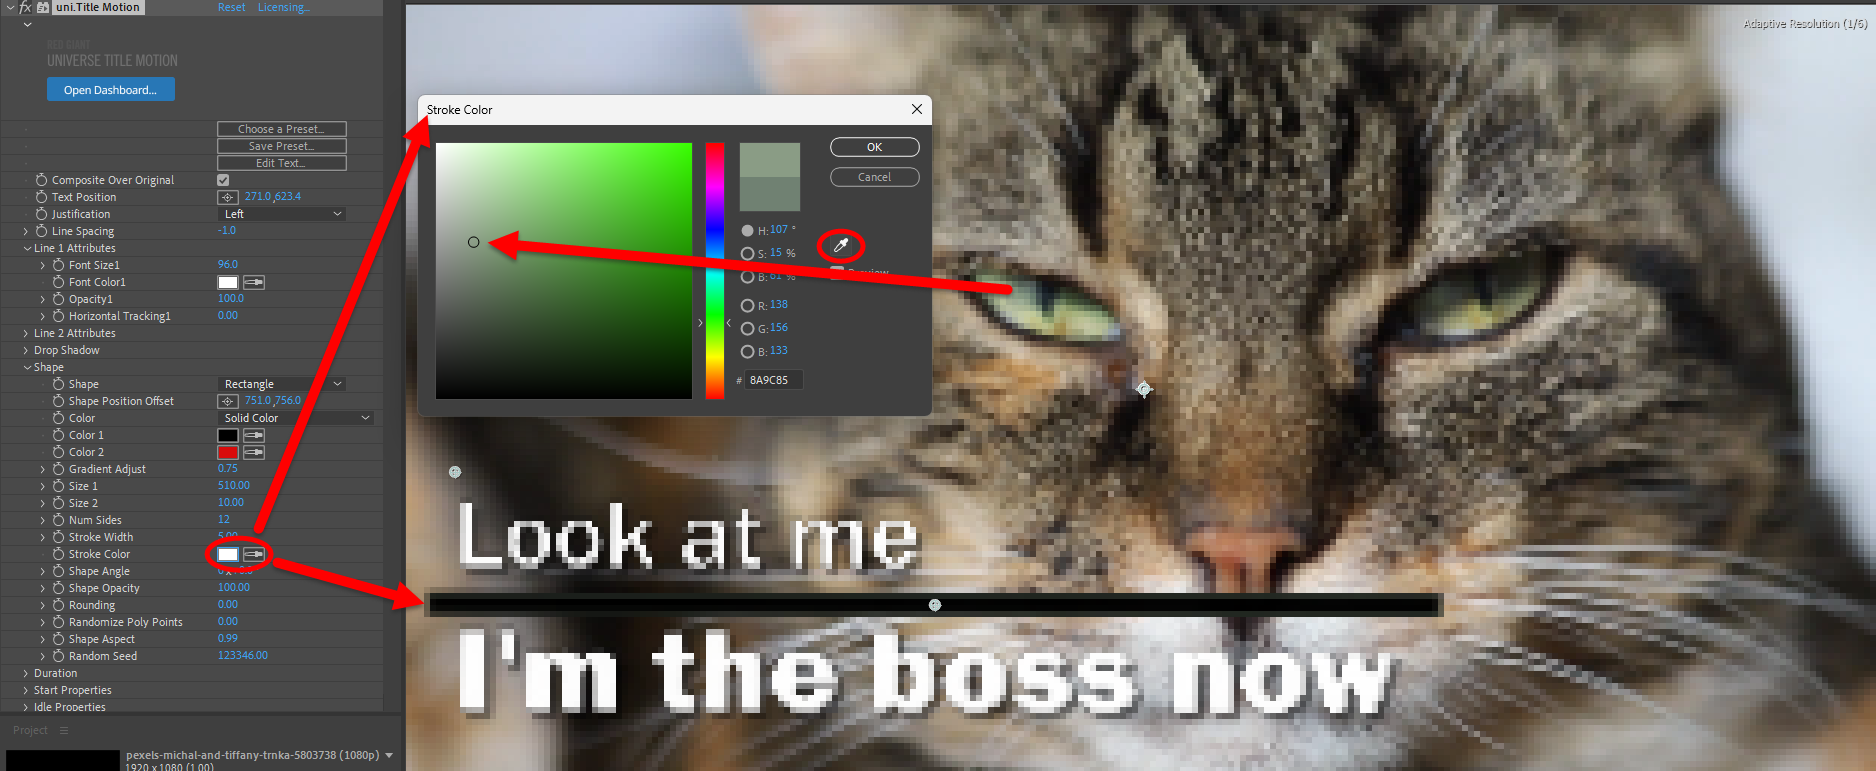
This example also shows how you can create a line (the black bar shown between our text lines) from a Rectangle shape. - Shape Angle adjusts the angle of the shape around a 360-degree rotation.
- Shape Opacity controls how transparent the shape is over its background.
- Rounding rounds the corners of a Rectangle shape. In the "I'm the boss now" image above, we changed Rounding to 0, preferring a hard-angled feel for the message.
-
Randomize Poly Points
distorts the location of the points of your Polygon
shape.
What would you possibly do with this? We're not entirely sure, but...maybe this animation from values of 1000 back to 0 on a 15-sided Polygon will spur your imagination.
-
Shape Aspect
controls the shape's x:y ratio.
Here, we animate the value from 0.10 when the title first transitions in to 3.35, which is enough for the shape to form a bar across the screen.
- Random Seed adjusts the formula used to Randomize Poly Points and thereby create different kinds of distortions.
-
Shape
contains a drop-down menu of preset shapes to choose from. The shape will go behind your title, although you can manually separate the two. Your options are None,
Burst (shown below), Circle, Polygon, and Rectangle.
-
Duration
- Transition Duration controls how long the transition of your animation lasts from off- to on-screen. (Note: This only affects the "transition in" when Use Clip Length (below) is enabled.)
- Idle Duration adjusts how long the title stays on screen between transitions. (Note: This does not work if Use Clip Length is enabled.)
- Idle Animation Speed controls how fast the animation plays during the title's idle state.
-
Match Start & End Values
lets the plugin use the Start and End positions of the clip to which it's been applied to determine when to start and stop its transition animations.
For example, we trimmed the following clip to exactly four seconds, disabled Use Clip Length, and set Transition Duration to 1.00 second. With these settings, the title's drop shadow exits the frame at 0:00:03:23, leaving about a quarter of a second with the title fully absent. Similarly, the title begins to enter the comp after only three frames and reaches its final position at exactly 0:00:01:00.
Note: Match Start & End Values may override some preset preferences. If you begin with, say, the Enter Top Exit Bottom preset, then enable Match Start & End Values, your title will exit back to the top. - Use Clip Length lets the plugin use the length of the clip to which it's been applied to determine the length of the effect's durations. Using the above clip as an example, we again used a 1.00-second Transition Duration but enabled Use Clip Length. The transition in took 23 frames. However, the exit was a bit faster, with the title having left the frame at 0:00:03:11. Use Clip Length offers a convenient shortcut for timing your title motions, but if you need precision, you might prefer disabling it and setting manual values.
-
Start Properties
- Position Start determines where the title is when the animation starts.
-
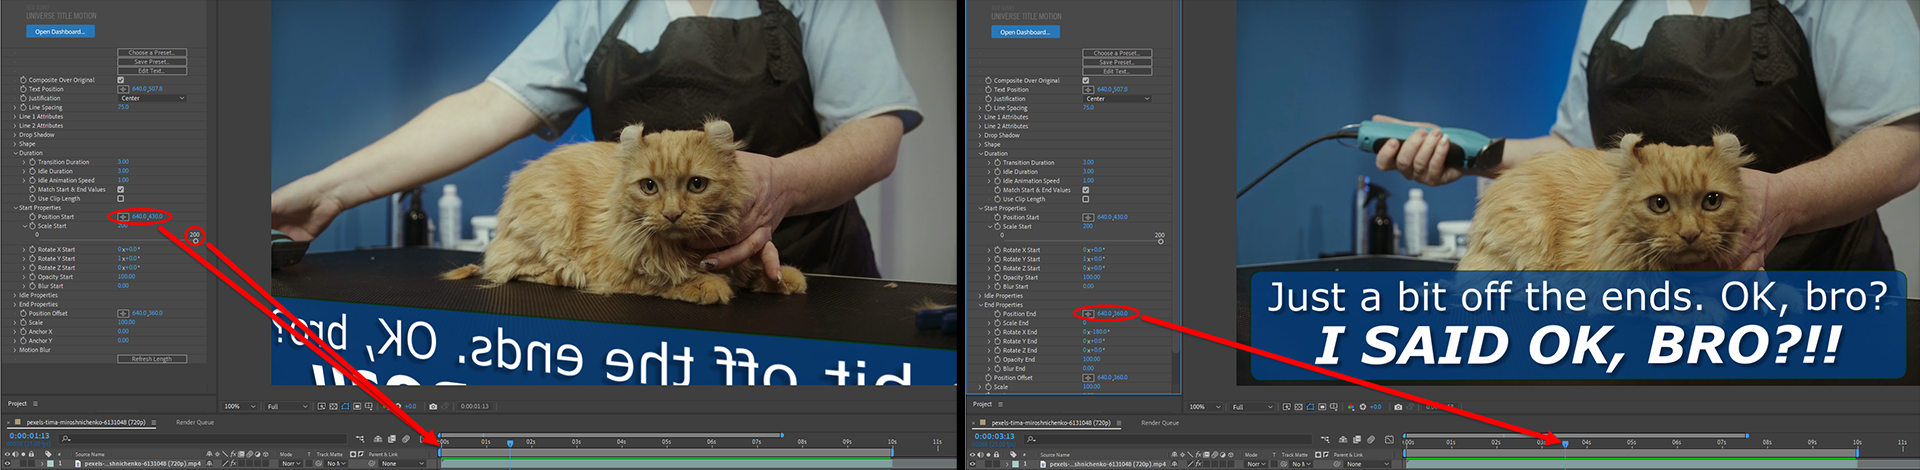
Scale Start
controls the title size at the start of the animation.
In the following example, we wanted the title to spin into view from below the bottom and to begin larger than the scene's width, then shrink into its regular size. The left image (below) shows a y-axis Position Start value of 430, which is out of view. It also has a Scale Start value of 200 (the maximum), which is why the text runs off the comp's edges. In the right image, we changed the End Properties Position Offset y value to 360, which is within view, and left the End Properties Scale at the default of 100. Title Motion automatically animates the scaling between the two values without any need for keyframing.
-
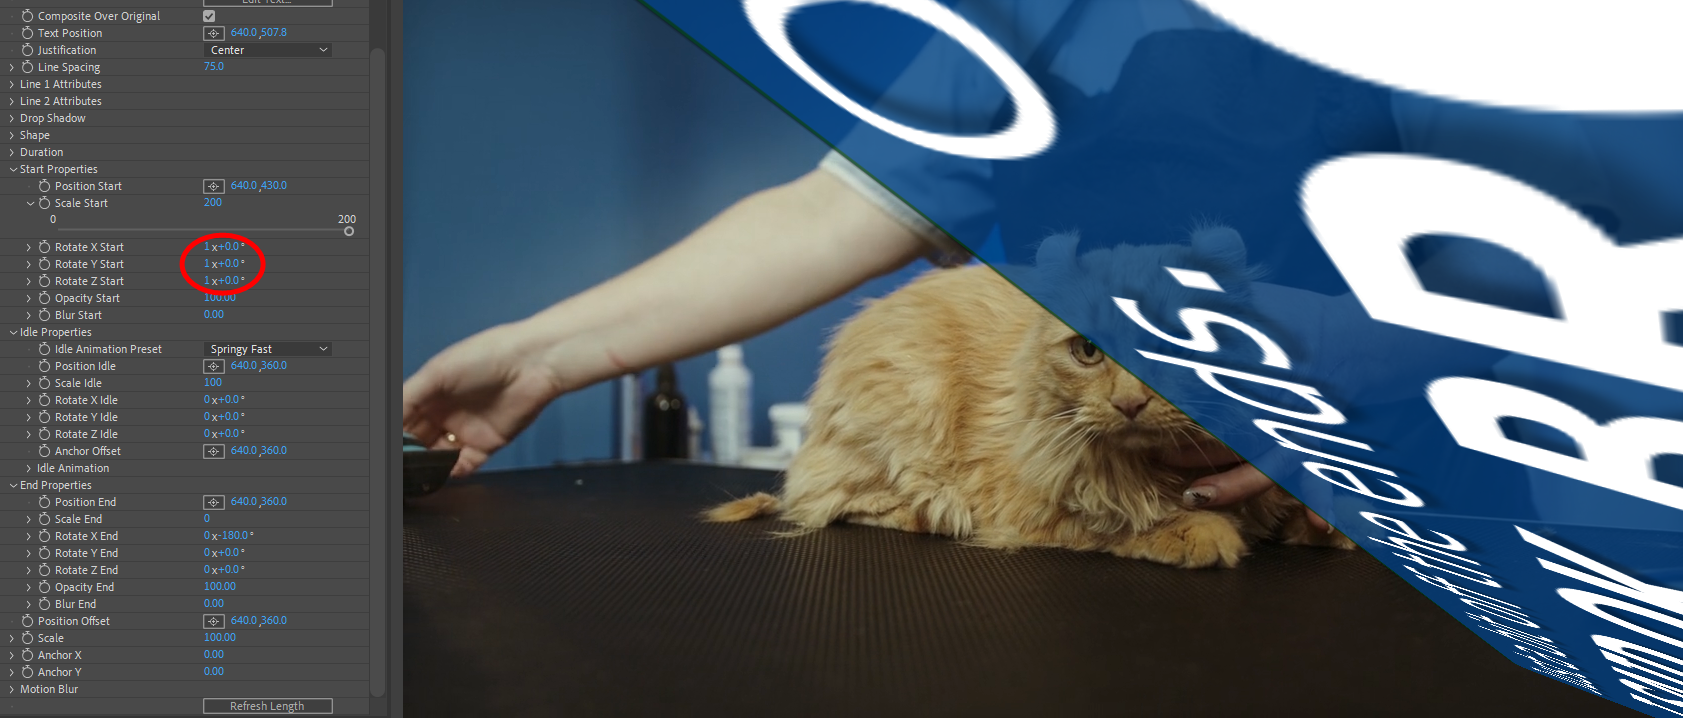
Rotate X/Y/Z Start
adjusts the rotation of the title at the start of the animation.
Friendly advice: Rotating along one axis appears predictable and pleasing to the eye. Rotating in multiple axes simultaneously, especially in a quick transition, can seem pretty chaotic.
- Opacity Start determines the title's transparency at the beginning of the animation.
- Blur Start controls how blurry the title appears at the animation's outset.
-
Idle Properties
-
Idle Animation Preset
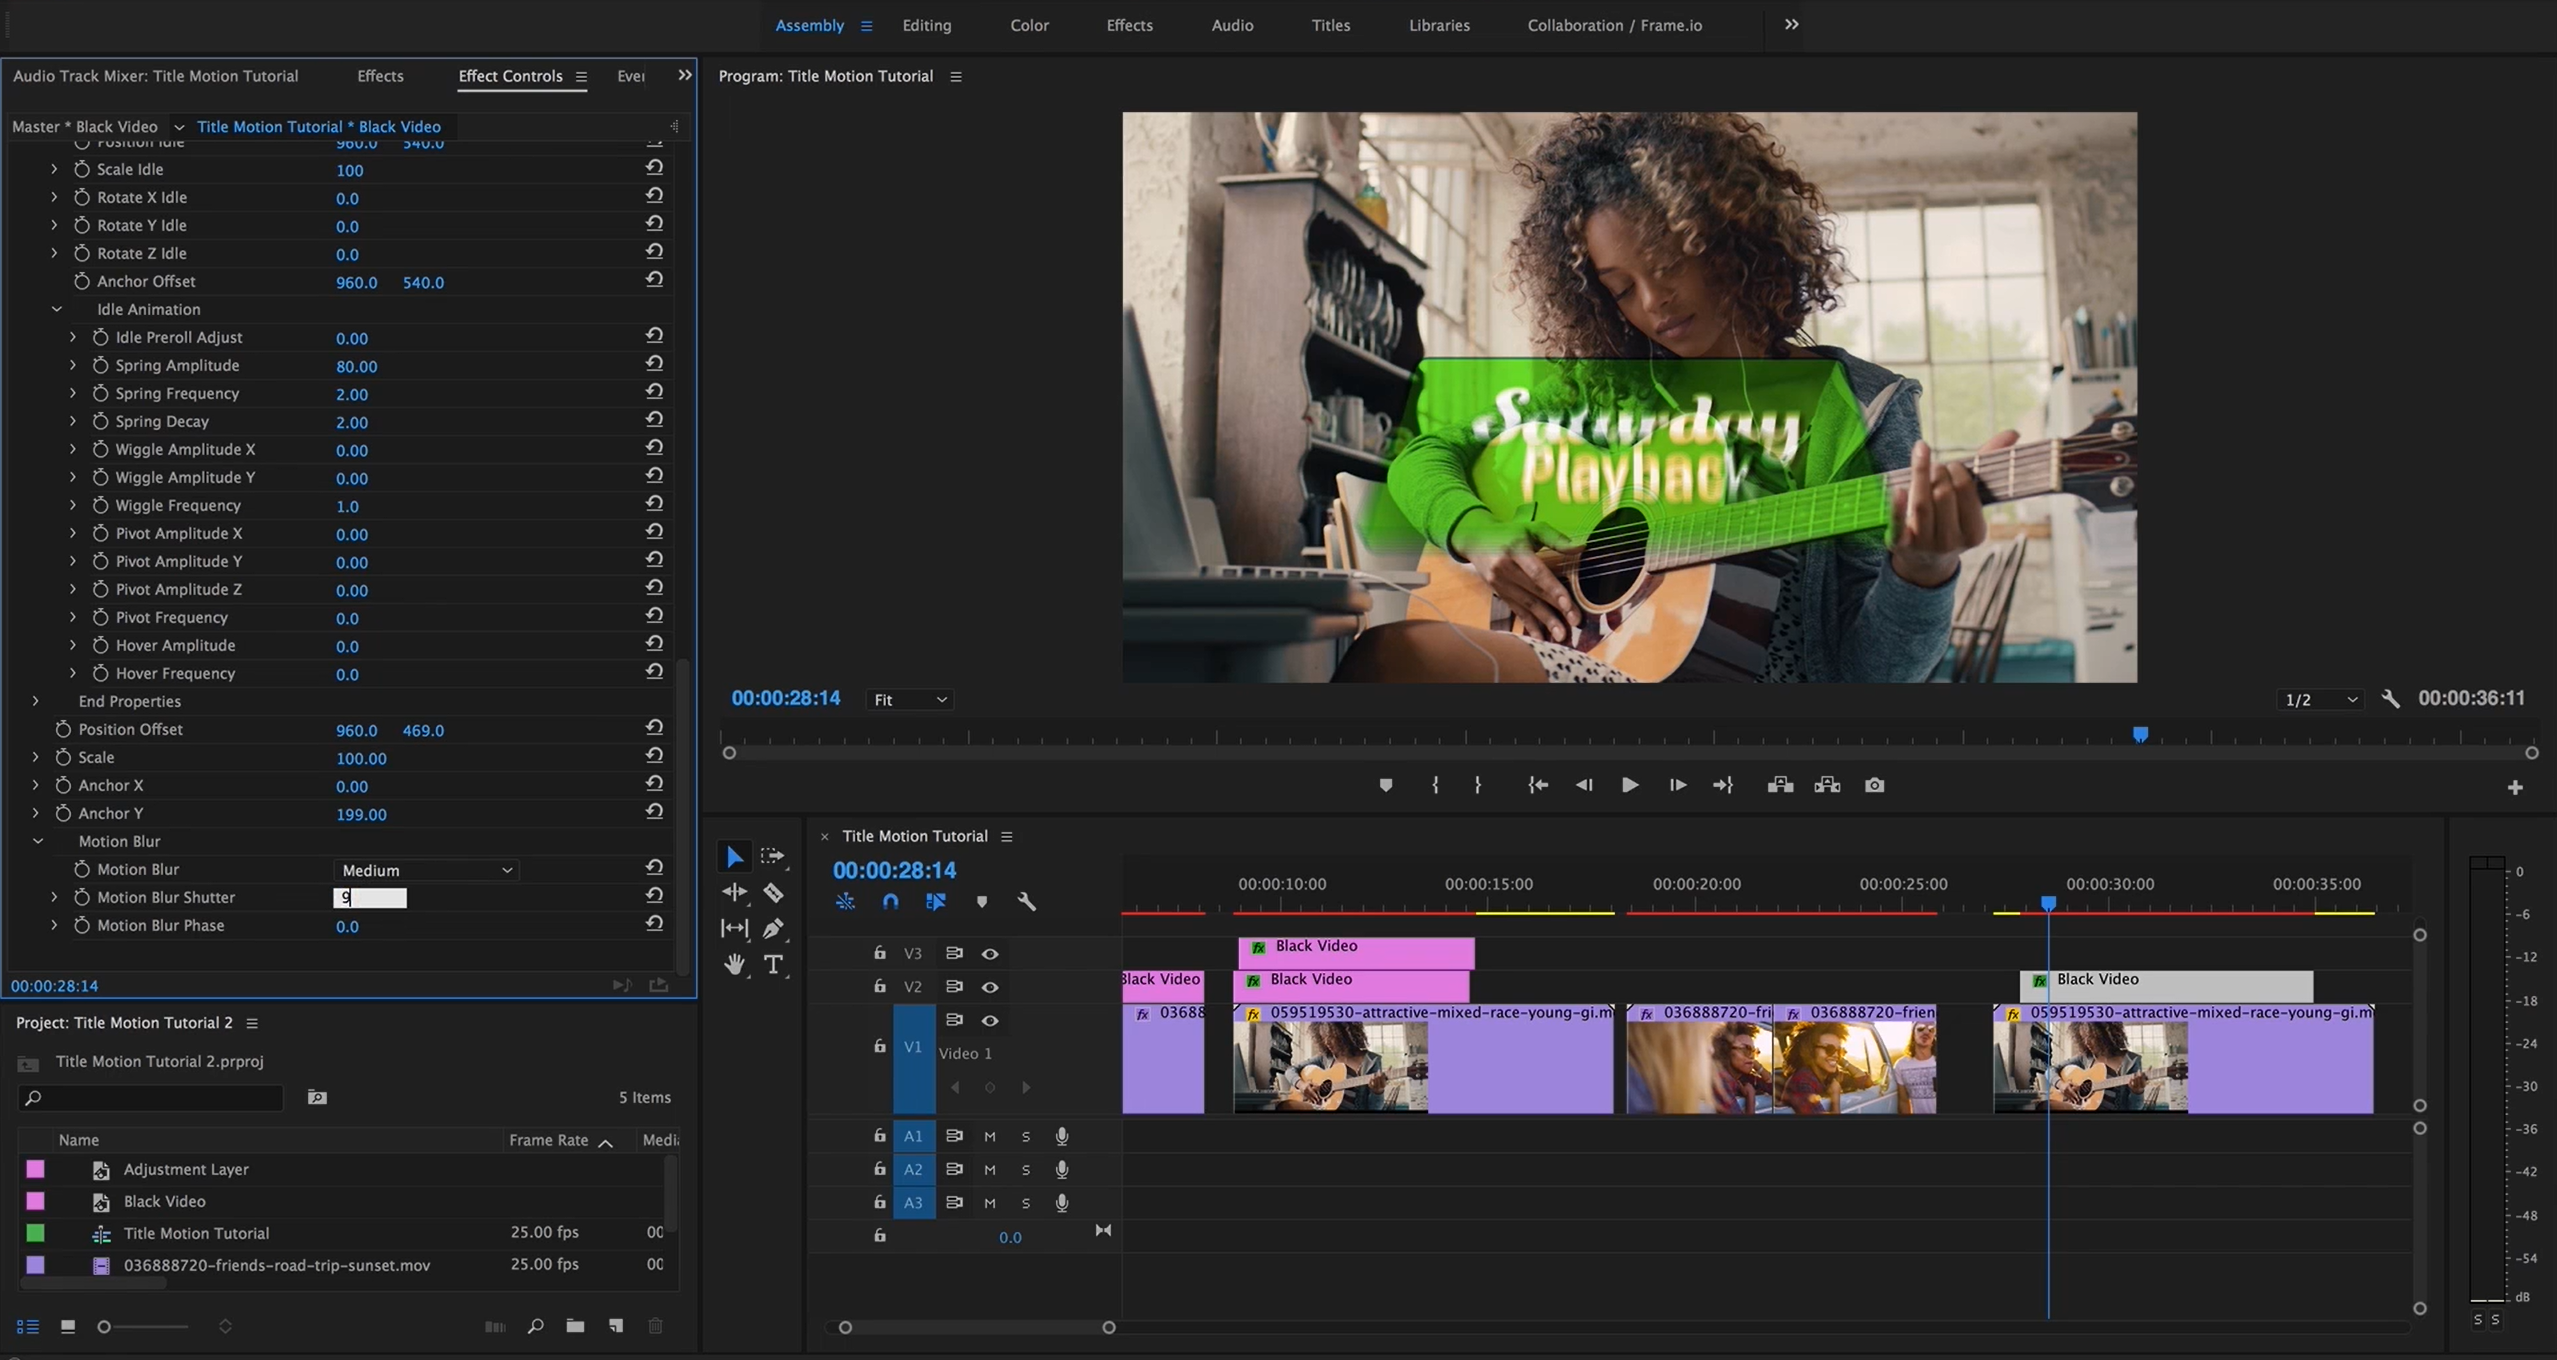
contains a drop-down list of preset animations for the title to utilize during its idle state between transitions. Options include Springy, Springy Fast (shown below), Wobble X/Y, Pivot Y, Pivot Z, and Hover.
- Position Idle determines the title's location when the animation is idle.
- Scale Idle controls the size of the title during its idle state. Default is the max value of 100. A 0 value essentially makes the title so small that it becomes invisible. A -100 value inverts the title, flipping it upside-down and mirroring it.
- Rotate X/Y/Z Idle adjusts the rotation of the title during the animation's exit transition, much like the Rotate X/Y/Z End controls.
-
Anchor Offset
controls where the title appears relative to its anchor position.
It's important to differentiate between Anchor Offset and Text Position, as shown below. Keep in mind that our title is center justified. This is why the left side of the title appears to cut off strangely. We moved the x value for Text Offset from its centered position of 640 to 350. Thus, when the text faces the viewer straight on, that's where the title meets the left edge of the comp.
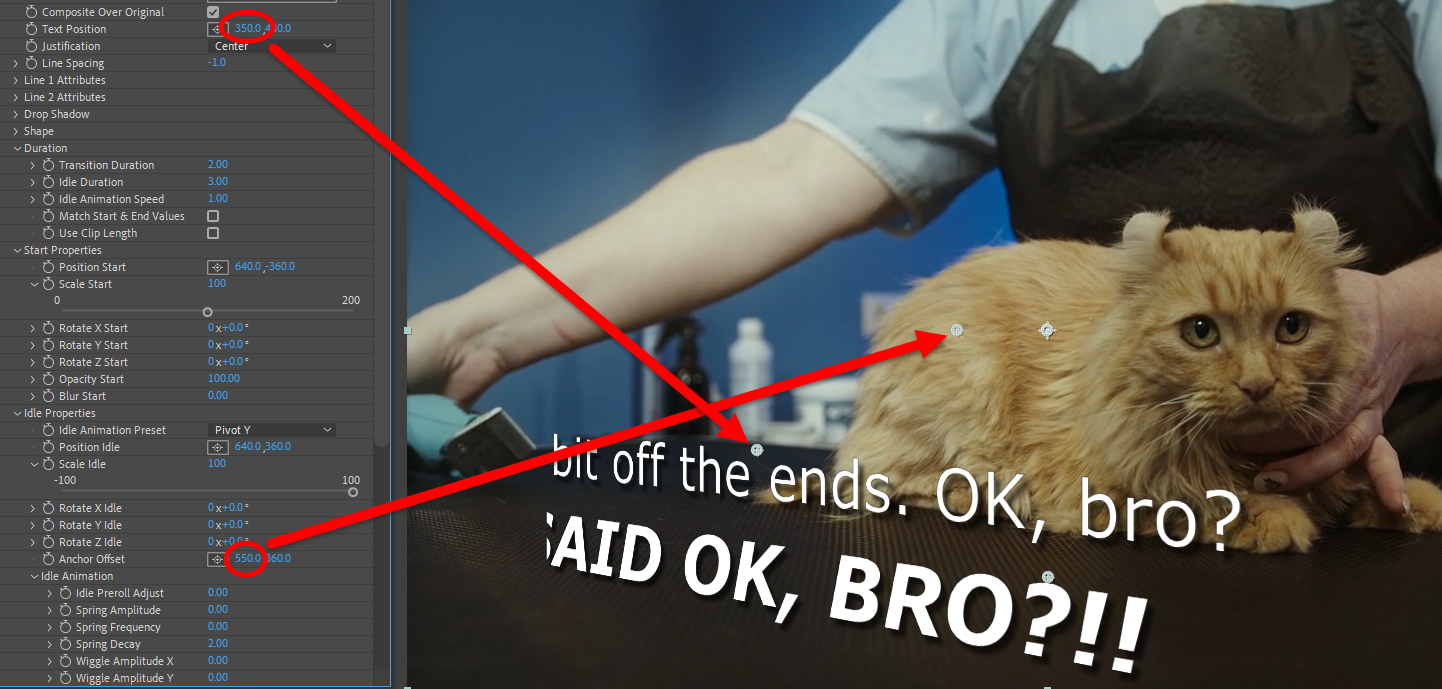
Now, let's put the Text Position x value back to 640 but scoot our Anchor Offset to 475, which is still well left of center. You can see the full title width is preserved (see below).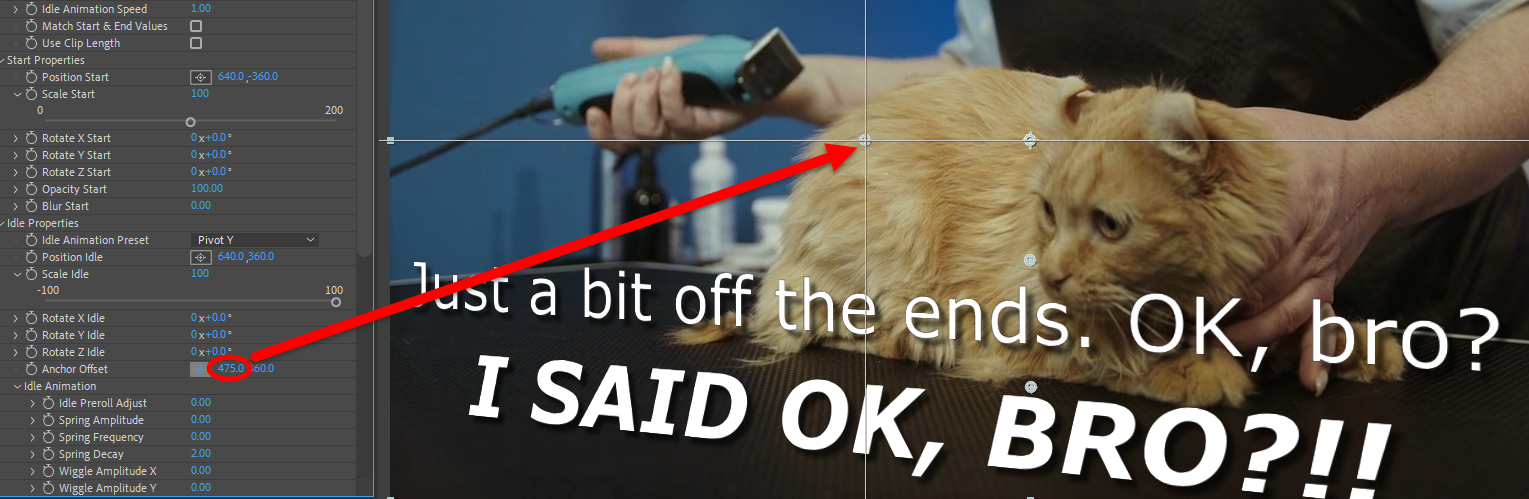
-
Idle Animation
- Idle Preroll Adjust controls how much the animation has already completed from its idle start forward. The default value is 0.
- Spring Amplitude adjusts the amplitude of the random pattern used to spring the title in its idle state. Higher values means more springiness further from the source. Lower values mean less springiness closer to the source.
- Spring Frequency adjusts how frequently the springy animation occurs within its given duration. Take a close look at the Springy and Springy Fast presets and you'll notice that they have values of Spring Amplitude: 35 and Spring Frequency: 1.5 versus Spring Amplitude: 50 and Spring Frequency: 2, respectively. The higher values are what make the preset "fast."
-
Spring Decay
controls how much tapering occurs during the spring animation.
The following clip begins with a value of 3, which almost immediately stills our applied "Springy" idle animation. After the scene cut, we drop the value to 0.5, resulting in the very springy idle action.
- Wiggle Amplitude X/Y controls how much wiggling (or "wobbling," if you go by the preset name) occurs among the x and y axes.
- Wiggle Frequency adjusts how frequently wiggling occurs within its given duration. Not surprisingly, near-maximum values may make text difficult to follow and read.
- Pivot Amplitude X/Y/Z adjusts the amplitude of pivoting on a given axis. Higher values mean more pivoting farther from the source. Lower values mean less pivoting.
- Pivot Frequency controls how frequently pivoting occurs within the given duration.
- Hover Amplitude determines how amplified the hovering animation is within the idle state. Higher values mean more extreme hovering. Lower numbers mean less extreme hovering.
- Hover Frequency controls how rapidly the hovering animation animates within its given duration.
-
Idle Animation Preset
contains a drop-down list of preset animations for the title to utilize during its idle state between transitions. Options include Springy, Springy Fast (shown below), Wobble X/Y, Pivot Y, Pivot Z, and Hover.
-
End Properties
- Position End determines where the title is when the animation ends. Don't confuse this with where the animation finishes upon exiting. Position End really refers to the title's position upon completion of its entrance transition.
- Scale End controls the size of the title at the end of the exit animation.
- Rotate X/Y/Z End adjusts the rotation of the title at the end of the animation.
- Opacity End determines the transparency of the title at the end of the animation.
- Blur End controls how blurry the title appears at the end of the animation.
- Position Offset controls how offset the title is from its anchor point within the composition.
- Scale controls the size of the effect. Animating this can add another element of dynamism to your titles. In this example, we start with Scale at 20, then progress to 100 over the length of the Transition Duration.
- Anchor X/Y controls where the title anchor is positioned within the frame on its x or y axis.
-
Motion Blur
- Motion Blur enables whether the effect renders with motion blur set at Off, Low, Medium, or High.
- Motion Shutter controls the shutter speed for the motion blur.
- Motion Blur Phase adjusts what phase the motion blur is in, letting you adjust how blurry the effect appears.
- Refresh: In the event your effect didn't automatically update its appearance when adjusting things like Duration, click Refresh Length to refresh the effect and update the current frame.