
Object Manager

Overview
The Object Manager lists all objects in the scene and allows you to create custom object groups. In addition, further properties—such as visibility or layer affiliation—are displayed next to the listed object names. Finally, a large section is dedicated to tags. These refer to additional data and properties, such as assigned materials, UV coordinates, or saved selections. Let’s take a look at Figure 1 below for context.
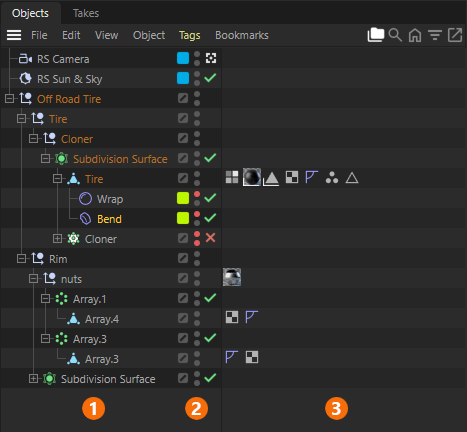
The Object Manager can be divided into three sections:
1The objects are listed here with their icons and names. You can rename them individually by double-clicking their names. You can also create groups by dragging and dropping one object onto another. Small + or - symbols then appear in front of the objects, allowing you to collapse or expand the object hierarchy below that object (you can also use). You can also drag objects out of groups again. When dragging an object entry in the Object Manager, indicators on the mouse pointer show whether the object will be used as a child to another object when the mouse button is released (the mouse pointer displays a downward-pointing arrow) or placed on the same level as adjacent objects (the mouse pointer displays a leftward-pointing arrow). In addition, a horizontal line indicates the new position of the dragged object within the Object Manager hierarchy.
Grouping objects is not only helpful for improving the readability of a scene in the Object Manager, but is also sometimes necessary when working with Generators or Deformers, for example.
Clicking on an object entry in the list selects that object, and its name is displayed in a bold orange color. All parent objects in the same hierarchy are displayed in a darker shade of orange.
In addition, you can hold down the CTRL key while dragging an object. When you release the left mouse button at the destination of the dragged object, an independent copy is created. If an object is duplicated in this way and there are other objects grouped beneath it, the entire group is duplicated. Otherwise, you can, of course, use the standard keyboard shortcuts to perform the classic copy-and-paste operation on selected elements.
Elements are selected by clicking with the mouse, dragging a selection rectangle (an additive selection is made when the Shift key is also pressed) or using the arrow keys if a selection already exists.
The following keyboard shortcuts apply when clicking on an object in a hierarchy:
- Middle mouse button: The clicked object including all sub-objects is selected.
- Alt + middle mouse button: The clicked object including all objects in the same hierarchy level are selected. Child-objects are excluded.
Multiple selection is of course possible in several ways. These are the primary methods:
- Drag a selection frame with the mouse (holding down the left mouse button in the Object Manager).
- Click on an element and, holding down the Shift key, click on another element. This and all elements in between are selected.
- Press the Up and Down arrow keys while holding down the Shift key.
- With some commands from the Edit menu of the Object Manager.
- Elements can be inverted in their selection status by holding the Ctrl/Cmd key and clicking on them.
2To the right of the list of objects is a column that displays up to three icons per object. It starts with a rectangular area that is gray by default. Clicking on it adds the object to a new layer or to a layer that may already exist. Layers are useful for grouping objects that are part of different hierarchies. The separate Layer Manager allows you to name and assign individual colors to the defined layers, as well as assign properties to the objects on a layer. For example, with a single click, you can make all objects on a layer invisible for the viewport or rendering.
To the right of this, you’ll find two gray dots stacked one above the other, which can be toggled separately by clicking on them. The top dot controls the object’s visibility in the viewport, while the bottom dot controls its visibility during rendering. You’ll also find the same options in the Basic tab of the Attribute Manager when you select an object. A red dot indicates “Invisible,” and a green dot indicates “Visible.” A gray dot means that the visibility setting of the parent object is inherited. Thus, for the top-level object in a hierarchy, you can click the top dot twice to change it to red, thereby making that object invisible in the viewport. All objects grouped under them that display a gray dot at the top automatically adopt this setting.
Finally, a green checkmark may appear next to so-called generators, indicating that the generator is active. Clicking on it turns the generator off, and a red x appears. This allows you, for example, to temporarily disable the function of a Subdivision Surface or Cloner object.
3The third column of the Object Manager is reserved for tags. Tags perform various functions for objects and for Cinema 4D. For example, a Material tag is automatically created for an object when you drag a material from the Material Manager onto the entry in the Object Manager or directly onto the object in the viewport. This tag then establishes the connection between the object and the material and also provides projection settings. Other tags are created when, for example, you use the Store Selection... command in the menu to save a point, edge, or polygon selection on an object.
This can result in a large number of tags per object. The Object Manager therefore also offers an option to automatically group tags of the same type. You’ll find a folder icon in the header of the Object Manager that allows you to switch between a grouped view of the tags and a list of all tags. The following section explains this in more detail.
Tag Grouping
Tags serve various purposes for objects and are typically displayed as icons after the object name in the Object Manager. For example, saved selections of points, edges, or polygons ( > Store Selection...), as well as Vertex Maps ( > Set Vertex Weight...) and material assignments and UV coordinates, are managed using these tags.
Depending on the complexity of a task, many such tags can be applied to individual objects, which may make it difficult to quickly find the right tag. This is because many tags not only store information but also offer their own functions and settings in the Attribute Manager. In such cases, it can therefore be helpful to group tags together and to use the filter settings to control their visibility. To do this, look for the folder icon in the header of the Object Manager.

The figure above highlights the most important elements:
1, 2, 3: Here you can see various tag types behind an Extrude object. It starts with a Phong tag, followed by five Polygon Selection tags, and finally five Material tags.
4: The folder icon is located in the header of the Object Manager. When you click it, all tags of the same type are automatically grouped together. You can return to the default view of all individual tags at any time by clicking the folder icon again.
5: You can already see the result here. Tags of the same type, which were previously displayed separately, now appear grouped together as a single tag. White lines on the left and bottom edges of the tag icon indicate that this is a group of multiple tags. This can be seen with the Selection and Material tags. Since the Phong tag can only appear once per object, it remains unchanged as a single tag.
By the way: You can also use drag-and-drop to move a tag group’s icon to a different position behind the object. This allows you, for example, to first group tags that were previously scattered behind an object, then move them to a position in front of it, and finally ungroup them.
6: To find out how many tags have been grouped together in each group, simply hover your mouse pointer over the corresponding icon. A number appears in the tag icon, indicating the number of grouped tags. In our case, there are 5 Material tags.
So now we've learned how to group multiple tags of the same type in a convenient and space-saving way. But how can we still select individual tags within a group to access their settings? There are two options available for this, as shown in the following figure.

1: This first option is useful for custom-named tags or selection tags, since their contents are already displayed as a preview in the viewport when you hover over them with the mouse pointer. Clicking on a tag group expands a list of the elements it contains. In this list, you can select tags directly by clicking on them without having to expand the group.
If you want to select multiple tags from this list at the same time, simply hold down the Ctrl key while clicking. The names of selected tags are highlighted in color. You can also double-click on tags in the list. This performs the same function as double-clicking on an ungrouped tag. For Selection tags, this will, for example, directly select the selection stored in the tag; for Material tags, the Start Node of the material is activated, and its settings can be edited directly in the Attribute Manager.
2: The second option involves using the filter in the Object Manager, which must be opened separately. Clicking the filter button in the header of the Object Manager opens the filter list, which also includes an entry for tags. When this group is expanded, the tag types present in the scene are listed, along with a white group icon next to them if the tags are grouped.
3: When you click on one of these white folder icons, it changes to a gray icon. This makes all the elements in that group visible separately again in the Object Manager (see also step 4).
4: After deactivating the filter group, you can access the individual tags in the Object Manager as usual. The remaining tag groups for the other tag types remain unchanged. By clicking the gray folder icon in the filter list (see 3), you can regroup this tag group at any time if you no longer need to view the tags individually.
Tag Preview
Some tag types can appear multiple times on objects, such as Vertex Map or Selection tags. Even when unique names are used for such tags, it can still be cumbersome to find the specific tag you need based solely on its name. Starting with Cinema 4D 2027, there is therefore a new preview option for grouped tags that is enabled by default and provides a preview of the data stored in the tag directly in the viewport as soon as you hover over the tag in a group with the mouse.

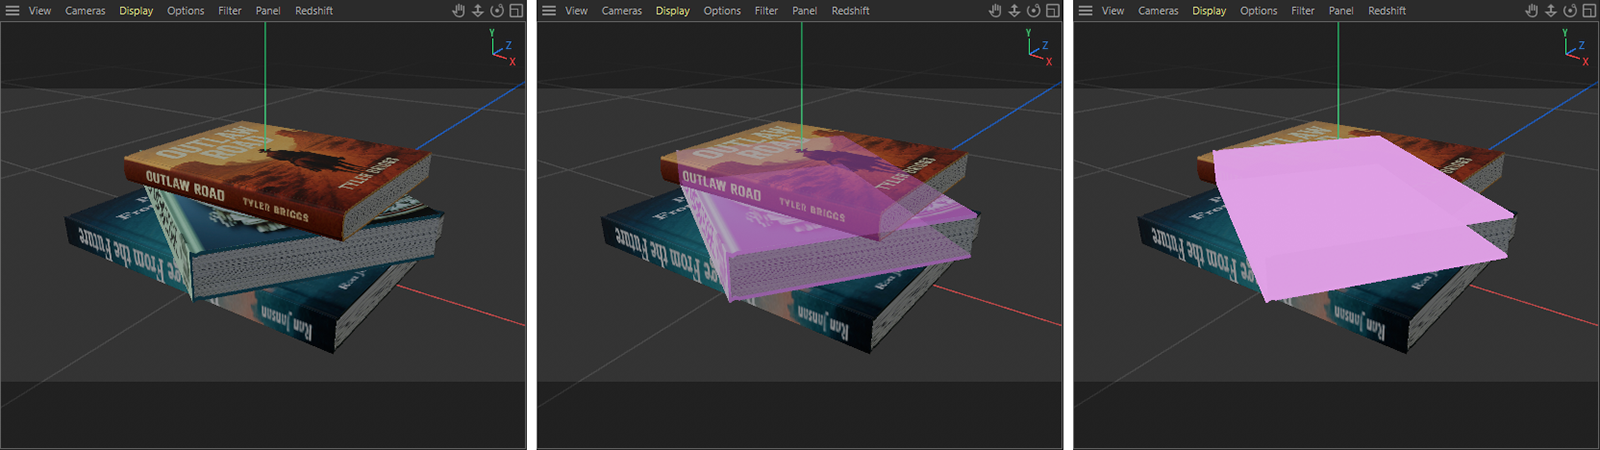
As shown in the figure above, this even works for parametric tags, such as those used by fields or generators. In our example, various polygon selections were automatically generated by an Extrude object and displayed as a group by clicking the group icon in the header of the Object Manager. Clicking on the group of selection tags displays the list of tags it contains (see left side of the figure above). When you move the mouse pointer over these list entries, the selection stored in that tag is highlighted in color in the viewport (visible on the right side of the figure). The intensity of this color highlighting can be set in C4D’s under Viewport Display > Tag Highlight Visibility (see the following figure).
The following tag types are generally supported by this highlight feature:
- Polygon Selection
- Edge Selection
- Point Selection
- Vertexmaps
- Vertexcolors
The default highlight color can also be customized here: Cinema 4D > > > Hovered Component
Even if the tags have not been grouped, this Highlight feature can still be used. In that case, you simply need to select the tag by clicking on it to see a preview of the data stored within it in the viewport. As usual, a double-click on the tag is then sufficient to, for example, actually reactivate a selection stored within it on the object.
Filter Options
Complex projects can easily contain several hundred objects. It is therefore helpful to establish descriptive naming conventions for the objects, as well as a logical grouping and hierarchical structure, as early as possible. Even then, however, additional filter or search options, which can be accessed via the icons in the title bar, are still welcome. The option for grouping tags, which is also located there, has already been described here so lets continue with the other icons there.
Keep in mind that the various filter options described below can also be combined. For example, the Type filter includes magnifying glass icons that affect the results of the name search filter.
The Search Filter
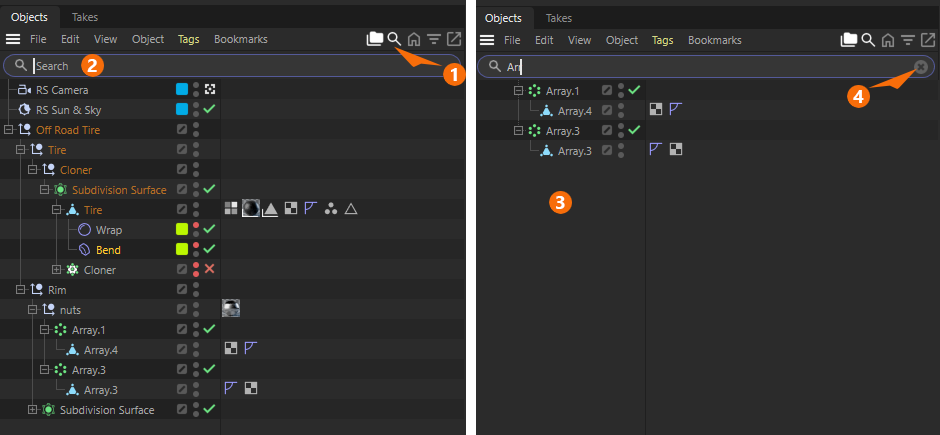
1You can use the magnifying glass icon in the header of the Object Manager to show or hide the search bar (see 2 in Figure 6).
2Click in this search bar with the mouse to place the cursor there, and then simply type the name or string you want to use to filter the objects.
3For example, in our scene, simply typing Arr causes the list to display only those objects whose names contain that string.
4To return to the unfiltered list, click the x icon on the right side of the search field or simply clear its contents. Keep in mind that the search filter remains active even when the search field is hidden using the magnifying glass icon.
The Root Filter
Clicking the Home icon in the header of the Object Manager activates an additional filtering option that allows you to display only the elements of a specific branch of the hierarchy (see Figure 7).
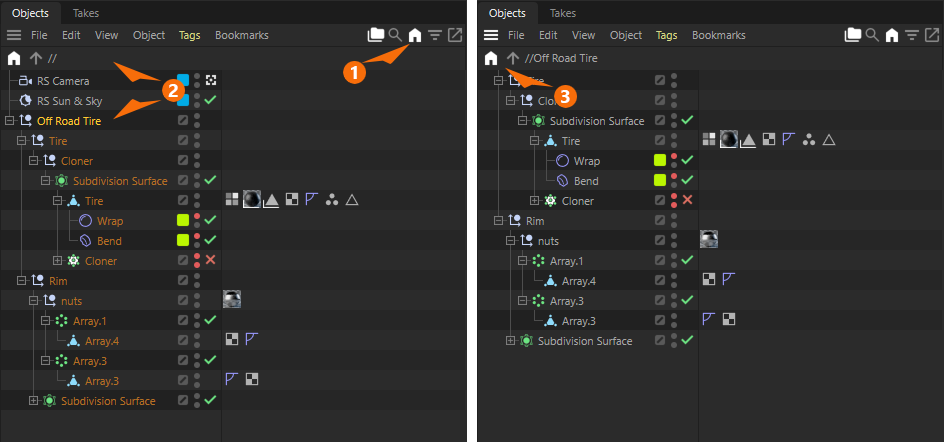
1Clicking the Home icon displays a navigation bar that works similarly to a browser's URL bar. A group assigned here can be viewed in isolation in the Object Manager list and can be expanded step by step toward its parent object.
2To limit the filtering to a specific branch of your object hierarchy, select the top-level element of that hierarchy and drag it directly into the path field (see the arrows next to 2 in Figure 7). As shown on the right in Figure 7, only the children of this root object are now displayed. You can adjust the filter level using the icons to the left of the root field.
3Slashes in the path indicate the depth of the currently displayed object segment within the hierarchy. By clicking the upward-pointing arrow, you can display one additional hierarchy level at a time until you reach the double slash in the path, which corresponds to the top-level hierarchy in the Object Manager and thus displays all elements again. As a shortcut, you can also click directly on the Home icon to the left of the root path. This always takes you back to the top level of the hierarchy immediately.
Please note that filtering by hierarchy levels remains active even if the path bar is hidden using the Home icon in the Object Manager header. To view all elements in the scene, the path bar must therefore be empty. If in doubt, also check the other filter options, such as filtering by type or by name.
The Type Filter
Clicking the List icon in the header of the Object Manager activates an additional filtering option that allows you to display only the elements of a specific type (see 1 in Figure 8).
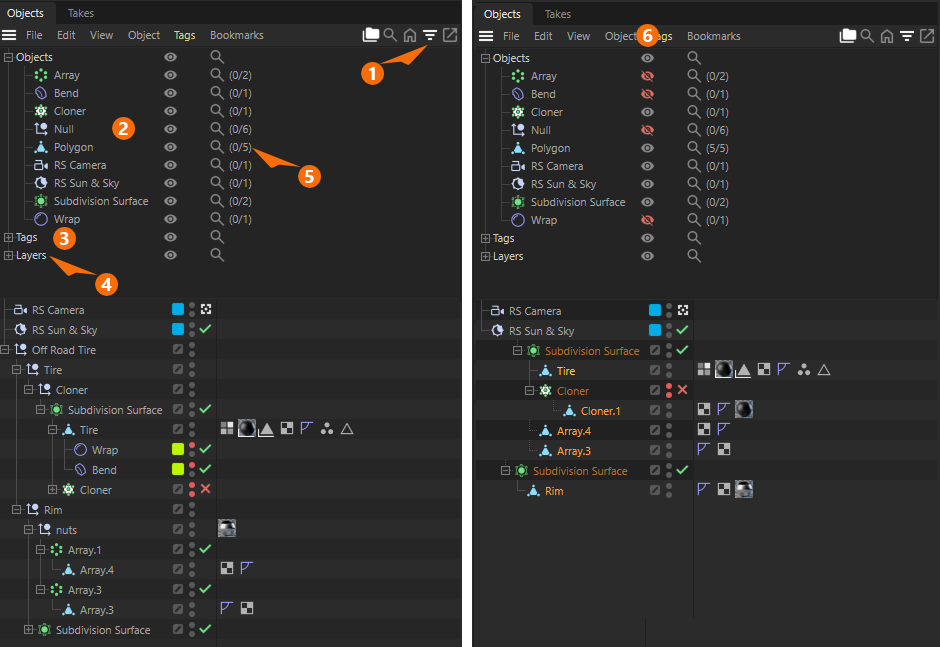
1Clicking the List icon opens an additional panel above the object list, displaying the categories Objects (see 2), Tags (see 3), and Layers (see 4). Expanding these categories provides an overview of all elements of the corresponding type in the scene. Depending on how many different object types are used, this list may be longer or shorter. Double-clicking on one of the entries automatically selects all objects of that type. This is very handy, for example, when you want to apply a uniform subdivision setting to all Subdivision Surface objects in the scene for rendering. Finally, the Attribute Manager can also display the values for multiple selected elements of the same type and allow you to edit them.
5In the right-hand column, behind each entry, you'll find numerical values. The first value indicates how many of these objects are currently selected. The second value indicates the total number of these elements in the scene. The display (0/5) behind the entry for polygon objects therefore indicates that there are 5 of these objects in the scene, but none of them are currently selected.
The magnifying glass icons next to this display allow you to exclude certain object types from a name search. Simply click the corresponding magnifying glass icon next to the object type to exclude it.
6Finally, there are also the classic eye icons, which can be used to show or hide individual element types or even entire groups of elements in the Object Manager.
Reordering the object/tag sequence
Drag an object/tag between two existing objects/tags or to the end of the list. The dragged object/tag is moved to this position. The mouse pointer changes to the following symbol:

If you want to create a copy, hold down the Ctrl/Cmd key while moving the element. The mouse pointer changes to the following symbol:

The insertion position is indicated in advance by a line.
Changing the object hierarchy
Move an object on top of an existing one. The object being held now becomes a child of the other object. The mouse pointer changes to the following symbol:

If you want to create a copy, hold down the Ctrl/Cmd key while dragging. The mouse pointer changes to the following symbol:

Drag & drop can also be used on the right-hand side of the Object Manager. To assign a tag to another object, move the relevant property symbol into the row of the other object. The mouse pointer changes to the following symbol:

If you want to create a copy, hold down the Ctrl/Cmd key while sliding. The mouse pointer changes to the following symbol:

The future parent object is displayed in advance in the list with a colored background. If an action is not possible, a prohibition sign appears:

Shortcuts when working in the Object Manager
New object creation
Note the following buttons when creating a new object (this also works with an existing multi-selection, several new objects are then created accordingly):
- Shift: Object is inserted as a Child object of the active object. In the case of multiple selection of sub- and super-objects, only 1 object (intended for deformers) is created. This can be used, for example, to assign a deformer to each object with the same position for complex object selections.
- Shift + Alt: Like Shift, except that the newly created object is subordinated to EVERY selected object.
- Alt: Object is inserted as a parent object of the active object.
- Alt + Ctrl/Cmd: similar to the command
 Group Objects, except that any object is used as the parent object instead of the null object.
 - Ctrl/Cmd: Object is arranged on the same hierarchy level as the active object (behind it).
- Ctrl/Cmd + Shift: Object is arranged on the same hierarchy level as the active object (before it).
Other functionalities
Alt + Shift click on green tick/red cross: deactivates/activates the object and all its sub-objects. This allows you, for example, to switch all generators/deformers in a hierarchy on and off at lightning speed.