
Edit
Edit</menu> menu also work with Motion Clips.
Edit

Selected keys will be cut and copied to the clipboard. You can select one or multiple objects and use the Cut command to cut the keyframes of the tracks directly. Note that the tracks themselves will not be cut or removed, only their keyframes. You can also select specific keyframes if you do not want to cut and copy the whole track.

Keys will be copied from the clipboard and pasted at the desired location. The behavior is similar to the Cut command. You can copy tracks by selecting either the tracks themselves, or the objects directly.

Keyframes or tracks will be pasted using the following behaviors:
When adding a complete Track (incl. its keyframes), the Track will be placed at the current position in the Timeline. No track needs to exist prior to the paste command being used, it will create tracks automatically. If the tracks of a hierarchy of objects has been copied previously, you can paste the copied tracks onto a similar hierarchy of objects, as long as the hierarchies match (i.e: copying tracks from 3 nested cubes to 3 equally nested spheres, for example).
When pasting individual keyframes, a track needs to be present first, and this track needs to be of the same type than the keyframes copied (a Position track is needed to paste Position keyframes). The keyframes will be pasted at the current position of the playhead. If multiple objects keyframes have been previously copied, all the keyframes will be pasted based on the same hierarchy order, and all keyframes will be pasted at the playhead position. You can adjust keyframe positions afterwards, if needed.
Make sure you only paste keyframes of the same types. For example, keyframes cut or copied from a sphere's radius track cannot be pasted onto a sphere's scale track.

Works as described in the first point of the previous Paste setting only that the copied Track is not pasted at the Timeslider position but at the original point at which it was copied. This command is not designed for use with keyframes.

Selected keys/Motion Clips will be deleted.
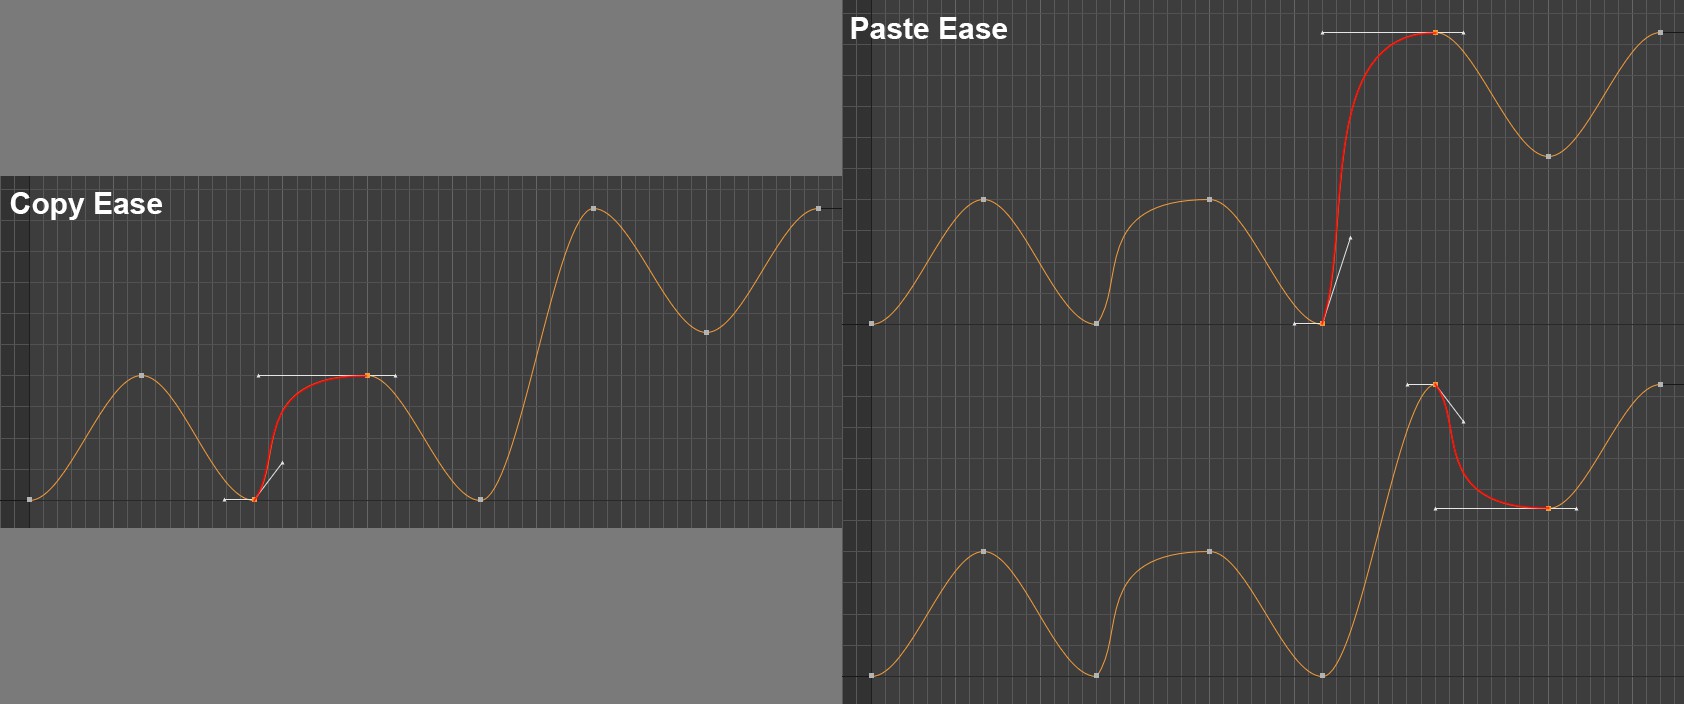 On the left is the initial state before Copy Ease is executed; on the right 2 different selections, each after Ease Paste was executed.
With these commands you can copy the F-Curve characteristics from multiple selected keyframes to the keyframes of another keyframe selection. The left tangent of the first and the right tangent of the lastly selected keyframes remain unchanged. In other words: nothing will change on the F-Curve outside of the selection.
Keyframe tangents will be adapted within the selection in order to maintain the curve's characteristics. This can be seen in the image above at each of the first selected keyframes: the left tangent remains unchanged while the right tangent has different lengths and directions.
If, after copying, you select more keyframes than in the original selection, tangent values will be looped - starting from the beginning - when added. This means, among other things, if you only copy the tangents of a single keyframe and then select 10 additional keyframes before executing the Ease Paste command, all 10 keyframes will be assigned the tangent values of the single keyframe originally selected.
There is an exception to the functionality just described: If you copy the tangents with a single keyframe selected, both tangents will be copied and both will be pasted when a single keyframe is selected.
Selection
Selects all items in the Objects Area of the Timeline. This is practical if you want to display all F-Curves in F-Curve mode.

All keys will be selected.

Inverts selections of objects, materials, shaders, tags, render settings and post effects. In order to invert a selection at least one of the aforementioned items must already be selected.

Deselects all keys in the respective view.
Inverts a key selection (i.e. keys that are selected will be deselected and those that were not selected will be selected).
This option applies only to visible (not hidden) keys in F-Curve mode.

Use this setting to select all keys within a specific time range within the animation. Define the From Time and To Time in the dialog window that opens. The Only Selected setting ensures that only selected tracks will be affected. Select Range can also be used to temporally restrict an existing keyframe selection.
Marker

Sets markers at both the left and right borders of the visible Timeline.

Sets a marker at the current frame, i.e., where the Timeslider is currently located.

Deletes all existing markers.

Sets markers on the first and last keys of a given selection. When in F-Curve mode, only the currently visible key selection will receive markers. Selected keys of hidden curves will be ignored.
Layer

A new layer will be created into which all selected objects will be placed.

All selected items will be removed from assigned layers. These items will no longer be assigned to any layer(s).
Selecting this option will open a sub-menu in which all layers, including colors, will be made available for selection. Selecting a layer from this menu will select all items on that particular layer.
Opens the Layer Manager

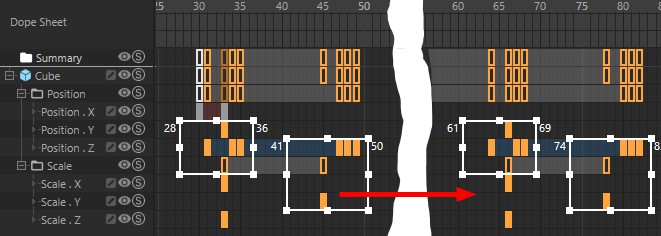 Moving or copying groups of keys via drag & drop.
The Region Tool is basically nothing more than a floating selection that can be changed at any time and lets you edit key groups in either Dope Sheet mode or in F-Curve mode. Large key groups can be copied and accurately pasted somewhere else. The selection frame has handles at all corners and on each side with which it can be scaled. The frame numbers at which the selection frame lies are displayed at the top left and right of the selection frame. Every key within a given selection frame will be selected.
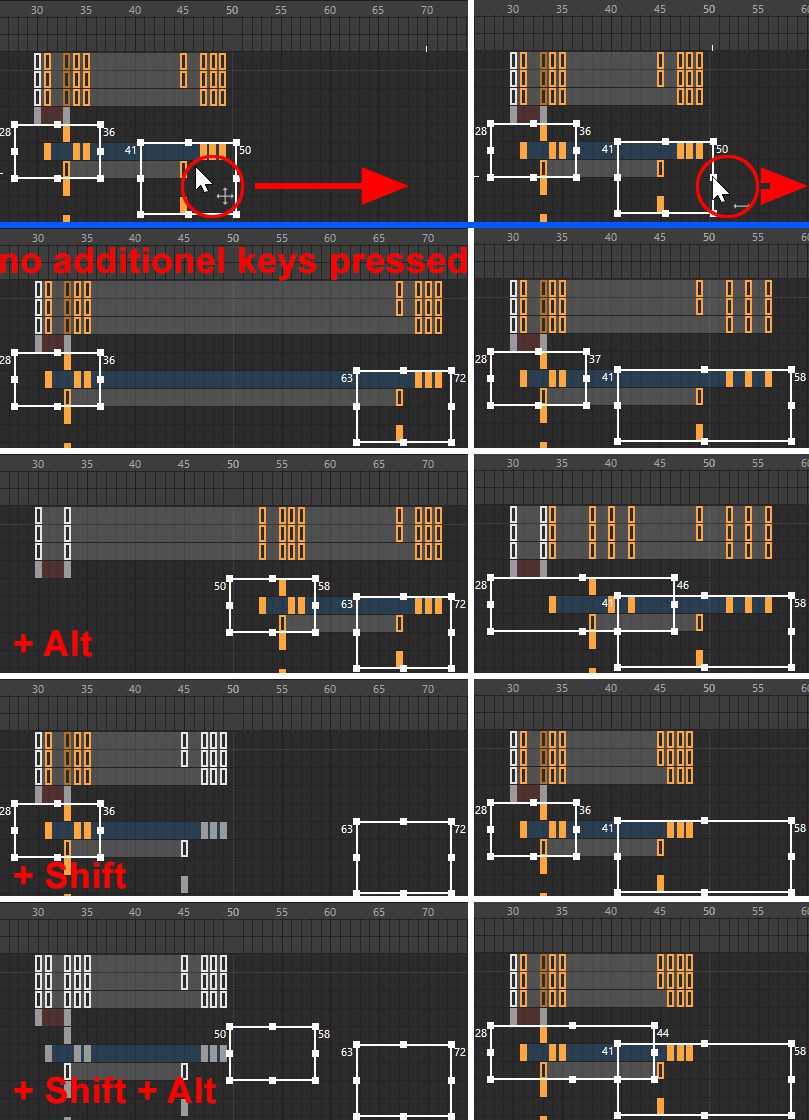 The Region Tool as it can be applied in combination with the keyboard keys shown: Left when selecting a region; right when a handle is pulled. The Ctrl key can be pressed while moving keys to automatically duplicate them.
Activate the Region Tool and drag over a selection of keys in the Timeline. You can drag as many selection regions as you like. Selection regions may even overlap.
How to use the tool, including keyboard shortcuts:
- Clicking and dragging within a given region will move only the region underneath the cursor, including keys.
- Click + drag + Alt within a given region will move all regions, including keys.
- Click + drag + Shift within a given region will move the region underneath the cursor, without keys.
- Click + drag + Shift + Alt within a given region will move all regions, excluding keys.
- Click + drag + Shift outside of a given region will create a new region.
- Click + drag + Ctrl/Cmd outside of a given region will remove regions or parts of regions.
- If keys within a region are copied, the region without keys is moved (horizontally or vertically / temporally extended) and the copied keys pasted into the moved region, the pasted keys will be scaled according to the length of the region into which they were pasted.
The same keyboard shortcuts apply to the region handles. The keys will also be scaled temporally and regions without keys will be scaled.
Simultaneously pressing the Ctrl/Cmd key while performing any key move function will duplicate the selected keys.
It is also possible to copy keys within a given region using Ctrl/Cmd + C, move the keys to the desired position and paste the keys using Ctrl/Cmd + V.

Use this command to delete all regions created using the Region Tool. All selections defined using the Region Tool will be removed.

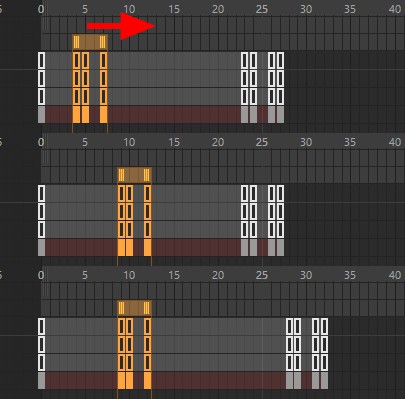 From top to bottom: Initial state; without ripple; with ripple
This option only works in Dope Sheet mode. When keys are moved or pasted, subsequent keys located on the same track will be moved and will make room for the new keys. If keys are moved to the left or deleted, subsequent keys will be moved to the left. Ripple Edit also works in conjunction with the Region Tool.

This command lets you:
- Activating this mode lets you move selected F-Curves by dragging a selected F-Curve to a new position. Remember that all key values and key times (for that F-Curve) will also change accordingly.
- Dope Sheet Mode: The entire area between the first and last keys (also referred to as Pseudosequence) can be moved. To do so, click once on an area of track with no keys to select the sequence and drag. Careful: The Track Start / End option (Preferences / Timeline) must be enabled!

Activate this option when selected keys/Motion Clips should snap to a specific time in the animation while editing keys/Motion Clips (moving, scaling, etc.).
No matter if the option is active or not, the prior state can be temporarily restored by simultaneously pressing the ALT-key.
Example: You do not like snapping. You let your keys/Motion Clips land where they may, even if it's on key 12.245, so you leave Enable Snapping deactivated. The first key of your animation, though, should lie exactly on the Start marker. No problem. Press the ALT-key while moving your keys and you can snap your first key to that marker (of course the corresponding option must be activated in the Snap Settings).

If this option is active, keys/Motion Clips will snap to frames. If this option is not active, keys/Motion Clips will not necessarily come to rest on the full frame number (e.g., a key may lie at frame 3.45).
Keys/Motion Clips are selected via a rectangular selection box. This option defines the point at which a key/Motion Clips is considered selected. If this option is selected, keys/Motion Clips can merely be touched by the selection box to be selected. Otherwise, the full key/Motion Clip must be included in the selection box in order to be selected.

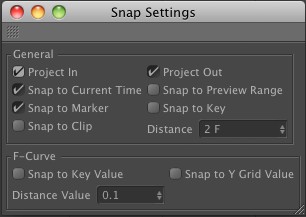
Use the Snap Settings to define onto which position in time a key should snap (the General options apply to keys in both Dope Sheet mode and F-Curve mode):
- Project In: The start of the scene, as defined in the menu.
- Project Out: The end of the scene, as defined in the menu.
- Snap to Current Time: The current time in the animation, as defined by the location of the Timeslider.
- Snap to Preview Range: Start and end of the preview range.
- Snap to Marker: Snapping will occur to markers.
- Snap to Key: Timeslider and markers will snap to keys.
- Snap to Clips: When moved, a Motion Clip's starting point will snap to the starting point of other Motion Clips.
- Distance: The time range before and after a given time in the animation to which keys that are moved will snap.
- Snap to Key Value: Vertical snapping for F-Curve keys. If a key exists with a value of 20 a key that is moved will also snap to 20.
- Snap to Y Grid Value: F-Curve keys will snap to horizontal grid lines.
- Distance Value: This reflects the vertical region at which an F-Curve key will snap to the grid line height or key value.

If you have loaded a sound track using the , this track can be displayed in wave form (similar to what you're familiar with in the Animation Palette) in FCurve mode. This makes it much easier to synchronize animations that have to be synchronized to a sound file.

If multiple sound tracks exist, a selection menu will be made available from which you can select the desired sound track to be displayed.

Opens the menu for the Timeline.