

Object Properties
Use this option to select the reference scene. Absolute (e.g., c:/Files/hubert.c4d) or relative (e.g., hubert.c4d) paths can be defined. If the latter is defined the reference scene will be searched for according to Path rules. We recommend you save master and reference scenes to the same directory and to the same layer (which, by the way, is done automatically when the Save Project with Assets command is executed).
Note that the Reference parameter can be animated! This means that you can sequentially reference, i.e., switch, add and remove, different reference scenes. This is useful when animating LOD objects – models of increasing levels of detail can be read into the master scene (each time replacing the lower resolution model) as the object nears the camera (and vise-versa). This can save render time and ensure optimal memory usage.
The XRef Object will assume the name of the reference file (as long as the object has not been manually renamed in the Object Manager). For example, if the reference file is named Hajopei.c4d the XRef Object will also be named Hajopei.c4d. This lets you quickly see which file is referenced by which object.
- Upload the reference scenes to the server as well (relative paths must be defined in the master scene's XRef Object).
- Or make sure that the reference scenes’ absolute path can be found by all clients, e.g., a network path. In this case the reference scenes will not have to be uploaded to the server.
If the reference scene contains an animation, use this setting to define which animation time should be loaded into the master scene.
The Scene Time setting can also be animated. This means you are in essence animating animations. This can, for example, be used when animating a reference scene in reverse. To do so, animate the Scene Time setting from Frame x to Frame x-30.
In most cases, loading the reference animation via the Take Animation button will cause the animation to play correctly.
Clicking on this button will open the referenced scene as a separate Cinema 4D file and can be edited there. All changes made will automatically be updated in the master scene (when both scenes are open simultaneously; when the Reload Scene button in clicked; when the Reload All button is clicked).
Don't forget that you can switch back and forth quickly between open scenes using the keyboard shortcut.
As long as the master scene and reference scene(s) are opened on the same computer, changes made to the reference scene(s) will automatically appear in the master scene.
However, since master and reference scenes often lie on different computers, these buttons have been made available to manually load the reference scenes.
Cinema 4D will alert you if a reference scene has been altered. A dialog window will open displaying the message Scene has been changed.
- Reload Scene: Only the currently selected XRef object's reference scenes will be reloaded.
- Reload All: All XRef objects’ reference scenes will be reloaded.
Clicking this button will cause animations contained in reference scenes to be assumed in the master scene. A track will be created and animated for the Scene Time setting. Also, any XPresso Expressions present in the reference scene will only be executed when this button is clicked on.
If Take Animation is not applied, the reference scene will be assumed by the master scene in the state defined by the Scene Time setting.

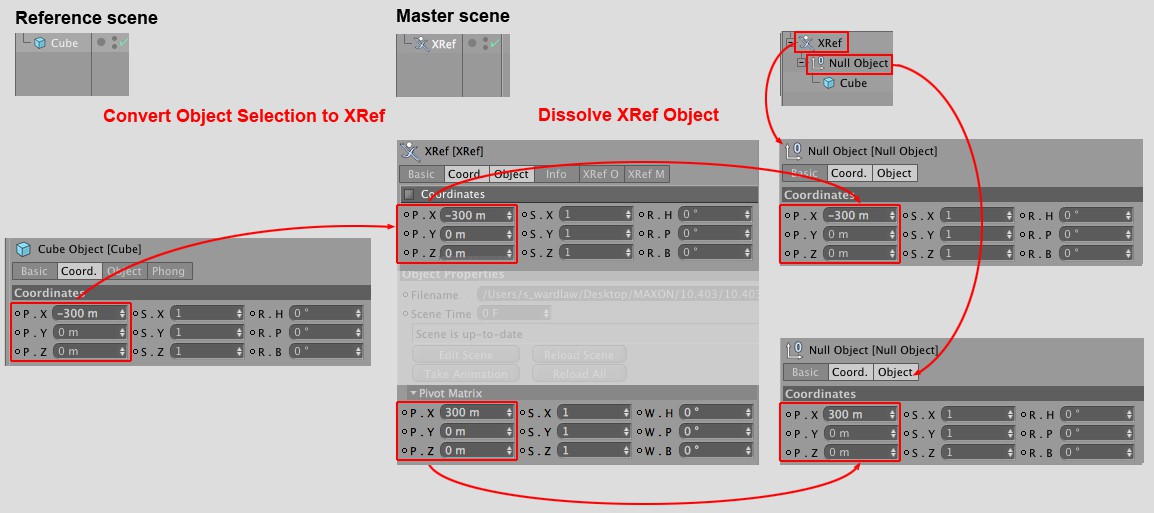 Various coordinates of objects from reference and master scenes. Of course the XRef Object must not be dissolved (included in this example for demonstration purposes).
The Pivot Matrix more or less represents the reference scene's world origin (as viewed from the XRef Object's own coordinate system).
This sounds more complicated than it actually is. The Pivot Matrix's purpose is to allow the XRef axis (using the Object Axis Tool) to be placed anywhere without affecting the reference scene's coordinate system (this is an internal process in Cinema 4D).
If an XRef object is made editable (c-key), up to two hierarchical Null Objects will be created as Child objects of the actual reference object (in the image above, the Cube). The Pivot Matrix will be that of the second Null Object.
In the XRef Object's XRef O tab, the XRef Axis can be set to individual referenced objects or to the world origin by right clicking on a given object in the list.