
Rendering Pyro simulations
The following topics will be covered:
Overview
The Pyro settings linked in the Pyro Scene tab of the Pyro Output object provide different display modes and display qualities of the simulation already in the Viewports. To do this, you just need to use one of the shading display modes there(Gouraud Shading, Quick Shading or Constant Shading). However, in order to actually render the simulation with Redshift, and thus e.g., diffuse lighting or even generate light itself, the simulation must be available as a cache. There are several options for this:
- The current simulated frame of the simulation can be stored in RAM using the Pyro Output object. To do this, activate the desired simulation channels by On or On Export in the Object settings of the Pyro Output object. In that case, a Redshift Pyro Volume material can then be directly assigned to the Pyro Output object for rendering. When using the RAM cache, rendering is possible in the 3D views as well as in the Picture Viewer or Redshift RenderView. After closing the scene, however, the simulated frame and its storage in RAM are lost and must be regenerated when the scene is reopened by playing the simulation. Compared to rendering a .vdb cache, rendering the RAM cache directly requires more memory overall. Nevertheless, this rendering is of course useful for test renderings during the configuration of the simulation or also for checking the material settings.
- When using the On mode for Pyro components on the Pyro Output object, the RAM cache is not only created for rendering, but is already available in the Object Manager. This allows, for example, the direct use of the Pyro Output object as a basis for a Volume Builder, in order to convert components of the Pyro simulation into geometry in this way, or to create vector fields for use as force objects.
- If at the Pyro Output object the required properties of the simulation are marked with On Export, they will be stored in RAM only during rendering. In addition, this mode is intended for marking properties for storage as .vdb cache (see next point).
- The simulation can be saved as a sequence of .vdb files and then reloaded using the Pyro Output object, a RS Volume object, or a Volume Loader object. To do this, activate the desired simulation channels on the Pyro Output object by setting the On Export options and pressing the Cache button in the object's Cache tab. The then saved .vdb file sequence can then also be loaded in third party programs or other Cinema 4D scenes without having to recalculate the simulation. A Pyro Emitter tag or the Pyro Output object no longer need to be present in the scene for this.
Alternatively, the Pyro Output object itself can load .vdb caches. In that case, as with rendering a RAM cache, the Redshift Pyro Volume material must be assigned to the Pyro Output object. - Pyro properties marked Off will still be visible in the viewports during simulation if they are enabled on the Pyro Emitter tag. However, properties marked Off cannot be rendered or saved to a cache file. The only exception to this is the storage of a Initial State for the simulation. In that case, properties marked Off will also be included in the Volume Set if they were simulated using the Pyro Emitter tag.
If you want to use the simulation only to render a single image, the desired state of the Pyro simulation can also be saved as a Volume Set object and used as the Initial State in the simulation. This creates a single .vdb file that takes up correspondingly less space on your storage media compared to saving the entire simulation as a .vdb sequence.
Corresponding information about the creation of a Volume Set object can be found in the explanations of the Pyro Scene settings at the Pyro Output object.
Rendering a simulation in RAM with Redshift
A prerequisite for the following steps is that you have activated Redshift as active Renderer in the Render Settings.
If the required properties of the simulation have been marked with On Export or with On at the Pyro Output object, you can e.g., generate a Volume material via the Create menu of the Material Manager under Redshift/Volume. There you would have to enter the names of the activated Pyro simulation channels (e.g., density, temperature or color).
However, it is even more convenient to use the Pyro Volume material that has already been suitably set. There, the entry of the typical simulation channels density and temperature is done automatically. In addition, the realistic Blackbody simulation for the colors of the temperature distribution is used by default.
Within the RS Volume or Pyro Volume materials, the Scatter property represents the Density of the rendered volume (VDB volume grid: density) and Emission as a light-generating property represents the Temperature of the simulation (VDB volume grid: temperature). These are already the two most important features of a Pyro simulation for rendering. The RS Volume or Pyro Volume material can then be assigned to the Pyro output object and you can render the simulation directly.
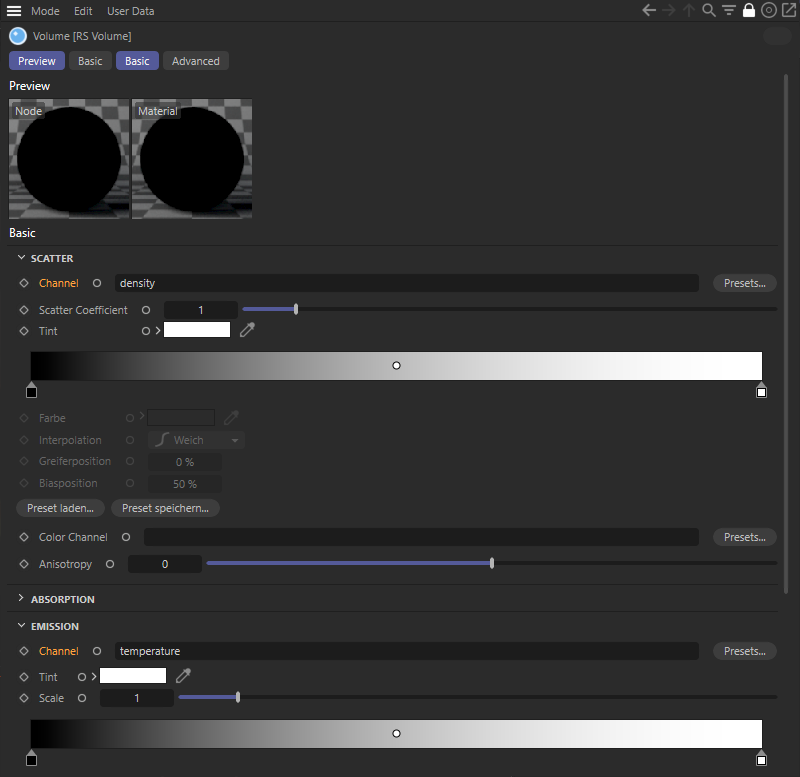 Typical density and temperature assignments of a Pyro simulation within an RS Volume Node.
The following scene contains two material variations that demonstrate the individual coloring of the temperature simulation.
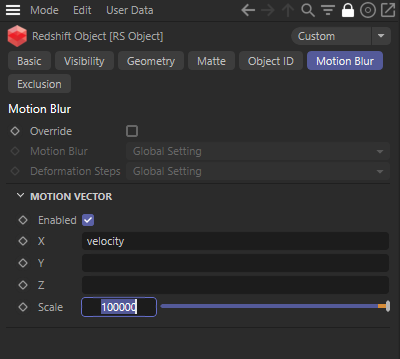
To display motion blur in this setup, a Redshift Object tag must be assigned to the Pyro Output object. There you activate the evaluation of the Motion Vector and enter velocity as the simulation channel for the velocity vectors in the simulation at the X field. Use the Scale value to control the intensity of motion blur. Remember that Motion Blur calculation must also be enabled in the Render Settings!
Rendering VDB files with Redshift
If a simulation has been saved as a .vdb sequence, one of the things that can be used to load it is the RS Volume object, which you can find in the Volume menu if Redshift is the active renderer (see Render Settings).
At the RS Volume object you will find the option to load the .vdb files. To do this, first define the path to the first file of the sequence in the Path field and then switch to the Animation tab of the object. There you will find the Mode menu where you can select, for example, Simple Mode. This means that the saved simulation is automatically retrieved frame by frame when you render an animation. When reaching the last simulation file in the sequence, this playback ends automatically. In the other available modes, for example, the replay of the simulation can be triggered at this point. Then press the Detect Frames button to count through the sequence of files and automatically enter their number on this dialog page. Check the Frame Rate specification to make sure it matches the frame rate used in your scene. Otherwise, a loaded simulation may be displayed faster or slower than originally simulated.
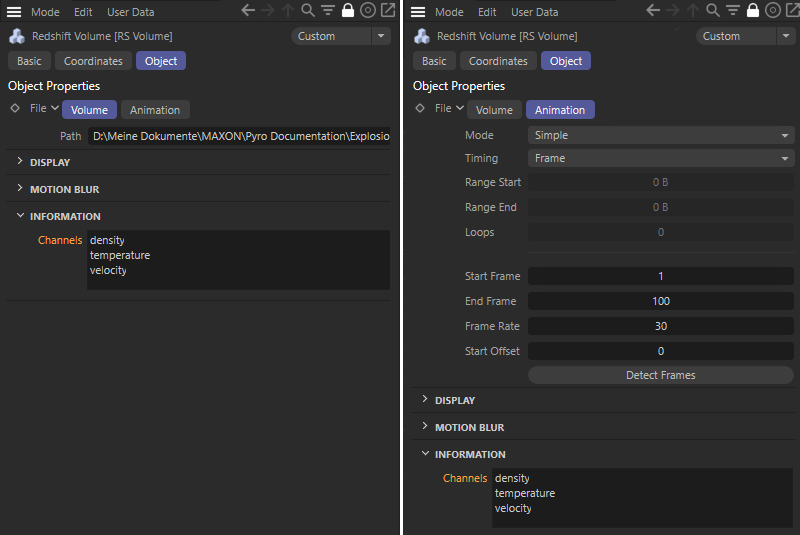 After defineing the Path to a VDB sequence (left), its playback can be controlled in the Animation tab (right). In addition, the Information area shows which object properties are contained in the VDB sequence.
As can be seen in the figure above, the Channels list shows which properties are contained in the loaded files. These terms can then also be used in the RS Volume material to define the colors, density and emission of the simulation during rendering. This step does not differ from the rendering of a simulation in RAM described above. In this case, however, the Redshift Volume material or Redshift Pyro Volume material is assigned to the RS Volume object.
Unlike direct rendering of a simulation residing in RAM, no Redshift Object tag is required to enable Motion Blur rendering when using the Redshift Volume object. You can find corresponding Motion Blur settings directly on the RS Volume object. There, too, you simply enter velocity for the X channel, provided the loaded simulation has the 'velocity' property (see the Information area in the RS Volume object.
Detailed information about the Redshift Volume object and the Redshift Volume material can be found here.