

Basic Properties
When tags are created, they are automatically given a name according to their function. For example, a Vertex Map tag is appropriately called a "Vertex Map".
However, you can also give all objects and elements (e.g. shaders) any name you like. The object or element appears under this name, e.g. in the XPresso Editor or in the Timeline or link fields.
So far, so good. However, there are tags that can be assigned as often as required (e.g. Selection tags, Vertex Color tags, etc.). If they all had identical names, this could lead to problems. Imagine 2 Polygon Selection tags with the same name and you want to restrict a material to one of the selections: this becomes difficult with identical names, as only the Selection tag furthest to the left is used.
This is why Cinema 4D numbers them consecutively where it makes sense. For example, 3 Polygon Selection tags on the same object:
- Polygon Selection
- Polygon Selection.1
- Polygon Selection.2
This automatic numbering occurs when creating tags using the menu/command, when duplicating with the ctrl key and with some tag-creating tools such as the Paint Tool, MoGraph Selection, Bind Tool, etc.
If the element (object, tag, track, etc.) has been assigned to a layer, you will find the layer name and color here. Layers can be dragged here directly from the Layer Bowser or from other similar fields. You can also use the menu behind the small triangle button on the right to assign layers or remove the element from the current layer. Show in Manager opens the Layer Manager.
Click on the small triangle to the left of Layer to show the layer properties. This gives you access to all properties that are otherwise only accessible via the Layer Manager.
Here, this setting reflects the visibility settings (gray, green, red) of the Object Manager.
You can select from the following:
-
Undefined: The Child object's setting will be applied.
-
On: Object will be shown in the Viewport.
-
Off: Object will not be shown in the Viewport but will be rendered.
Here, this setting reflects the visibility settings (gray, green, red) of the Object Manager.
You can select from the following:
-
Undefined: The Child object's settings will be used.
-
On: Object will be taken into consideration for rendering.
-
Off: Object will not be rendered.
You have the following options here, which define how the object is displayed in the view, provided that Material is deactivated in the Viewport in the Options menu (if Material is activated there, it will always be displayed - independently of the following options).
-
Material: This displays the material color (or texture) of an assigned material.
-
Layer: With the Layer option the object, if it is assigned to a layer (see Layer Manager), will colored according to the layer color.
-
Automatic: This displays the material color (or texture) of an assigned material. In the absence of a material, the color defined below will be applied.
-
Custom: Use this to assign a custom color.
Defines the display color. Click the color box to access the system color chooser or click the small triangle to access Cinema 4D’s color chooser. Choose the desired color.
Switches Generators, Deformers and primitives on or off. Disabled objects are not visible in the Viewport.
If this option is enabled, the selected objects will be semi-transparent. All points and edges can then still be seen when using a shaded display mode, such as Gouraud shading.
The Character object will automatically size the template based on the type of Character. This attribute allows you to specify the a character type to be used for auto-sizing, prior to building any components. If Character is set to None, the Character type stored in the template will be used. If Character type is set to Custom, you can specify a unique name and icon for the Character object. This attribute does not filter the template choices, or in any way affect your ability to build any type of template.
When this option is enabled, the template will be automatically scaled based on the type of Character specified in the template. The size will automatically be adapted to the project unit scale, so in most cases the template should be built at approximately real-world scale.
Character Type Auto-Sizing
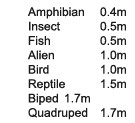
With Auto Size disabled you can specify a custom height for the Character object. For instance, you can select your character mesh, view its Y height via the Size+ option in the Coordinates Manager, and use this value. This should result in a template that more closely matches the actual size of the character. Note that the Size must be specified prior to building any components of the rig.
Here you can specify a custom name for the Character type. The name is currently not used for anything.
A custom icon can be specified here, overriding the icon defined in the template. This icon will be used as the Character object icon.