
Pose Library Browser

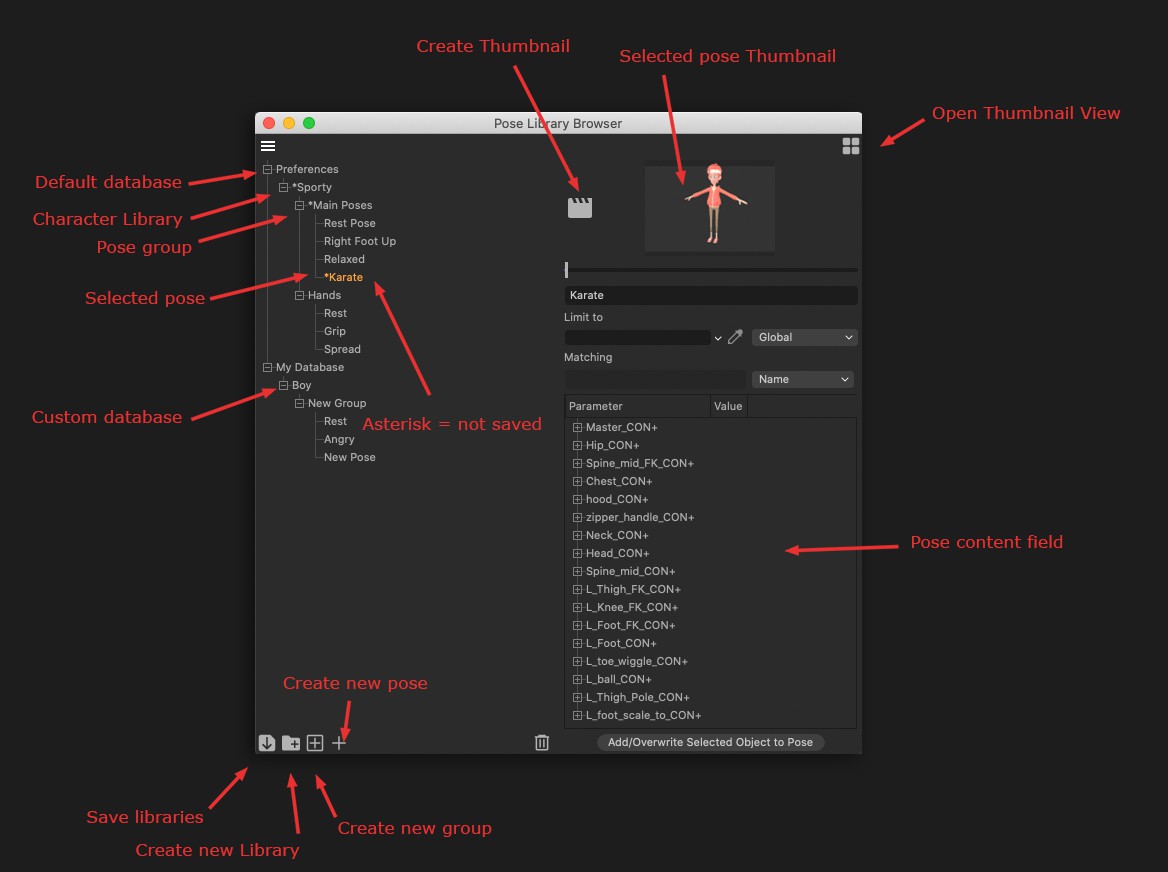
The Pose Library Browser is used to manage your libraries of poses and consists of two sections:
- The tree view on the left, which shows the full library structure, with all available databases, Libraries, Pose Groups and Poses. Selecting an item in this list will display its attributes on the right panel.
-
The Attributes section on the right, which hosts the content of each list item. Databases, Libraries and Pose Groups will only display name and comments fields, whereas Poses will show which objects have recorded parameters for that pose, allowing to add or remove items from the content list, as well as give you the option to create a thumbnail, apply a pose and filter the content selection and which object it will apply to based on various parameters.
You can apply a pose by either using the Blend Slider to apply a certain amount of the pose or clicking the thumbnail to apply the pose at 100%.
Using Databases
Pose libraries are stored into external databases. By default, all libraries, groups and poses are saved into the "Preferences” database, inside the "userrepository” folder, in your user preference folder. This database will automatically be available for that Cinema 4D installation.
Alternatively, you can make use of the assets system and use external databases that can be shared across multiple installations and users. You can add a new database from the Asset Browser (database view) via the Create New Database context menu . Once done, the new database will be displayed in the tree view of the Pose Library Browser, and become available to record poses into.
Several databases (which can be shared with other users across a network) will be integrated in one of two ways:
-
In the Preferences menu under Files, a database can be selected by clicking on the Add Folder button.
-
In the Asset Browser, open the database view Stack icon at the top-right of the window), select Connect Databasefrom the Database menu.
Commands and Settings
Save Library
Use this command to save the content of the selected database. Make sure you save each pose, once satisfied, as the database is not saved with the scene.
New Library
Use this command to create a new library. Usually, you will want to create a library for each character you would like to pose.
New Group
Use this command to create a new group of poses. This is usually used to regroup poses of a similar type. For example, you will want to regroup body, hands and face poses into separate groups, so they can be applied independently.
New Pose
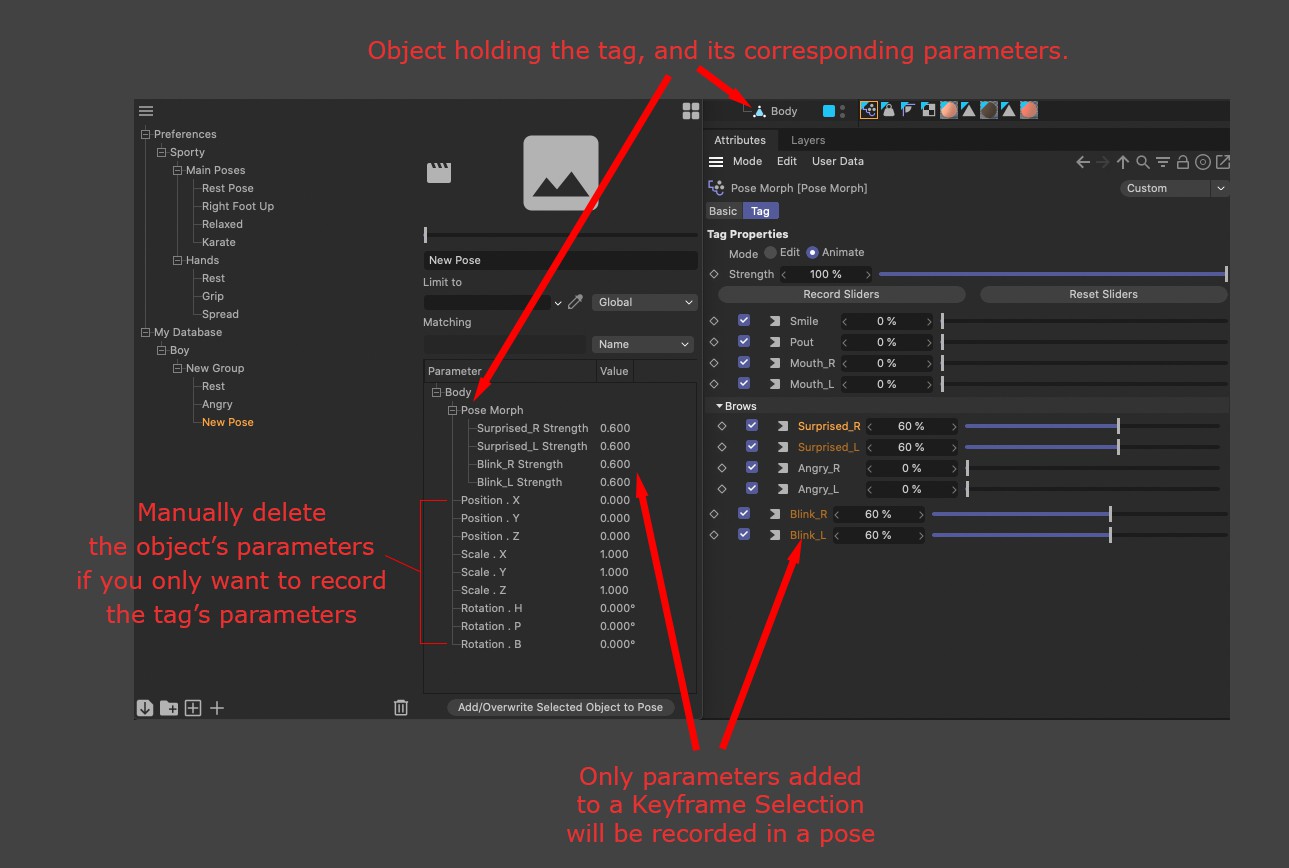
Use this command to save the contents of a pose. A pose contains a list of objects, with their position, scale and rotation values, as well as any animatable parameter values. Note that in order to be able to save parameter values, you will need to add said parameters to a keyframe selection or make sure the parameter has an animation track. To add parameters to a keyframe selection, select the parameters you wish to record from the Attributes Manager, then right-click and use the "Animation>Add Keyframe Selection” command. To add an animation track, right-click the parameter in the Attributes manager and use the "Animation>Add Track” command.
If you have added the object that holds the tag to the Parameters list, but would like to only blend the tag parameters, you can remove any extraneous parameter manually (for example, PSR values of the object holding the tag are always added by default – you might not want to use them in your pose).
Tags that have been added manually will always show the object they belong to in the parameters list for easier identification, but without the default PSR parameters for that object.
You can also now reorder and duplicate Libraries, Groups and Poses at will by simply selecting and dragging entries where needed. You can duplicate entries by Control-clicking and dragging where needed in the list. Multi-selections are not supported. Do not forget to save the database when you duplicate or reorder your libraries and poses.
This new behavior should make it easier to follow specific workflows and/or naming/ordering conventions.
Delete Selected
Use this command to delete Databases, Libraries, Groups or Poses from the Pose Library Browser. Use this command with caution, there is no undoing deleted nodes!
Capture Thumbnail Image
Use this command to capture a snapshot of the Viewport, which will be converted into a thumbnail for the current pose. Note that it captures what the Viewport currently displays, gizmos, grid, Null objects and so on... If you want a cleaner thumbnail, you can either set your own viewport filters to exclude what you don't need and save a preset using the "Filter>Presets>Save Preset” command (useful if you need to show something other than geometry, such as Splines, for example), or toggle the "Filter>Geometry Only” command to only display geometry in the Viewport.
It is recommended to use either Filter Presets or the Geometry Only commands because they act as toggles. This allows you to toggle the state of the Viewport for posing and thumbnail capture more easily. Or just set your filters once and do your object selection via the Object Manager exclusively.
Open thumbnail View
Use this command to open the Thumbnail View. This additional manager is used to display thumbnail and blend slider for each recorded pose, especially useful when animating
Thumbnail/Apply Pose
The thumbnail for each recorded pose, which can also be clicked to apply the pose at 100% strength.
Blend Slider
The Blend Slider is used to modulate the strength of the pose to apply to the character. When using the slider, you enter a blend session, which allows you to modulate the current pose at will, but the pose will only be applied once you hit the Enter key or click outside of the manager to confirm the pose. You can cancel a blend session by using the Escape key and it will revert to the original pose.
Name Field
Use this field to assign or edit the name of libraries, groups and poses. You can also double-click on the name in the tree view on the left.
Limit To
Since poses are not saved with the scene file, applying a pose to an object is done by matching the names of the objects in your scene, to the names of the objects recorded into your pose. Use these matching and filtering rules to define how the search for name matching is restricted and applied. This is extremely useful to restrict poses to a specific character or part of a character, for example.
Global
This mode will apply the pose without any restriction. It will search the whole scene for objects with matching names. If your scene contains several characters with similar naming conventions (for example, the left hand controllers of all the characters in your scene are labeled "Hand_Left”), it will apply the selected pose to all characters at once.
Selection
This mode will restrict posing to the currently selected objects. This can be useful if you want to do partial posing, for example, by restricting the pose to the hand controller only, or maybe by posing the whole body without affecting the head orientation of a character, for example.
Sel. Hierarchy
This mode will restrict posing to the currently selected object and its hierarchy. It allows to easily restrict posing to specific objects and their hierarchies, without having to select each object individually. Much like the Selection mode, it can also be used to assign partial posing to your characters or objects, but without having to select each individual controller to do so.
Limit To Field
Use this field to define which object and subsequent hierarchy you would like the pose to be applied to. If you have two characters in a scene that share the same naming convention for their objects, for example, this is a useful way to restrict the posing to a specific character without affecting the other. It also allows you to always assign the poses to the same objects or character or set of controllers, regardless of what is currently selected in the Object manager.
Note that this filter can work in conjunction with the other filters, so you can restrict filtering to both specific hierarchies and selected objects.
Matching
Use these options to restrict the application of poses by using name modifiers.
As a user case example, let's assume we have two characters in the scene, the first character has a hand controller named "Character1_Hand” and the second character has a hand controller named "Character2_Hand”. The recorded pose we are trying to apply is recorded with an object named "Hand”.
On the other hand, if your scene contains several characters, and each character uses a similar naming convention, then you can either restrict the application of poses using the Limit to options if you do not wish to rename your objects, or rename each character's objects with a prefix to allow the Pose tools to identify which one you would like to target.
Name
The Pose Library will look for objects matching the name of our posed object one to one. In our case, none of the hand controllers of our characters are labeled "Hand”, so the pose will not be applied to any of them.
Namespace
Using this mode, you can add a prefix to be used when matching for names. If we add the prefix "Character1_” to the text field, the pose will then be matched and restricted to the hand controller named "Character1_Hand” in our example.
Match to End
This mode will start from the end of the object names and will be stopped once the name searched is complete. In our example, both our characters’ hands controllers have the word "Hand” at the end of their names, so both controllers will be posed.
Separator
This mode is usually intended to be used with XRefs, but can also apply to other cases where your naming convention makes use of separator characters. In our example, adding the "underscore” separator ("_”) to the text field will match both our characters’ hands controllers, since they both contain an underscore character in their names.
Pose Contents Field
This field will display all objects data recorded with the selected pose. Any animatable parameter can be recorded. Position, Scale and Rotation parameters are recorded by default, but any other parameter will need a keyframe selection or animation track to be set prior to recording a pose (useful to record the values of custom User Data entries on a controller, for example).
To record a keyframe selection, highlight the parameters you wish to add to the selection, then right-click one of them and use the "Animation>Add Keyframe Selection” command to set a selection. Parameters included in a selection set will be highlighted dark orange. To add an animation track, right-click the parameter in the Attributes Manager, then use the "Animation>Add Track” command. A track is represented by an empty orange circle on the animation dot (meaning a track with no keyframe at the current frame is present for that parameter).
New in S24: you can now selectively apply individual object poses by selecting and dragging parameters from the Pose Contents Field list to the object of your choice either in the Viewport or the Object Manager.
As an example, say you have a relaxed pose of your character recorded, but you are only interested in applying the pelvis and leg positions. You can selectively apply the recorded parameters of these objects to your character, without having to apply the whole pose.
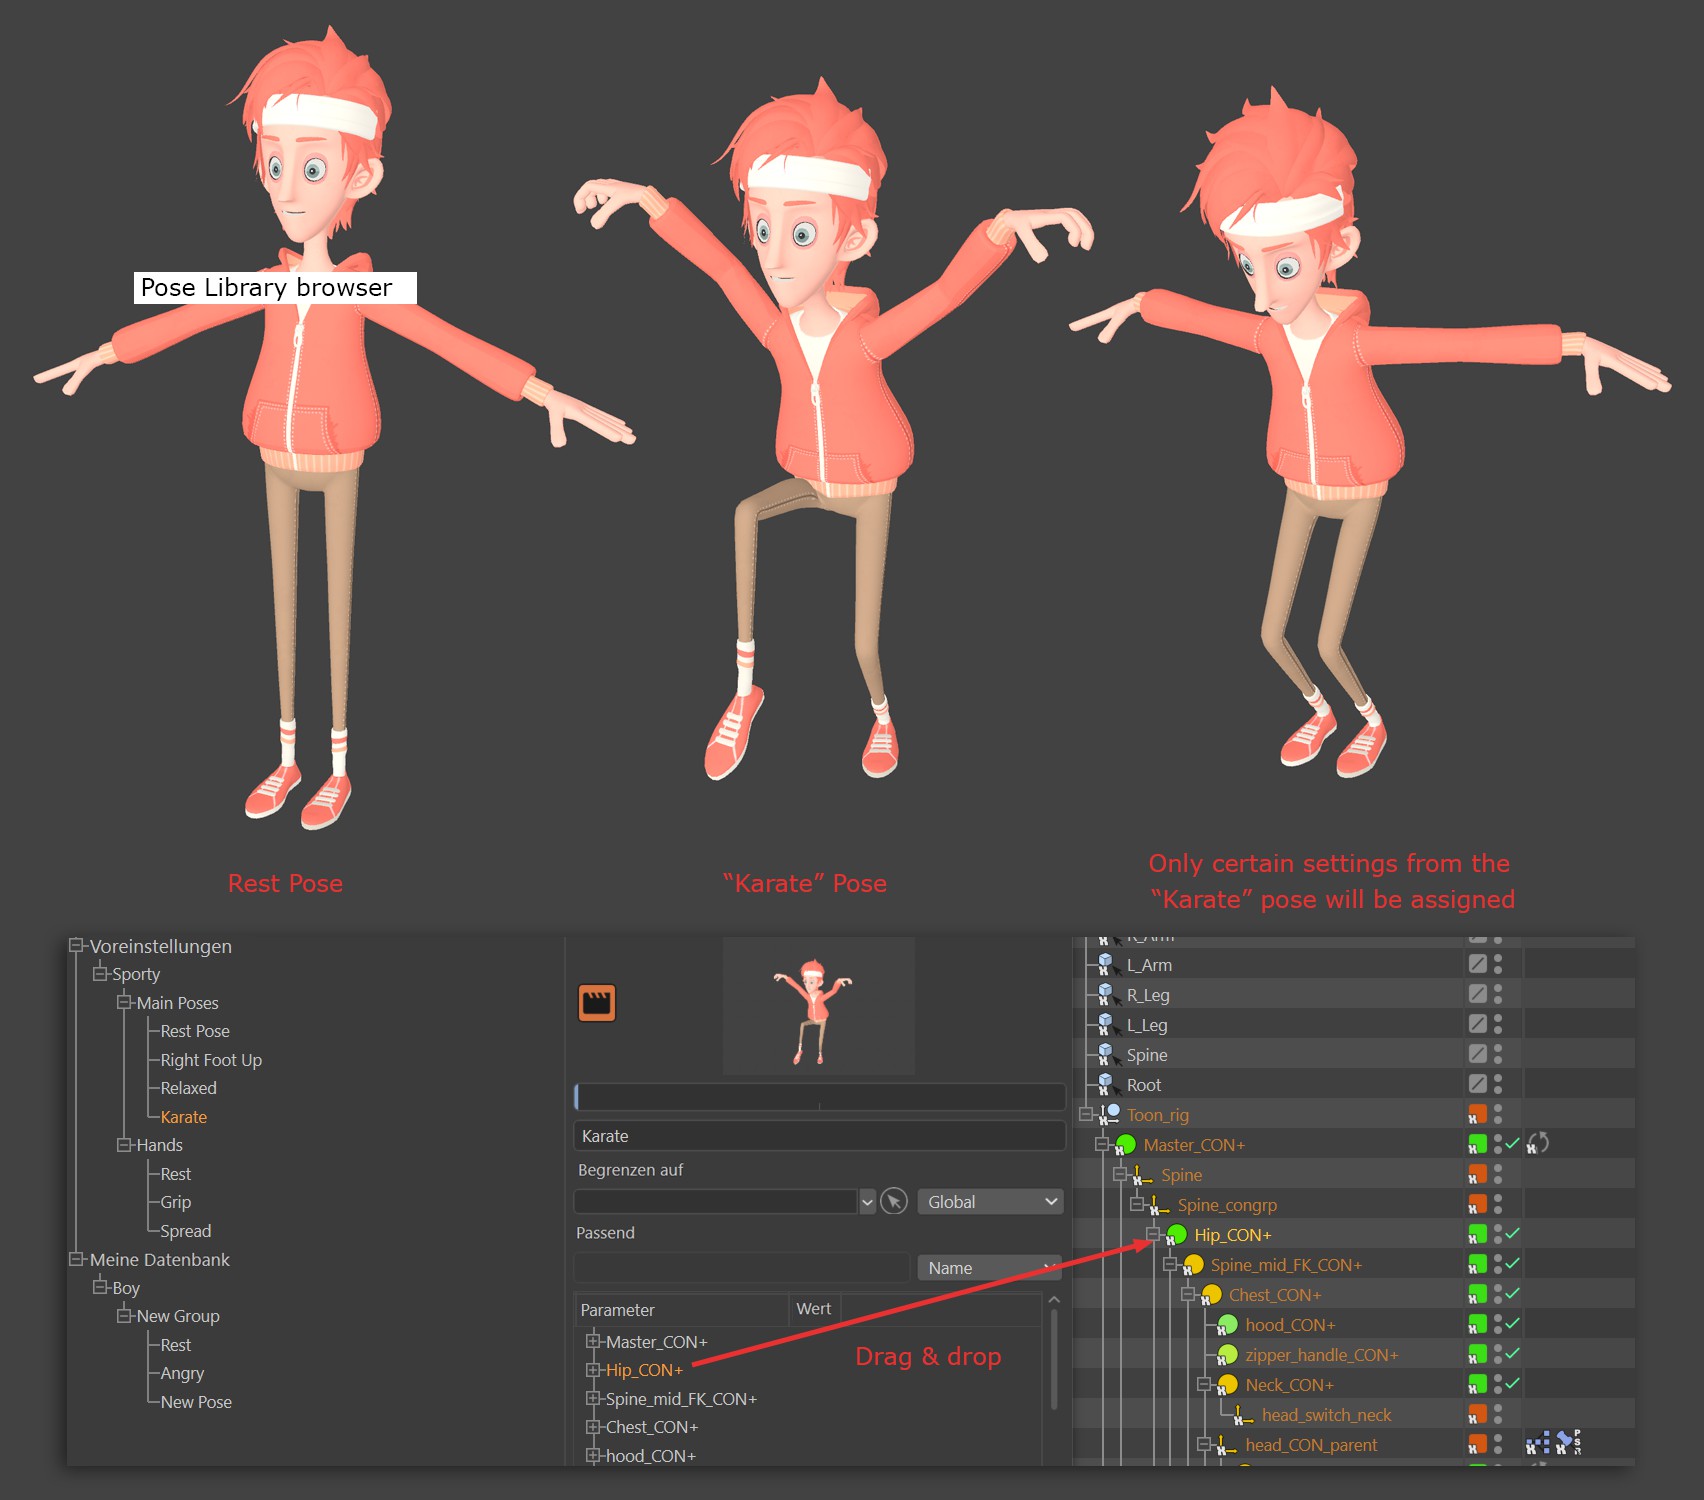 Hip_CON+ object from the Contents Field to the Hip_CON+ object in the Object Manager. Alternatively, we could also drag and drop from the Contents Field to the target object in the Viewport. Note that the pose parameters of the Hip_CON+ object can be applied to any object. It will basically apply the recorded PSR values, or any matching value to the new object.
Add/Overwrite Selected Object to Pose
Use this command to record other objects or parameters to an existing pose. You can also use this command to edit the values of an object already recorded. Do not forget to save the database regularly, as it needs to be saved externally any time you add or edit a pose.
Note that this command only adds selected objects, it will not add selected tags if no object is selected first. If an object with a tag is selected, the tag parameters that are part of a keyframe selection will be added to the parameters list, along with the selected object.