
ArchiCAD
Installation
 ArchiCAD 18+ Scene Combine... command, and here.
Plug-ins for both ArchiCAD and Cinema 4D are required.
Please download all required plugins online at:
http://www.graphisoft.com/products/archicad/addons/cinema_4d/cinema4d_download.html
Earlier plug-ins versions are available at:
http://www.graphisoft.com/products/archicad/addons/cinema_4d/cinema4d_download_old.html
(copy the above address and paste it into the url line of your internet browser)
To install the first plug-in, simply double-click on the downloaded file and the plug-in will automatically be installed in the correct ArchiCAD directory.
Before installing the second plug-in it must first be unzipped. Copy the unzipped directory into the plug-ins directory of your Cinema 4D installation folder. When updating the second plug-in, remove the previously installed ArchiCAD plug-in for Cinema 4D.
Use
Two methods are available for exchanging files between ArchiCAD and Cinema 4D:
- ArchiCAD can read and save native Cinema 4D (*.c4d) files. This is the recommended, most current method of interfacing with Cineware. Changes made to the file can be assumed seamlessly, just as with previous versions of the plug-in.
- Opened ArchiCAD files can be sent "live" to Cinema 4D (hereinafter referred to as Synchronization Mode) where they can be modified or have objects added to them, and be sent "live" back to ArchiCAD.
First, make sure that the ArchiCAD (Options / Scene Preferences / Dimensions) and Cinema 4D (Scene Settings / Document Scale) units of measure correspond.
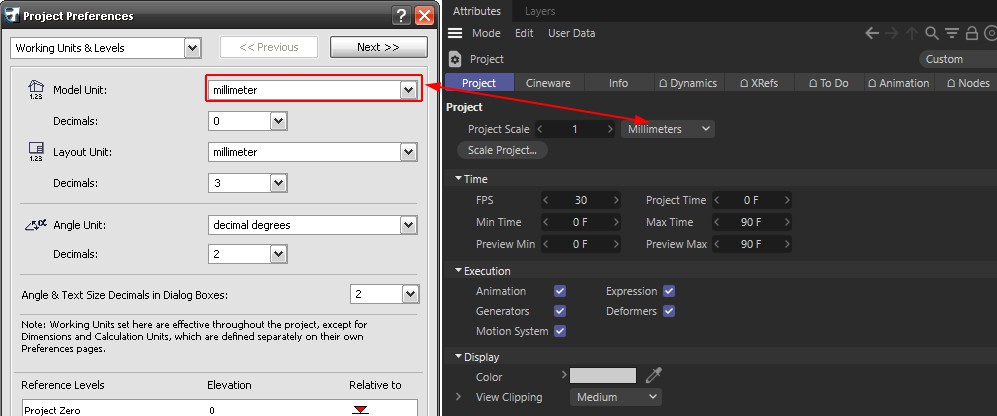
Loading and saving Cinema 4D files (*.c4d)
Loading in ARCHICAD
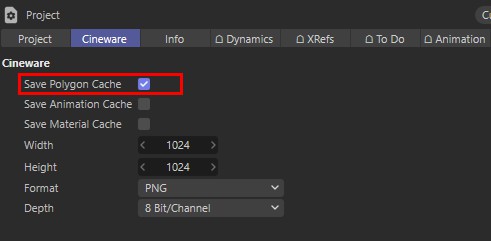
If you want to open a Cinema 4D scene file (*.c4d) in ARCHICAD you must make sure theSave Polygon Cache option (Attribute Manager: Mode/Scene/Cineware) is enabled when saving the Cinema 4D file:
In ArchiCAD, go to "File / Open" and select "Cinema 4D File (*.c4d)" as the file type in the dialog window that opens:
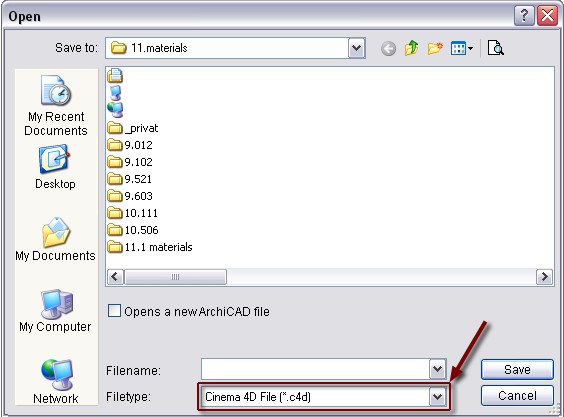
Now you can load any Cinema 4D file. Primarily geometry and materials will be loaded.
Saving from ARCHICAD
To save a file in the Cinema 4D file format ArchiCAD must be set to the 3D view (e.g., "View / 3D View Mode / Perspective"). Select the "File / Save As" command and select "Cinema 4D File (*.c4d)" as the file type in the dialog window that opens:
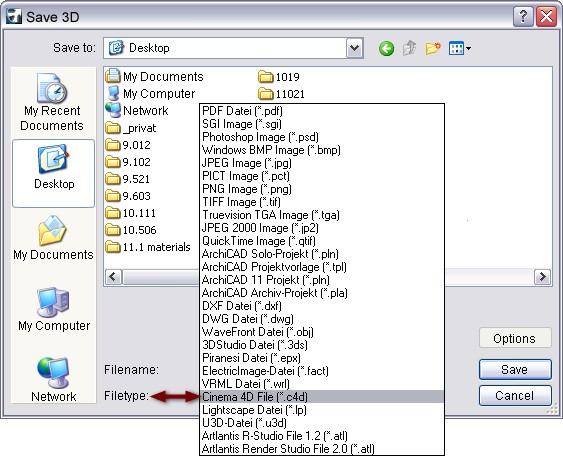
Primarily geometry and materials will be loaded.
Workflow leading to Cinema 4D
Let's say a colleague of yours creates an object in ArchiCAD and you want to render the scene in Cinema 4D. After the colleague has saved his file in Cinema 4D format, as described above, you can open the file in Cinema 4D using the Open command. You will have a similar structure to the one below.
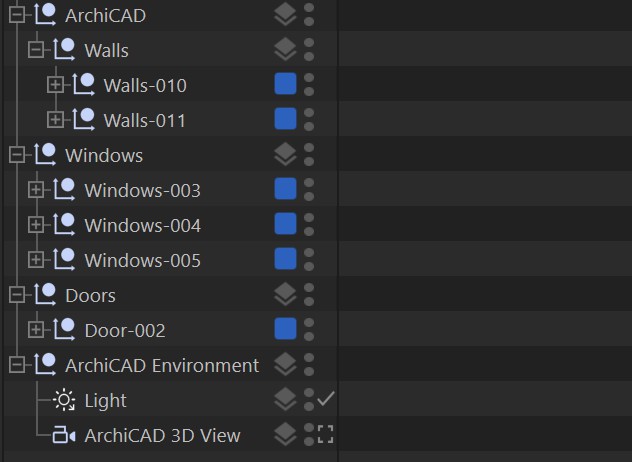 Typical Object structure
The scene elements are located under the correspondingly named Null Object in the Object Manager. For example, the group, "ArchiCAD Environment" contains all lights and cameras of the original file; the "Windows" group contains all windows (this structure should remain unchanged if you are planning on modifications in construction). Modifying names or changing the order of scene elements is unproblematic in ArchiCAD - IDs are assigned internally upon export which are recognized by Cinema 4D, allowing them to be placed correctly in the hierarchy.
This structure is created according to the ArchiCAD object classes. For example:
- Wall (walls)
- Beam (beams)
- Column (supports)
- Slab (ceiling)
- Roof (roofs)
- Mesh (free-standing surfaces)
- Object (objects)
- Window (windows)
- Door (doors)
- Lamp (light sources)
While you were editing the scene in Cinema 4D, e.g., replacing materials with high-quality Cinema 4D materials or adding a Sky, your colleague decided to make a modification to the original ArchiCAD file - he removed a window from one wall and added a window to another wall.
Of course these changes must also be assumed by Cinema 4D. If the above-mentioned structure was not modified, the changes made will be automatically assumed and the newly created materials in Cinema 4D will be maintained and even be automatically applied to newly added elements.
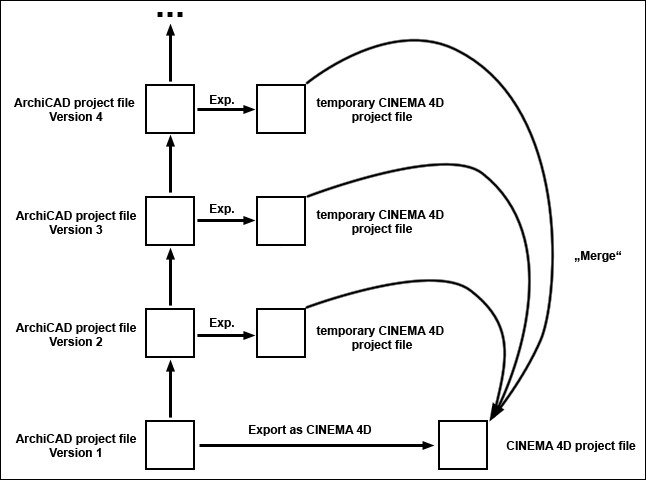 Modifications to the original file and their transfer to Cinema 4D.
All you have to do is tell your colleague to save the modified ArchiCAD file in Cinema 4D format. This file can then be loaded into the already edited Cinema 4D scene via the Merge command (Cinema 4D main menu).
The following will occur in doing so:
- New elements will be added
- Deleted elements will be deleted
- Existing elements’ geometry, incl. UVW tags, will be updated
- Materials will be maintained
Synchronization Mode
The second method with which ArchiCAD and Cinema 4D files can be exchanged is in Synchronization Mode. While both applications are running, objects can be passed seamlessly back-and-forth between the two.
From ARCHICAD to Cinema 4D

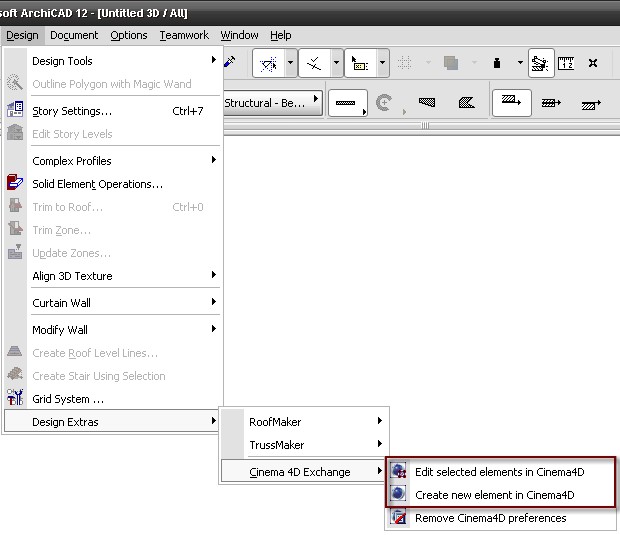
- If you want to send a scene to Cinema 4D and add an object there, select "Design / Design Extras / Cinema 4d Exchange / Create new element in Cinema4d".
- If you want to edit a single ArchiCAD element in Cinema 4D, select the element in question and the "Design / Design Extras / Cinema 4D Exchange / Edit selected elements in Cinema4d" command.
In either case, Cinema 4D will be started and the elements sent will be loaded. ArchiCAD and Cinema 4D will be in Synchronization Mode. When editing or creating new elements for the first time, ArchiCAD will open the Finder/Explorer dialog box. Browse to the Cinema 4D installation folder and select the Cinema 4d executable (Cinema 4D 64 Bit.exe or Cinema 4D.exe).
From Cinema 4D to ARCHICAD
After modifying or adding objects in Cinema 4D while in Synchronization Mode you can send these back to ArchiCAD via the "Send to ArchiCAD" command (File menu). You will have to enter a file name so the geometry can be cached as a temporary file.
For more details, please refer to the Graphisoft documentation.
ArchiCAD 18
Proceed as follows when exporting a scene to Cinema 4D (this reflects the method described here):
- Activate 3D Visualization in the menu, which will display the corresponding toolbar.
- Open PhotoRendering Settings in the 3D Visualization toolbar:

- In PhotoRendering Settings, make sure that CineRender by is selected in the Custom menu.
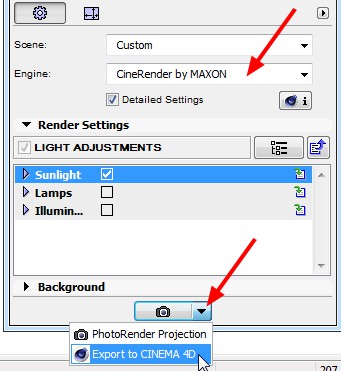
- Finally, select the Expot to Cinema 4D option next to the camera button.