
Spray, Foam and Bubbles - An Introduction
Real liquids exhibit various effects depending on their speed and whether they collide with themselves or with other objects. For example, when pouring a glass of water, you can observe how even small air bubbles form within the liquid, or when a wave breaks, how a spray or even foam-like bubbles can form. These effects are not accounted for by the main fluid simulation but can be supplemented by a separate Liquid FX Emitter. This has the advantage that we can define spray, foam, and bubbles separately without having to modify the main fluid simulation.
A major advantage of the solution built into Cinema 4D is that it allows you to stick with your familiar particle and fluid simulation workflows. This means you can start by creating a standard fluid simulation as usual — for example, using a Liquid Flow Emitter — and then, once you’re satisfied with the simulation, add spray, foam, and bubble particles.
To that end, we still need to clarify what the differences between spray, foam, and bubbles actually are:
-
Spray: Spray particles are determined by the velocity of the liquid particles and the abrupt changes in the travel direction of these particles, such as those that occur during a collision or at the crest of a wave. Spray particles will simply move by inertia.
-
Foam: Foam particles will be drifted by the surrounding liquid and stay at a specific offset from the surface
-
Bubbles: Bubbles form when air is trapped in a liquid and are calculated based on the velocities of neighboring liquid particles and their interactions with one another. Bubble particles will be drifted by the surrounding liquid and also experience buoyancy
In addition, the following rule applies: A particle with a low number of neighbor particles turns into a Spray particle, a liquid particle with a high number of neighbors is turned into a Bubbleparticle, and particles with a medium number of neighbors are turned into Foam.
The following video compares the effect of additional spray, foam, and bubble particles with a standard simulation of just a liquid:
Adding Liquid FX to all or just some Particles
Creating separate spray, foam, and bubble particles is incredibly simple — all you need to do is place a Liquid FX Emitter in the same simulation scene as the particle groups you want to enhance with these effects. The “normal” fluid simulation always serves as the foundation and should therefore already be present in the scene when you add Liquid FX.
Conversely, this also means that if you have multiple simulations for liquids in the scene and not all of them are supposed to have spray, foam, and bubbles, you’ll need to organize the scene using separate Simulation Scenes. You can learn how this works in the Introduction to the Particle System. The next figure gives the idea:
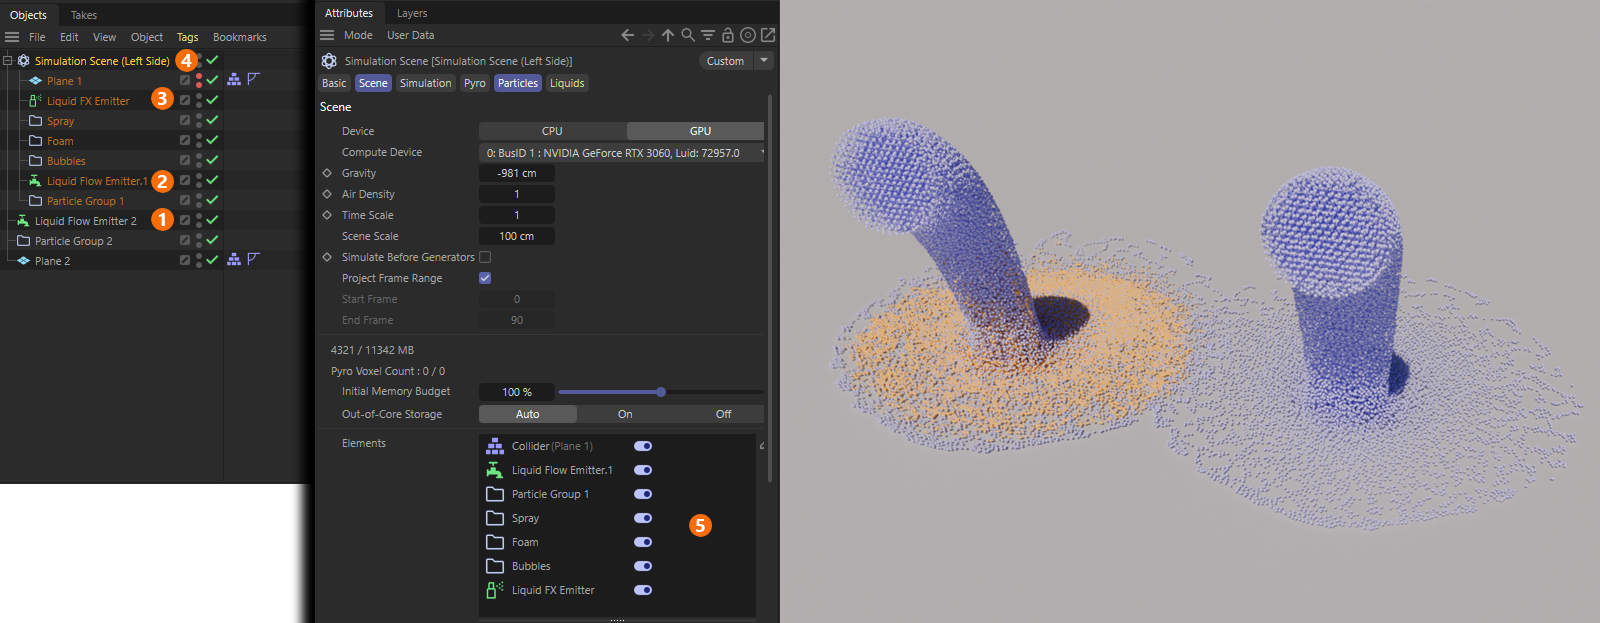
1This Liquid Flow Emitter was first created in the scene. When called, it automatically generates a corresponding Particle Group. A plane was also placed and tagged with a Collider Tag so that the liquid has a surface to collide with.
2A second Liquid Flow Emitter is created, and a new Particle Group is created in its settings so that the particles from both emitters are managed independently of each other.
3A new Liquid FX Emitter is added to the scene. It automatically comes with three new Particle Groups for the Spray, Foam and Bubbles. Playing the animation will show that both particles streams will receive additional Spray, Foam and Bubble particles.
4To limit Spray, Foam, and Bubbles to just one emitter, we create a simulation scene and place all the simulation objects that are supposed to interact with each other under it.
5By selecting the Simulation Scene, we gain access in the Attribute Manager to all settings that are otherwise managed in the default scene settings. However, here they apply only to the elements of the Simulation Scene. This is due to the Elements list, which specifically lists the scene elements that are to be calculated independently of other simulation scenes. As can be seen on the right in the figure above, the orange colored spray, foam and bubble particles are only created for the left Liquid Flow Emitter, that is linked to the Simulation Scene.
Control the amount of Liquid FX particles
The Liquid FX Emitter has no separate amount setting for each particle type. Instead, it emits new particles from the liquid and then decides on every frame whether a particle is currently a Spray, Foam or Bubble particle. A foam particle that is pushed into the liquid, for example, turns into a bubble, and a foam particle that is thrown into the air turns into spray. This is why most settings change all three particle types at once, and only a few of them shift the balance between the types.
To get more or fewer particles of all three types, start with Resolution on the Emission tab: Doubling this value doubles the number of particles. Rate in the Wave Crest section has a similar effect, because wave crests are usually the main source of Liquid FX particles. The following figure shows how individual settings affect each particle type:
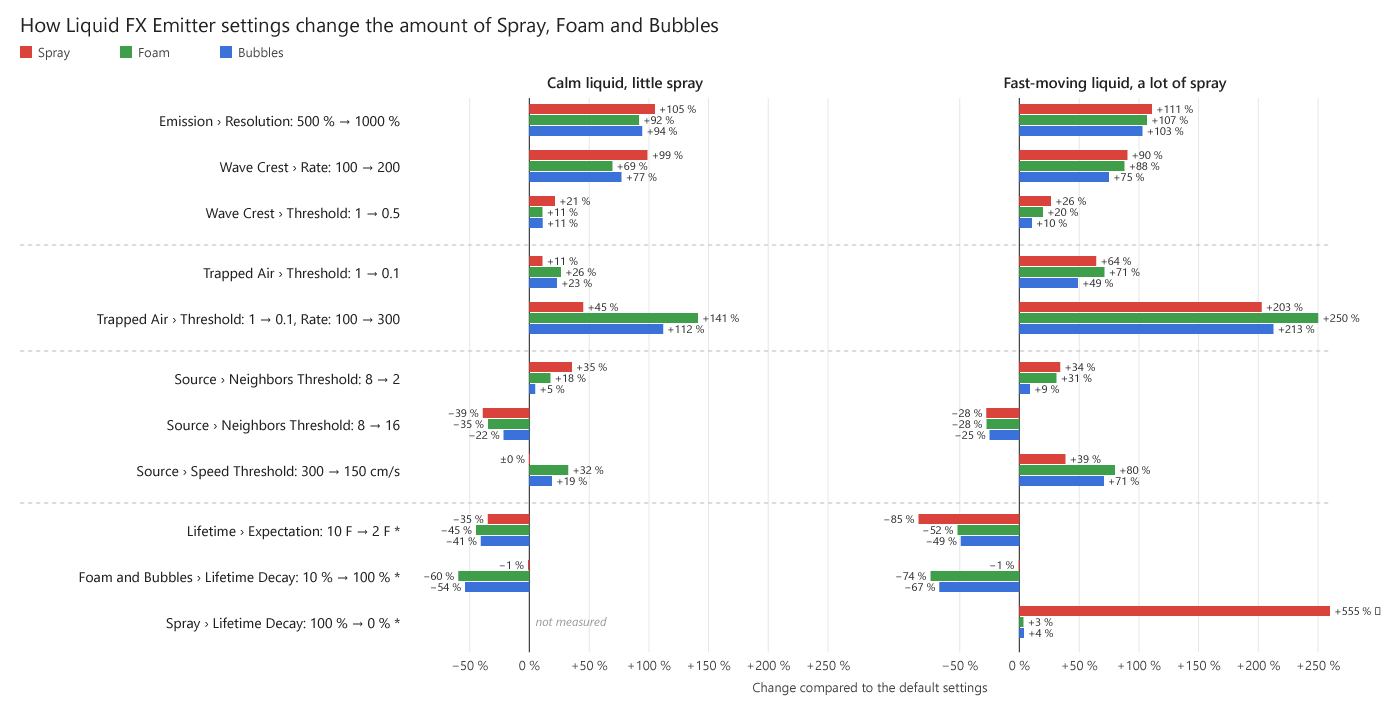
Each of the rows in the chart above shows the change in the number of Spray (red), Foam (green), and Bubble (blue) particles for a calm liquid with little Spray (left) and a fast-moving liquid with a lot of Spray (right) when a single setting is changed and all other settings keep their default values. Only in the second Trapped Air row are two settings, Threshold and Rate, changed together. The settings in the first group change all three types by a similar amount. The Trapped Air settings add Bubbles and, depending on the scene, a lot of Foam and Spray as well. The Lifetime settings control how long the particles remain visible, provided that Limited is enabled.
Work with a low Resolution while you adjust the settings, and raise it only for the final simulation. After each change, play the simulation again from the first frame so that it is recalculated.
Spray Amount
Spray is created where the liquid moves fast and breaks apart, for example at wave crests and splashes. Spray particles stay spray only while they fly through the air. As soon as they come close to the liquid again, they usually turn into Foam. Spray is therefore short-lived. Most Spray particles are not emitted as spray directly, but come from Foam that is thrown into the air, so the settings that add Foam usually add Spray as well:
-
Increase Rate in the Wave Crest section, or lower its Threshold so that weaker wave crests emit particles as well.
-
Lower Neighbors Threshold in the Source section. Liquid particles with only a few neighbors, such as those at thin, breaking edges, can then emit particles too. This mainly adds Spray and Foam, but hardly any Bubbles. Higher values have the opposite effect and reduce all three types.
-
Increase Speed Threshold in the Source section if particles should only be created where the liquid moves fastest. This also reduces Foam and Bubbles.
The lifetime of Spray particles has a strong effect as well, but only if Limited is enabled in the Lifetime section of the Properties tab. In this case, Lifetime Decay in the Spray section shortens the lifetime of Spray particles. With its default value of 100 %, Spray disappears very quickly. Lowering the value keeps Spray visible for longer and can increase the amount of Spray considerably, while the amount of Foam and Bubbles stays the same. If Limited is disabled, the lifetime settings are ignored.
Foam Amount
Foam floats on the surface of the liquid. Foam and bubbles constantly turn into each other: Bubbles near the surface become foam, and foam that is pushed into the liquid becomes bubbles. Settings that add bubbles therefore usually add foam as well:
-
Increase Rate in the Wave Crest section, or lower its Threshold.
-
Add more Bubbles with the Trapped Air settings, as described under Bubbles Amount. In the figure above, this more than doubled the amount of Foam.
-
Lower Speed Threshold in the Source section so that slower parts of the liquid emit particles as well. Foam and Bubbles benefit most from this.
-
Lower Lifetime Decay in the Foam section of the Properties tab to keep Foam visible for longer, or increase it to let foam disappear sooner. Expectation in the Lifetime section sets the base lifetime for all three particle types. Both settings only take effect if Limited is enabled.
Bubbles Amount
Bubbles form inside the liquid where air is trapped, for example below a splash or in turbulent areas. The Trapped Air section on the Emission tab is aimed specifically at bubbles. With fast, turbulent liquids, however, it also adds a lot of foam and spray:
-
Threshold: Bubbles are only emitted where the amount of trapped air exceeds this value. If no bubbles appear, the value is too high for your scene, so lower it step by step. Especially in calm liquids, the amount of trapped air can stay below the default value of 1, so that no bubbles are created from this source at all.
-
Range: Above the Threshold, emission increases gradually over this range until it reaches the full Rate. A smaller value reaches the full Rate sooner and therefore creates more bubbles.
-
Rate: Defines how many bubbles are created at full strength.
Many bubbles also come from wave crests, so Resolution and the Wave Crest settings change their number as well. Lifetime Decay in the Bubbles section of the Properties tab controls how long bubbles remain if Limited is enabled, and a higher Buoyancy makes them rise faster, so they reach the surface sooner.
Creating Mainly Spray, Foam or Bubbles
Instead of deriving spray, foam, and bubbles from a liquid simulation with a Liquid FX Emitter, you can also convert standard particles into Liquid FX particles. To do this, place a Liquid FX Modifier under the Particle Group of the standard particles and set its Mode to Enable. The number of Liquid FX particles then equals the number of emitted particles, so you control it with the settings of the emitter itself. A liquid simulation must still be present, because the type of each Liquid FX particle depends on its surroundings. This means that the position at which the particles are emitted determines which type you mainly get:
-
Spray: Emit the particles into the air above the liquid. They remain Spray as long as they fly through the air. One frame after they have entered the liquid, they turn into Foam or Bubbles. The faster they enter the liquid, the more of them turn directly into Bubbles.
-
Foam: Emit the particles directly at the surface of the liquid without speed or with only a low speed. More than 90 % of them turn into Foam and remain Foam.
-
Bubbles: Emit the particles inside the liquid without speed. Almost all of them turn into Bubbles and rise due to their Buoyancy. When they reach the surface, they turn into Foam.
Note that newly converted particles are always classified as Spray in the first frame, even if they are created inside the liquid. From the next frame on, they receive the type that matches their surroundings, and this type is checked again on every frame.