
LBW Import

Here you will find the settings for selecting the season, the growth variant, the material quality and, for example, the display options for the loaded Laubwerk plant. When loading as a Plant Object, most of these settings can be edited at any time. However, if you decide to load as a Polygon Object, these specifications are binding and cannot be corrected later.
Please note that the configured material settings cannot be easily changed at a later date.
This specifies what the loaded plant should be integrated into the scene as:
- Plant Object: A parametric Plant Object is created on which the settings, e.g. regarding plant age, growth variation,Season or Leaf Density, can be edited at any time. The assigned materials are adjusted automatically when the Seasons are switched, for example. The type of plant can also be easily changed again on the Plant Object. The Plant Object can also be found separately under >. This is the recommended option to obtain the greatest possible control over the selected plant.
- Polygon Object: The plant is converted to a polygon object when it is loaded. However, the setting options otherwise offered on Plant Objects, e.g. for growth variation or the season, can then no longer be changed retrospectively. If you would like to adjust these settings before converting the plant to a polygon object, you should use the import as a Plant Object instead, check the appearance of the plant in C4D and adjust it individually using its parameters if desired. You can then use>> (or the shortcut C) to manually convert the plant to a polygon object.
Within the Import/Export preferences of Cinema 4D, this menu item is grayed out, as the available settings in this menu may differ in type and number depending on the loaded plant. The selection options in this menu are therefore only available if you use to load a Laubwerk Plant.
Each selected plant species is generally available in several form variants, which in turn are often available in different growth phases, such as Young, Middle-Aged and Full-Grown. For deciduous and coniferous trees, for example, three shape variants are generally offered, each with three growth phases, resulting in nine different models per plant species.
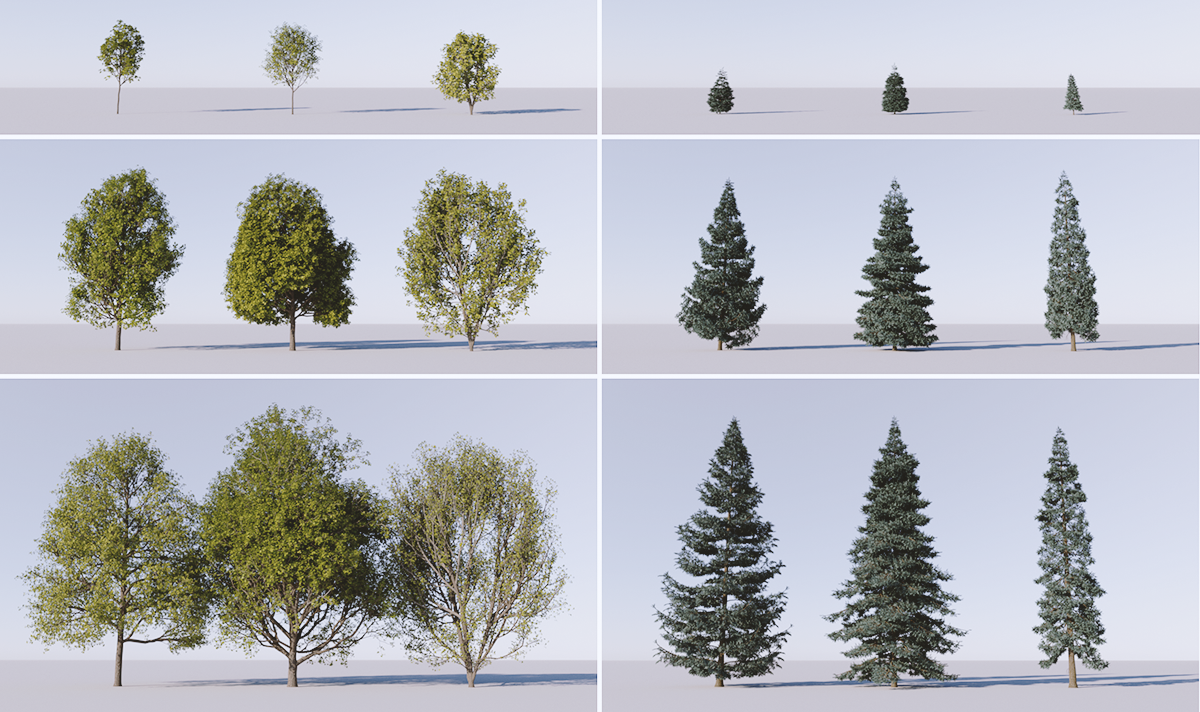 Each plant can be produced in several growth stages and shape variations. These variations are shown on the left for a deciduous tree and on the right for a conifer. The variants and growth phases are different for each plant species.
The following illustration shows an example of the flexibility of this setting for a simple grass, for which only a middle-aged growth phase is offered, but this is offered directly in six different variants.
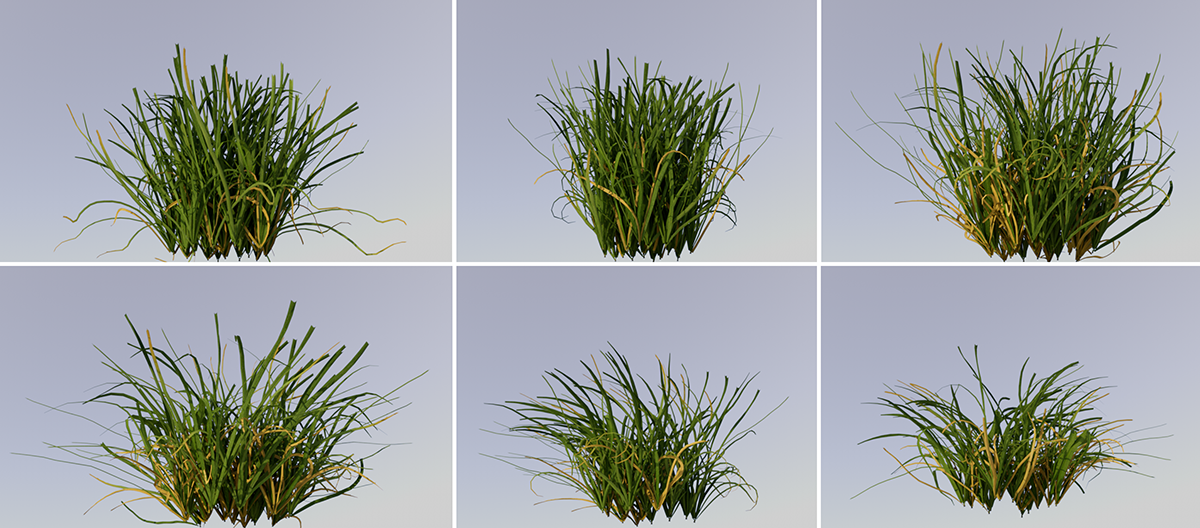 These pictures show an example of a grass plant for which only one middle-aged growth phase is offered, but in six different variations.
In any case, the Model setting allows you to place several plants of the same species close together without the plants looking too similar. Additional variations can also be achieved by rotating the models around the vertical, as this allows the viewer to see different perspectives of the plant. Settings are also available for individual adjustment, e.g. of the Leaf Density or a Custom Scale.
Within the Import/Export settings of Cinema 4D, this menu item is grayed out, as the available settings in this menu may differ in type and number depending on the loaded plant. The selection options in this menu are therefore only available if you use to load a Laubwerk Plant.
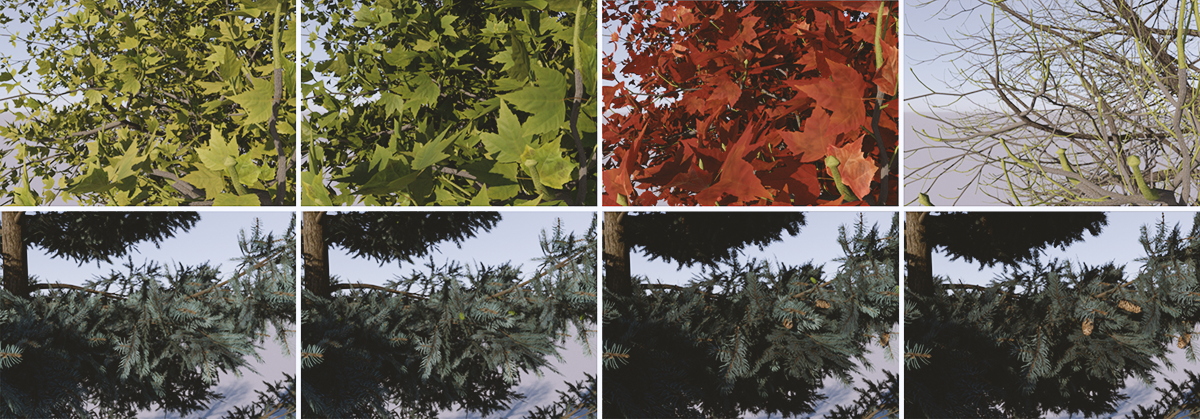 In the top row, from left to right, the seasons Spring, Summer, Fall and Winter are shown as examples for a deciduous tree. The series of pictures below shows these seasons for a pine tree.
The desired season for the plant can be selected here. This influences the number, size and coloration of the leaves, especially in deciduous trees. The changes during the seasons are less pronounced in conifers. In addition to a change in the color of the needles, additional details such as the growth stages of cones in Autumn and Winter are particularly striking.
Depending on the plant species selected, other variants may also be available, such as tropical plants, where the annual cycle tends to be divided into Rainy Seasons and Dry Seasons. The following series of images provides an example. There you could choose between early and late rainy season, as well as early and late dry season. However, there are also plants for which no season can be changed at all, such as some grasses that look the same all year round.
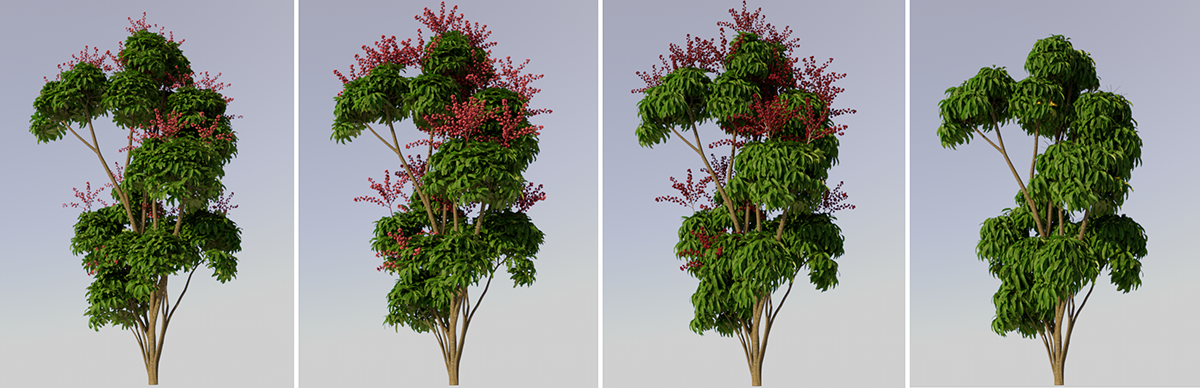 Exemplary variation of the seasons for a tropical tree. From left to right, the early and late rainy seasons and the early and late dry seasons are juxtaposed here.
The number of leaves or needles on a plant can be individually adjusted using this percentage value. This can be used, for example, to improve the visibility of a background or to save memory for leaf and needle polygons. It can also be used to indicate seasonal transitions, such as the time between winter and spring on deciduous trees.
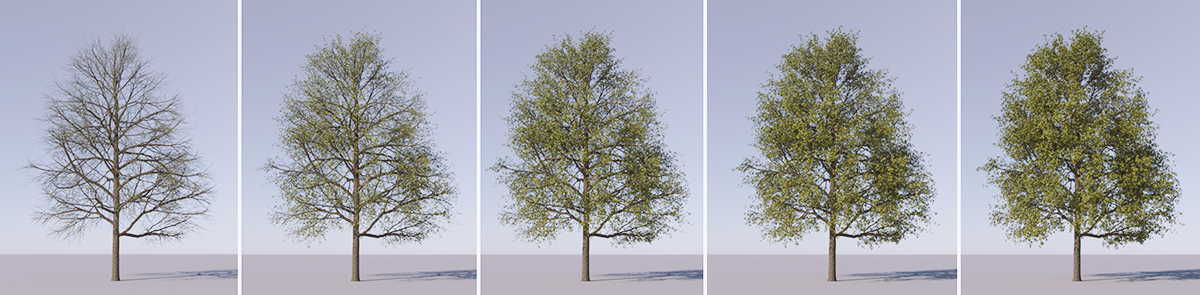 From left to right you can see the change in Leaf Density on a deciduous tree between 0% and 100%.
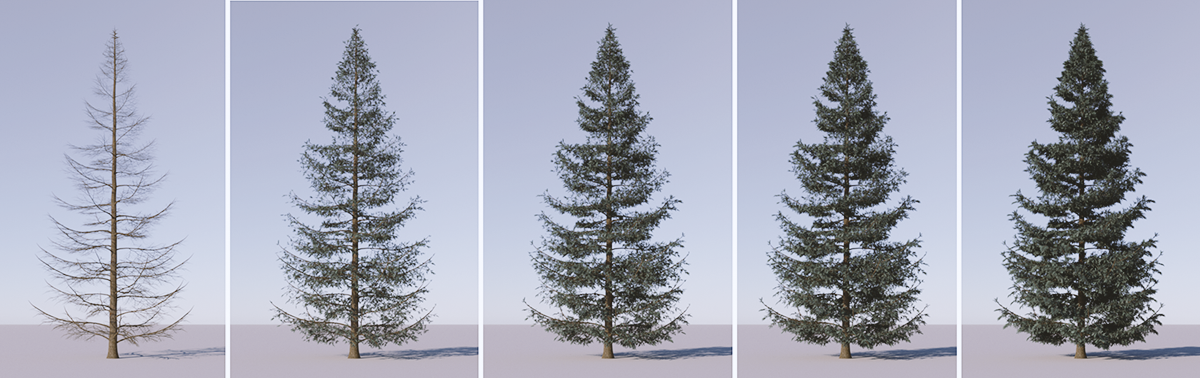 From left to right you can see the change in Leaf Density on a conifer between 0% and 100%.
This effect can be used, for example, for plants placed further away from the viewer, as fewer leaves or needles on a plant also mean a corresponding reduction in the memory requirements for this plant. This setting is also helpful for plants at close range, for example to reduce the subject coverage of a tree crown and make more of the background visible again.
In the Detail settings of the Plant Object, you will find a comparable Leaf Amount setting. This can also be used to reduce the number of needles or leaves, but the remaining leaves are enlarged at the same time in order to keep the visible volume of the plant as constant as possible.
All plants are automatically available in realistic size and do not normally have to be scaled manually. When activated, this option ensures that the plant size is automatically scaled to the unit of measurement currently used in the project (see Edit>Scene Settings>Project Scale). If, for example, Centimeters are used as the unit of measurement, the plant is automatically scaled correctly in this unit. Only if you want to adjust the plant size manually can you deactivate this option and use the Custom Scale value below.
This setting is only available if Use Document Scale has been switched off and then allows you to influence the plant scale yourself. The Custom Scale value functions like a multiplier. If you use e.g. 1 centimeter as the Project Scale in the Scene Settings, the 2 Centimeters Custom Scale can be used to halve the plant size. Every centimeter within the scene is therefore practically considered to be two centimeters and the plant is therefore only half the size.
Switching the unit of measurement behind the Custom Scale value can have an even more dramatic effect on the plant size. Switching from Centimetres to Meters (if Centimetres are used as the Project Scale unit) then results in the plant having only one hundredth of its original size, for example. One hundred centimeters on the plant becomes one centimeter in the scene.
Similar to the Interpolation settings on splines, the number and distribution of points along the branch paths and in the circumference of the branch cross-sections can be set here. Two methods are available for this:
- By Level: The point density along the branches and the circular branch cross-sections adapts to the curvature of the branches. This means that the subdivisions are used primarily where a change in direction of the branches can be observed. This means that the subdivisions can be used particularly effectively to improve the quality of shape reproduction at bends without wasting subdivisions on primarily straight sections.
- Uniform: Here, the course of the branches and the branch cross-sections do not play a role. Instead, the sections between the base points of the branches, which are always present, are divided into sections of the same size. Therefore, if you want to achieve the same subdivision quality as in By Level mode, more polygons are created. This mode can therefore not be used quite as effectively. On the other hand, there may be situations in which a uniform subdivision is helpful, e.g. to implement a deformation of the plant.
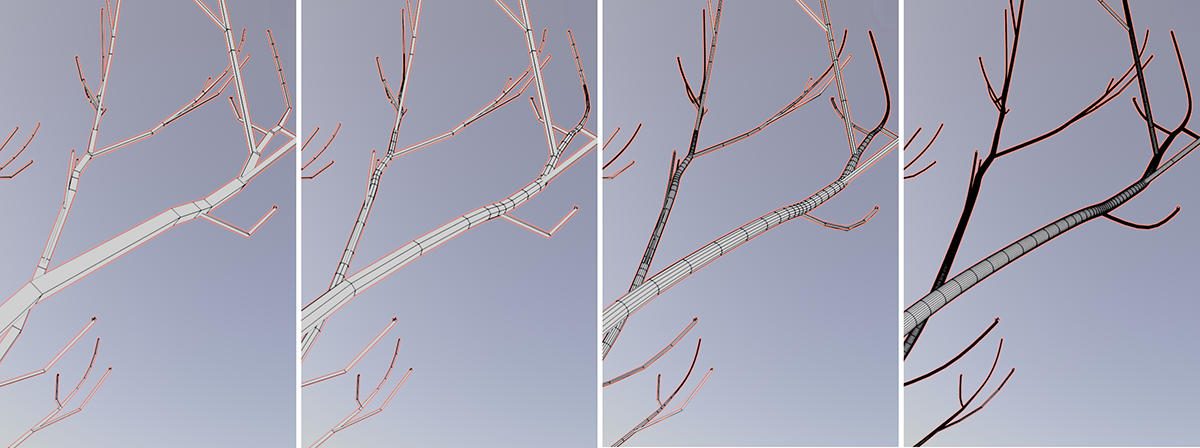 Here you can see examples of By Level subdivisions that focus on curved sections of the branches. From left to right, you can see branches of a tree crown on which 3, 4, 5 and 6 Subdivisions are used.
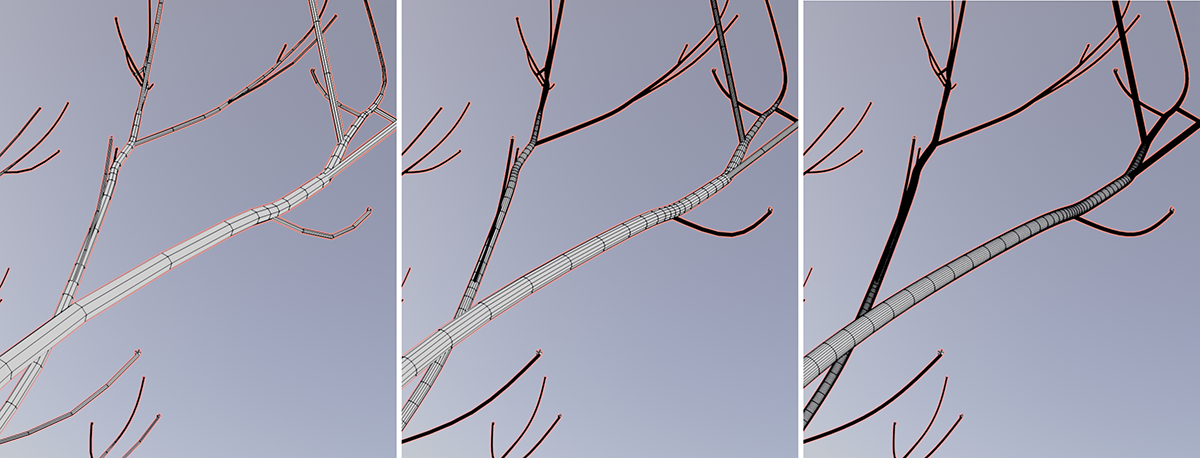 Here you can see examples of Uniform subdivisions that are used regardless of the shape of the branches. From left to right, you can see branches of a tree crown on which 1, 2 and 3 Subdivisions are used.
Subdivision value
Enter the desired subdivision value here. Depending on the complexity of the plant, make sure that you do not use too high values here, but only increase them in individual steps and check the result after each increase. A large number of polygons can be created very quickly, especially with the already complex, large deciduous and coniferous trees.
This activates the input field for Maximum Branch Depth, which can be used to configure the complexity of branch branching. This can be used to reduce the number of polygons. Unlike when using Minimum Branch Thickness, the thinly tapering branch ends are retained.
This value controls the complexity of the branching. The lower the Maximum Branch Depth is chosen, the fewer fine branches are calculated, but the overall size of the plant or tree is retained as far as possible. This can be used to reduce the number of polygons and thus the memory requirement, or to be able to control the visible complexity individually.
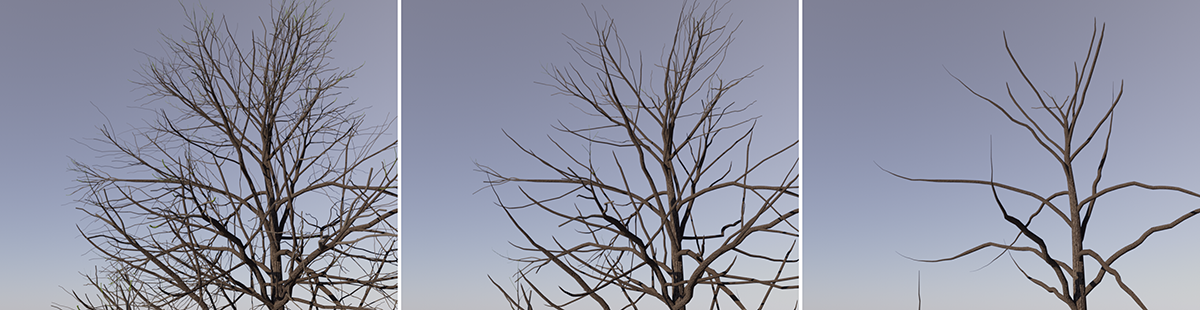 From left to right, you can see a tree crown where the Maximum Branching Depth was reduced to 4, 3 and finally 2.
This activates the input field for Minimum Branch Thickness, which can be used to trim branches from the ends. This can be used to reduce the number of polygons.
Minimum Branch Thickness[0..10000m]
This input is enabled by the preceding Use option. All branch sections whose diameter is below this value are cut off on the model. In this way, the thin branches, which are often not visible from a greater distance anyway or are covered by leaves, can be removed automatically. This can be used to optimize the storage requirements for the plant, or if you want to visualize a pruning on a bare tree in winter, for example.
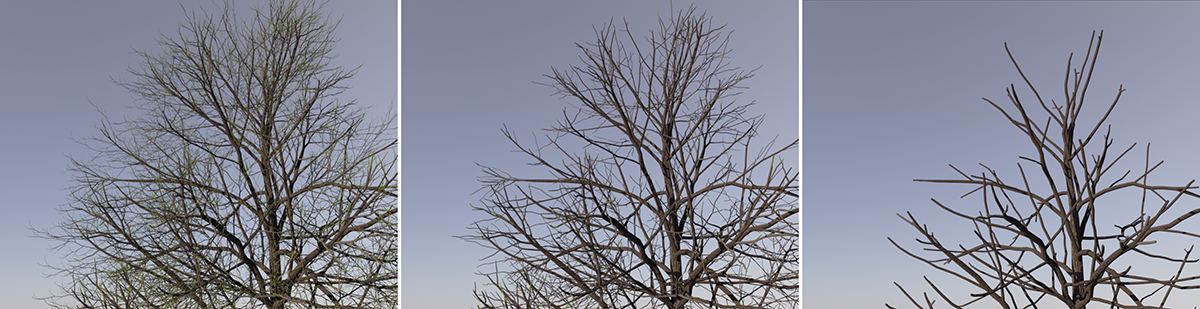 From left to right, a tree crown can be seen here on which the Minimum Branch Thickness was gradually increased.
This can be used to individually enlarge the polygons through which the leaves and needles are displayed. At the same time, their number is reduced, which leads to a corresponding reduction in memory requirements. In this combination, the effect is therefore particularly useful for optimizing the number of vertices and polygons in the background of a scene without having to accept visual restrictions.
The scaling of the visible needles or leaves can also be helpful as an artistic stylistic device (depiction of fresh leaves at the beginning of spring), or simply to close visible gaps in a tree crown, as documented in the following sequence of images. Smaller values lead to fewer but correspondingly larger leaves, whereby the original number and size of needles or leaves is always calculated at 100%.
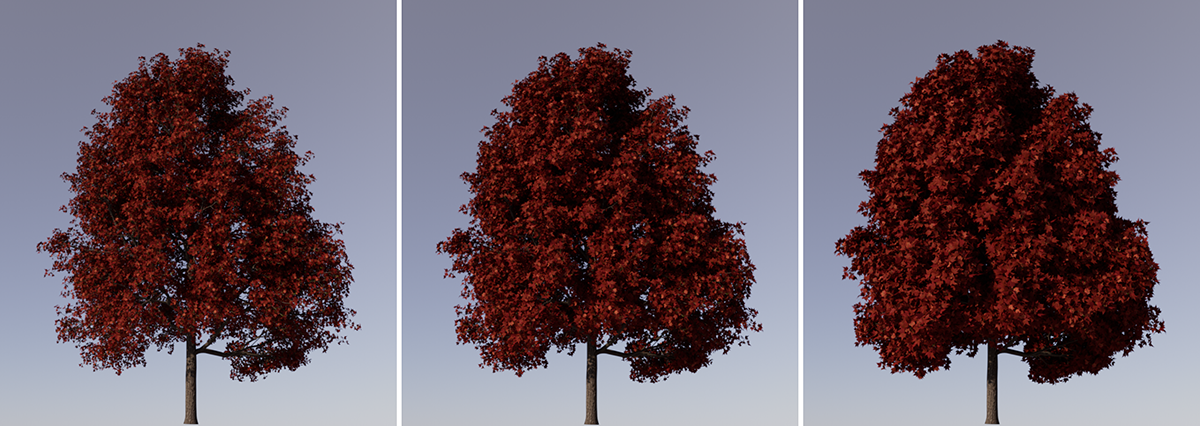 Viewed from left to right, an identically configured tree can be seen here. The only difference is the reduction of the Leaf Amount value from 100% (left) to 75% (center), down to 50% (right).
If you are only interested in reducing the number of leaves or needles in order to optimize the memory requirements of the plant or its motif coverage, you can also use the Leaf Density value, which does not trigger a simultaneous scaling of the leaves. Both settings can also be used together to create a balance between the number of leaves/needles, the plant's memory requirements and the optical volume of the plant.
Here you will find settings to configure the type and quality of the textures and materials with which the plant is to be covered. Here it usually makes sense to optimize the materials directly for the renderer that is also used in the scene.
Here you select the renderer for which the materials are to be created. This should therefore be the renderer that you want to use for the image calculation of your project. Many renderers that support node systems for materials are already supported by default. The materials can be switched via their Node Spaces in the Basic settings if an active renderer is subsequently changed.
- Active Renderer: If supported, native materials are automatically generated for the renderer currently selected in the Render Settings. These are therefore Redshift materials by default, unless you have manually switched to a different renderer before importing the plant. Laubwerk plants also partially support third-party renderers, such as the Arnold Renderer. You can also see whether your installed renderer from a third-party provider is directly supported by the Type listing of the materials. If a compatible, installed renderer is found, it will also appear in this list as a directly selectable material type.
- Standard: This creates materials for the classic (old, legacy) standard renderer of Cinema 4D. This format is also suitable for other third-party renderers that may not be directly selectable here, as these often offer conversion functions for legacy standard C4D materials.
- Redshift: Materials are created that can be used natively by the Redshift renderer.
- Other renderers: In addition to Redshift and the old Standard renderer (or the old Physical renderer from Cinema 4D), other third-party renderers are also directly supported, such as the Arnold renderer. If renderers supported by Laubwerk are found, they will also appear in the list and can be selected directly to create suitable materials.
- Universal Node Material. Materials are automatically created for all installed renderers (that are compatible with the Laubwerk importer). This is made possible by configuring different Node Spaces for the generated node materials. This allows each material to be automatically switched for different renderers when the renderer is switched in the Render Settings. This makes it easier to switch the active renderer at a later date because the existing plant materials do not have to be converted or reconfigured afterwards. The Node Spaces of the materials can also be switched manually via their Basic settings.
The plant materials also use textures that are loaded automatically. These quality levels can be used to indirectly select the number and level of detail of the materials or whether textures should be loaded at all:
- High: The front and back sides of leaves are given separate materials in order to be able to reproduce all the properties of a real leaf. This setting is particularly suitable for detailed shots of plants and offers the best possible display quality.
- Medium: Only materials for the front of the leaves are loaded, which are then also used identically on the back. This reduces the number of materials required per plant to a minimum, but still provides sufficient detail for normal perspectives on a plant.
- Low: The materials do not use any textures and only show simple color values. However, this can be sufficient for plants in the distant background of a scene and helps to significantly reduce the memory requirements when rendering and saving a scene with many plants.
This allows the generated materials to be added directly to an existing or a new level. The small triangle drop-down menu to the right of the Layer field gives you access to selection options for layers that already exist in the scene or you can directly activate the addition of materials to a new layer.
Layers simplify the grouping of materials in the Material Manager, for example. The names, highlight colors and properties of layers can be edited in the Layer Manager, among other things.