
What is MCP?
Cinema 4D can be controlled by an AI assistant. The connection that makes this possible is called MCP, and this page explains what it is, what it is useful for, and what it deliberately does not do. No prior knowledge is assumed.
The problem it solves
An AI assistant can reason about your work and describe what to do, but on its own it cannot reach into an application. It has no hands. Before a common standard existed, every assistant that wanted to operate a program needed a connector written specifically for that pair — and with a dozen assistants and a dozen applications, somebody has to build and maintain a hundred and forty-four of them.
The Model Context Protocol replaces that with one agreement. An application describes its capabilities once, in a form any assistant can understand, and any assistant that speaks the protocol can use them. The application does not need to know which assistant is on the other end, and the assistant does not need to know how the application works inside.
MCP was published as an open standard in November 2024 and was adopted across the industry during 2025. Late in 2025 it was handed to a neutral foundation, so it is no longer the property of any single AI vendor. This matters for a host application like Cinema 4D: the connection is not a bet on one company’s product.
What MCP actually is
Three parts work together:
-
The host is the program you talk to — a desktop assistant, a code editor, a command-line tool.
-
The client is the connection the host opens for each service it wants to use.
-
The server is the side that offers capabilities. The MCP server built into Cinema 4D is one of these.
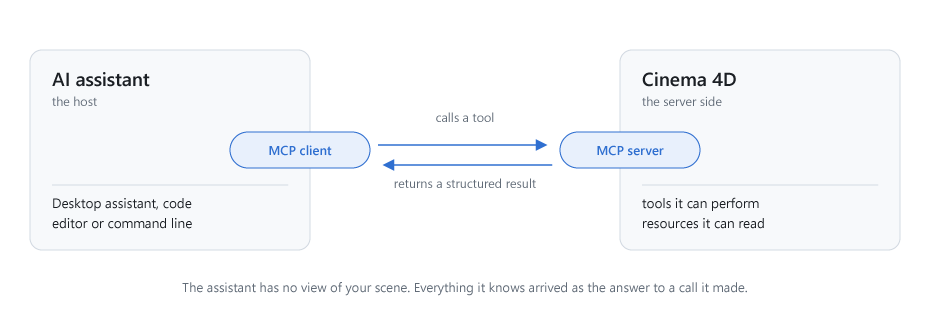
A server offers tools and resources. A tool is something that can be done: create an object, read a parameter, run a command, save the document. A resource is something that can be read. Each tool comes with a plain-language description of what it does and what it needs, and the assistant is given that list when it connects. When it decides a tool is needed, it calls it and receives a structured result.
One consequence is worth stating plainly, because it is often misunderstood: the assistant does not see your scene. It has no view into the viewport and no copy of your document. Everything it knows about your work arrived as the answer to a tool call it made. If it has not asked, it does not know.
The only action that can mitigate this somewhat is the option to transfer the current contents of the viewport or a rendering from the server to the host, so that the host can, in the truest sense of the word, get a picture of the current situation. As a user, you can grant permission for this yourself or choose to opt out of this transfer. There is still the option of answering the assistant’s questions about the current status yourself, so that it can intervene to make corrections if necessary—for example, if an object to be created has been designed upside down.
Where you meet MCP outside 3D
The same protocol is used far beyond graphics — for file systems, issue trackers, databases, version control and documentation systems. An assistant connected to several servers at once can carry information between them. The skills you build working with MCP in Cinema 4D transfer directly to those other contexts, because the way you phrase a request and the way you check a result are the same everywhere.
Built in versus bolted on
Integrations of this kind first appeared as community projects, for Cinema 4D and for other 3D applications. They demonstrated what was possible well before any vendor shipped something comparable, and the idea deserves that credit. Technically, however, they share a common shape: a plugin installed by hand, a second program running alongside the application, a network port opened between the two, and a configuration file edited manually in the assistant.
An integration built into the application can take a different route.
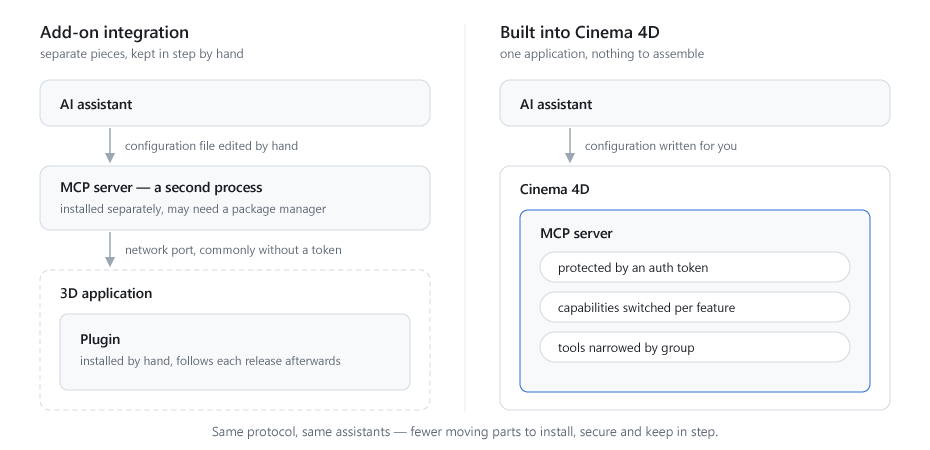
| Aspect | Add-on integration | Built into Cinema 4D |
|---|---|---|
| Installation | Plugin, a second process, often an additional package manager | Already present; one switch to enable |
| Connection | An open port, commonly without authentication | Local only by default, protected by a token |
| What the assistant may do | Usually all or nothing | Selectable by capability and by tool group |
| Running Python | Typically always available | Two separate switches, either can be turned off |
| Setting up the assistant | Editing a configuration file by hand | Written into the client’s configuration for you, or copied as a ready-made entry |
| Keeping up with releases | Follows each new version afterwards | Released together with the application |
The practical difference is smaller on the first day and larger on the hundredth. An integration that ships with the application is tested against it, documented with it, and does not quietly stop working when you update.
What this is good at, and what it is not
It is worth being direct about this, because the question behind it is a serious one.
The MCP connection is not a generative system. It does not invent designs, it does not produce imagery, and it holds no opinion about whether a shot works. It has no taste. Every instruction originates with you, every action it takes appears in the undo stack, and nothing happens at all while the MCP server is switched off.
What it is genuinely good at is the part of a working day that is not creative but consumes creative time. Naming three hundred objects consistently. Finding the four lights that were left at the wrong intensity. Checking a scene against a rule before it goes to render. Applying a decision you have already made, to every object it should apply to. Reading out numbers you would otherwise collect by clicking through the Attribute Manager.
None of that is the work people trained for. It is the work that sits between them and it. The decisions stay exactly where they were. What changes is how much of the day is spent carrying them out.
Getting started
Setting up the connection takes just a few steps. Each setting involved is described in full on the MCP preferences pages.
-
Start Cinema 4D. It has to be running when a client connects for the first time. A client that is already connected reconnects on its own if Cinema 4D is quit and restarted later.
-
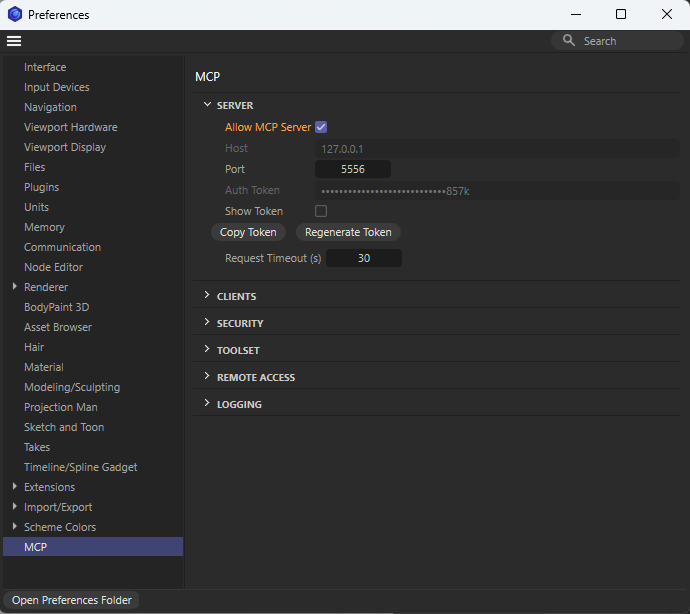
Enable Allow MCP Server in the Server settings of the MCP preferences. Cinema 4D asks for confirmation and explains what a connected client is able to do. The server starts immediately; no restart is needed. The Start MCP Server command in the Extensions menu or the Commander does the same.
-
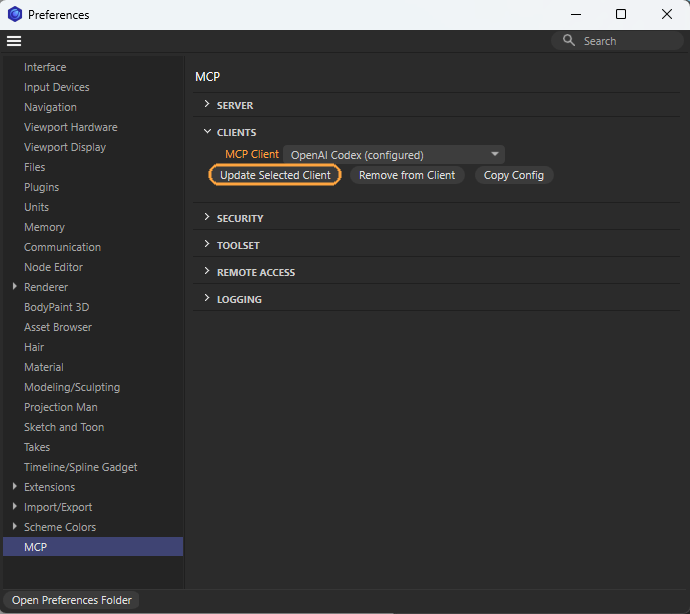
In the Clients settings, select your client in the MCP Client list and use Update Selected Client. Cinema 4D backs up the client’s configuration file and writes its entry into it. If your client is not offered there, choose Other and use Copy Config to paste the entry into the client’s configuration yourself. Repeat this for each client you plan to use.
Those are all the settings you need to configure for an initial test run. You can close the Preferences for now. -
Quit the client completely and start it again. Closing its window is not enough where a client keeps running in the system tray or the menu bar. Therefore, check - for example, using your system's Task Manager or Activity Monitor - whether there are any remaining background processes for the Client AI Assistant; these should also be terminated before restarting the assistant. This is the only way to ensure that the modified configuration file is actually read and applied. Otherwise, it is not necessary to restart the computer.
-
Ask the client if it can access Cinema 4D and let it create a cube in Cinema 4D. If a cube appears in the scene, the connection works.
From then on, you describe in the client what you want done.
Which client and which model you use is your choice. Any client that supports MCP servers can be connected, whether it runs as a desktop application, in a code editor or on the command line. Mechanical work such as renaming succeeds with almost any current model; work that requires reasoning about the scene benefits noticeably from a stronger one. A model running on your own computer competes with Cinema 4D and the renderer for graphics memory. Maxon does not charge for the MCP Server; the AI service you connect may charge for model use.
Typical workflows
The requests below are written the way you would actually type them. They are deliberately unglamorous, and they are the kind of task where this connection earns its place.
Ask before you act. Questions are free and change nothing, which makes them the safest way to get a feel for the connection:
List every material in this scene that is not assigned to any object,
and tell me the polygon count of each top-level group.
Tidy up. Bulk renaming is precise, tedious and easy to describe:
Rename every object under "03_Props" so its name starts with PROP_,
keeping the existing name after the prefix. Tell me about anything
you could not rename.
Check consistency. The assistant is patient in a way that people are not at the end of a long day:
Check every light in this scene and list those whose intensity
differs from the median by more than 20 percent.
Apply a decision you have already made. You choose; it repeats:
Take the material on the selected object and assign it to every
other object whose name contains "Railing". List what you changed.
Build a setup you already know. Faster to describe than to assemble:
Create a camera at the origin looking along positive Z with a 35 mm
focal length, give it a protection tag, and put it in a new null
called "07_Cameras".
Verify your own work. Perhaps the most underrated use, and one that benefits from the assistant having no stake in the answer:
Nothing in this scene should reach closer than 300 units to the
centre line. List every object that does, with its distance.
A pattern is visible across all six. Each one names a clear criterion, says what to do, and asks for a report. Requests phrased that way can be checked; requests phrased as “make this look better” cannot.
Specific examples
Scene Analysis and XPresso Setup
We loaded a wristwatch model from the Asset Browser. This wristwatch is to be animated in such a way that a typical exploded view is created. So that we can intervene later on—for example, to easily adjust the distances between the assemblies—we use the AI Assistant to identify the watch’s available assemblies and calculate end positions for them, ensuring that the moving parts do not intersect as much as possible along the way. In addition, an XPresso setup will be configured so that we can perform this movement of the assemblies ourselves.
Prompt: Hi, I’d like to work with you today on some sample scenes to demonstrate the MCP bridge to Cinema 4D. Currently, a scene featuring a wristwatch is open in Cinema 4D. It consists of separate assemblies and parts that I’d like to animate. Please take a look at the current scene and identify the objects that make sense to animate separately. Create a new camera for yourself to look at the viewport it needed. The already available camera objects in the scene use Restriction tags and therefore shouldn't be moved.
					Create a Null object, apply a user data slider with values between 0% and 100% to it and apply a XPresso setup to it that allows me to use that slider to move the building blocks of the watch outwards and create a typical exploded view of it. Take care, that the moved parts do not penetrate each other while being moved outwards. Make sure that, in the assembled watch, the outer parts are moved further outward in the frame than the deeper assemblies, so that the logical order of assembly is preserved.
				Let me know if you need any help. Do not save the finished scene automatically.
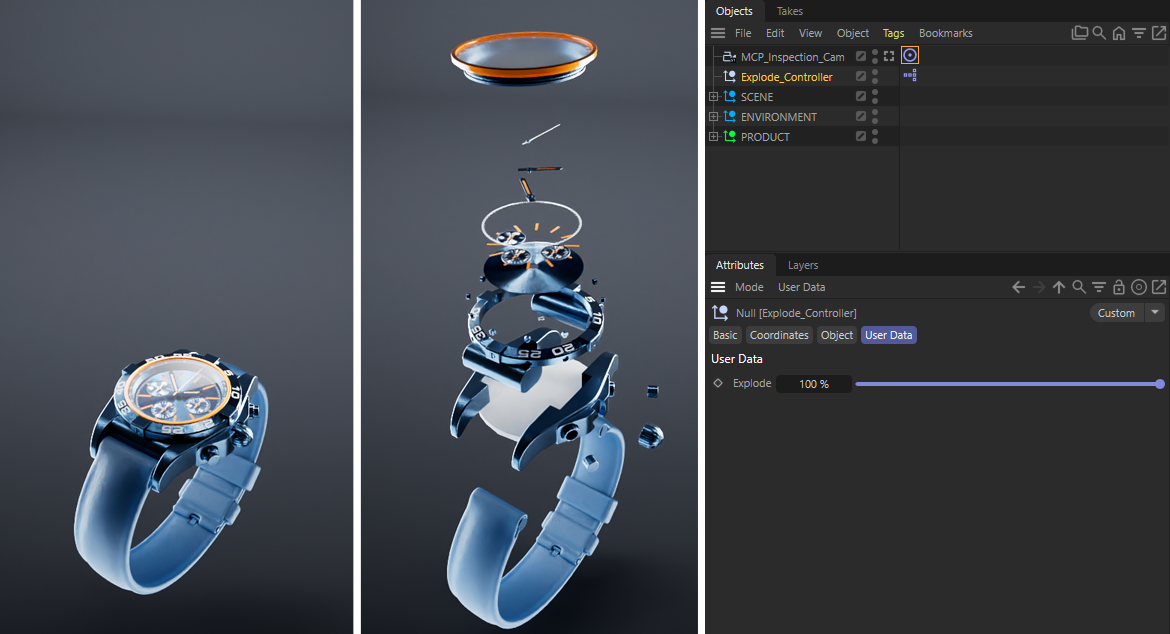
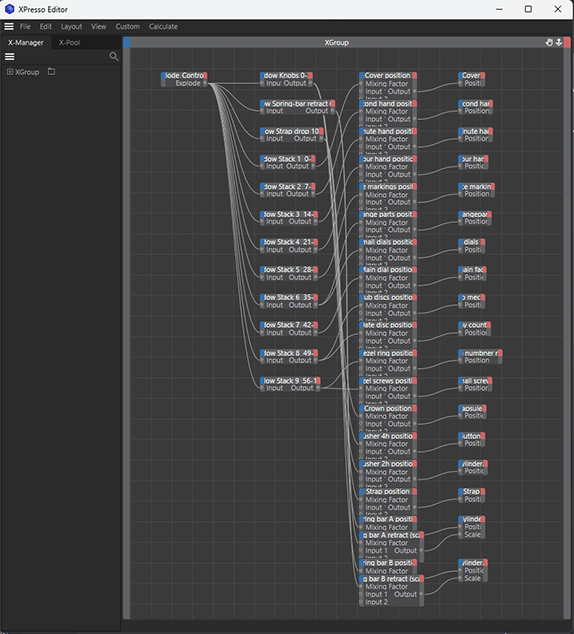
As requested in the prompt, an XPresso node graph was automatically created, which we can control using a user data value. By moving a slider, you can freely blend between the model’s original state and its exploded state. Since this XPresso setup can, of course, also be edited later via MCP or manually, we have full control at all times over the timing of an animation and the final positions of the individual elements.
Search for, place, and group assets
In this example, a bookshelf is to be filled with assets that the MCP Client will automatically select from the Asset Browser based on the appropriate size. To do this, start with the first prompt:
The scene currently open in Cinema 4D shows a bookshelf. Use the Asset Browser to load suitable objects of your choice and place them on this bookshelf. Be sure to select only objects that can be placed on the shelves without intersecting with each other or with the bookshelf’s components.
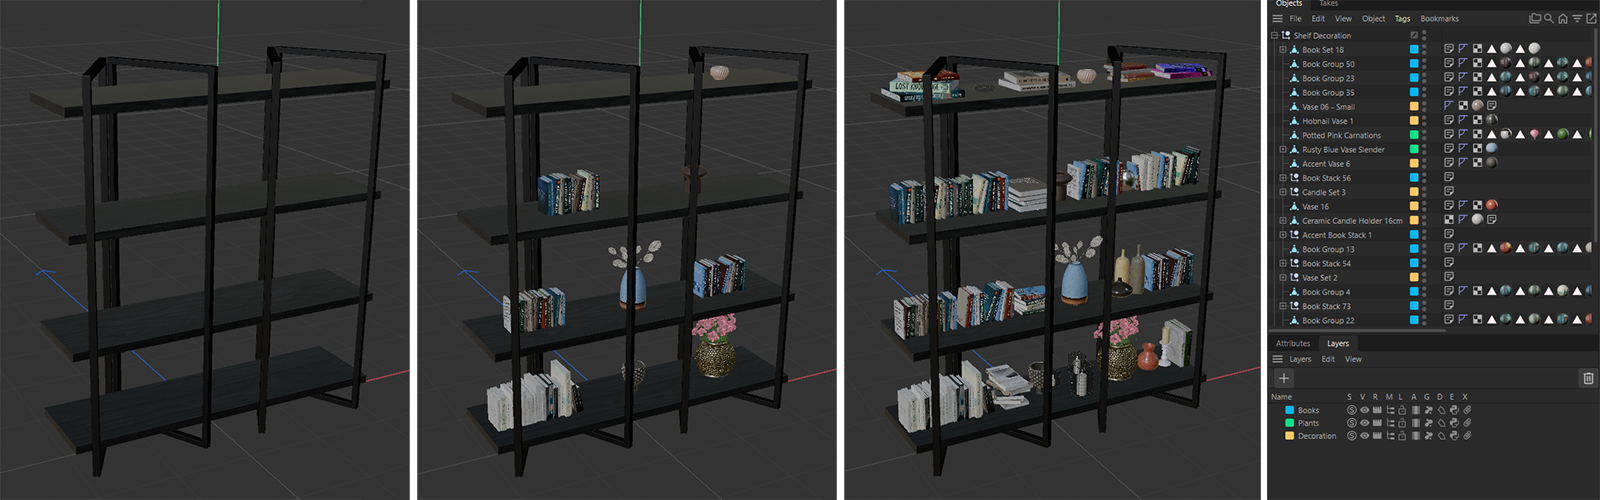
As you can see on the left in the figure above, this is already working well, but I'd like to use and fill the entire shelf space. So we'll follow up with this prompt:
Please fill the shelf even more with assets to minimize free spaces.
This gives us the crammed bookshelf shown on the right side of the image above. Finally, we’d like to make the image a bit more organized, so we’ll ask the model to arrange the new elements into layers so we can easily isolate or hide them as needed. The result is shown on the far right of the image above. Here’s the prompt used for this:
In Cinema 4D, please use different layers to organize the placed objects. One layer for all the books, one layer for the plants, and one layer for all the other decorative elements on the shelf.
Working with UV Coordinates
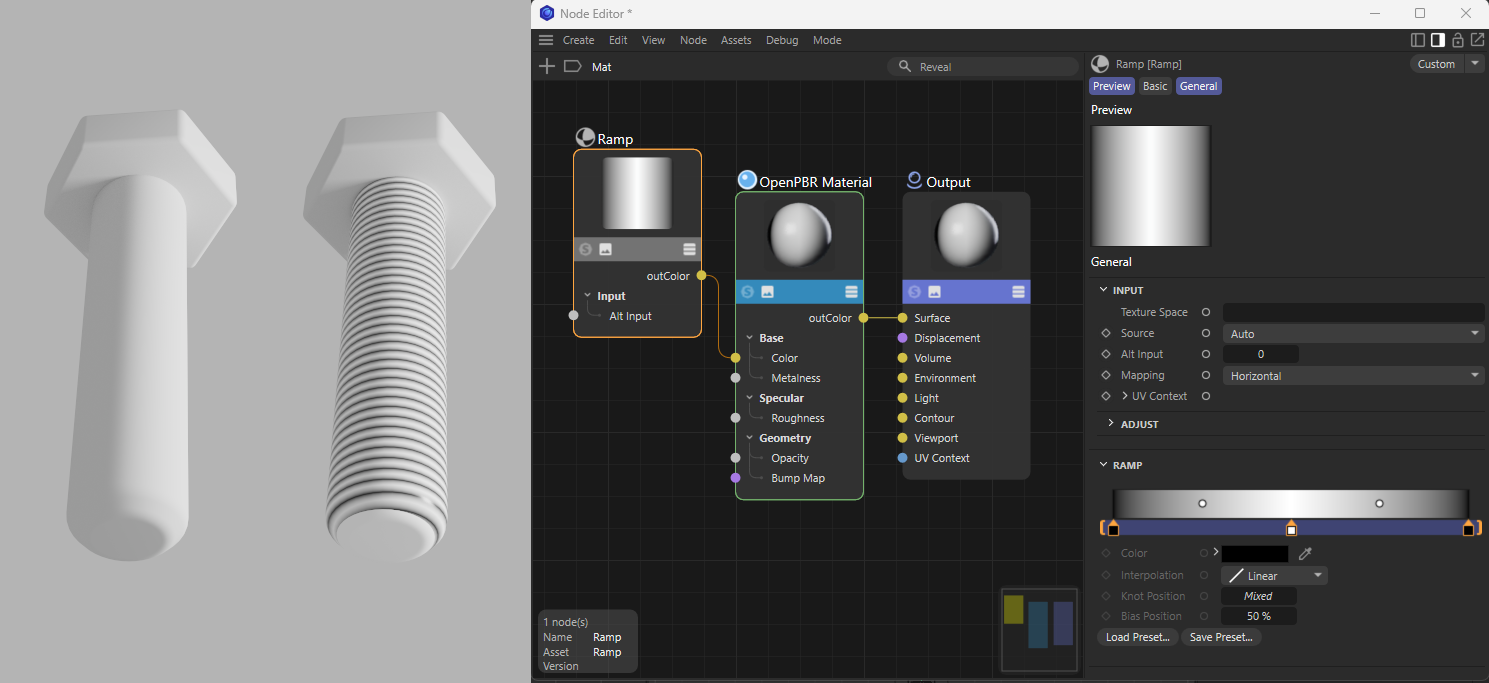
The next example will focus on a UV unwrap and a Redshift material. To save on polygons and avoid using displacement in a technical project, we’ll apply a spiral-shaped material to simple cylinders to simulate a thread. To do this, we’ll create two basic cylinder objects in Cinema 4D—one for the screw head and one for the actual screw body, which will display the thread—and use this prompt:
For the cylinder named "Thread", in the Cinema 4D scene that has just been opened, I want to simulate a realistic-looking thread simply by using a Redshift material. To do this, please create a UV unwrap for the object—which has been converted to a polygon object—that allows to wrap a horizontal, linear brightness gradient spirally around the cylinder. The UV unwrap should be set up so that the material can be repeated as many times as desired along the longitudinal axis without any noticeable visual misalignment.
Staying in control
The connection is off until you switch it on, and it is limited to your own computer unless you deliberately extend it. The assistant’s permission to run Python is governed by two separate switches (see Security setting page for the MCP Preferences), and the range of tools offered can be narrowed to the groups you actually want. The same documentation page also lists the numerous actions that do not require the use of Python at all, since they have already been integrated into the Cinema 4D MCP Server.
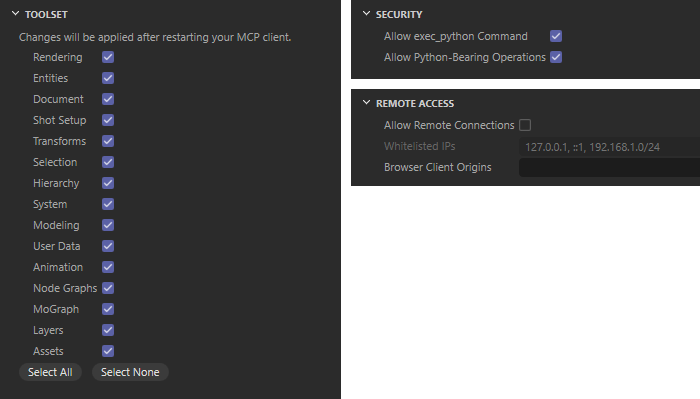
Access is protected by a token. It helps to think of it as a lock and a key: Cinema 4D creates both the first time it starts, and each client you set up receives a copy of the key or a link to where C4D stored it. You never have to handle the key yourself — and for the same reason it should not be copied out by hand, and neither a client’s configuration file nor your Cinema 4D preferences folder belongs in a shared location where others could find it.
When a client asks you to approve each step, that request comes from the client, not from Cinema 4D. Each client decides how often it asks and whether its prompts can be switched off. What Cinema 4D decides is what a connected client is able to do at all. While a client is working, the status bar shows the tool currently running and whether the last call succeeded. A single failed call is no cause for concern; a model often tries something, fails, and follows up with a corrected call.
An assistant working through MCP acts inside your live document. Save before handing it a larger task, exactly as you would before running an unfamiliar script.
Alternatively, you can also specifically ask the host to try out experimental features or techniques in a newly created scene and only transfer the results to your scene once they show promise.
Limits and support
-
The server runs only in the full Cinema 4D application. In Commandline, in Team Render clients and servers, in c4dpy, in Cineware and in Lite it does nothing.
-
By default, only clients on the same computer can connect. Connections from other machines have to be enabled deliberately in the Remote Access settings, and they are not encrypted.
-
Maxon supports the connection between Cinema 4D and the client. What the model does with the tools it is offered depends on the model and the client you chose, and is outside that support.
-
Approval prompts, the session history and the model’s behaviour belong to the client. Cinema 4D cannot change them.
The individual settings, and what each of them permits, are described on the MCP preferences page. Questions that come up in day-to-day use are collected in the MCP Server FAQ.