
Commands
Here you will find all commands for the creation or editing of XRef objects.

This command will open a prompt window to select the scene you wish to load as a new XRef object. The XRef will be loaded with the options defined in the next section:
Options
Options for loading a new reference scene can be accessed by clicking the icon next to the command. These options can also be accessed again for each XRef object already present in the scene by selecting the XRef and clicking on the Options command in the Object tab of the Attributes Manager.
Reference tab
Encapsulated
You can choose to group your referenced objects under an XRef object using this option. You will usually want to keep referenced objects encapsulated (grouped) if you have several XRef objects because it makes identifying XRefs easier when everything is grouped (and to know to which XRef a referenced object belongs).
If you are dealing with few XRefs, then not encapsulating can make sense as it will enable you to mix and group referenced objects with the master scene objects not being constrained by the XRef group.
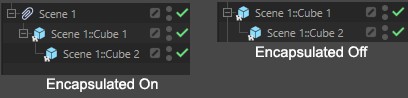
Note that once the Encapsulated option is off you can access the XRef option via the XRefs manager by right-clicking the XRef object you want to edit and selecting Options.
Generator
XRef objects can now be defined as Generators. No individual objects will then not be imported into the master Project and the XRef object will quasi instance the reference Project (as was done with older XRef projects). This lets you keep the master Project’s file size to a minimum. The disadvantage: Individual objects can no longer be modified, linked to Expressions or animated within the master Project. The XRef object itself can, however, still be animated or deformed.
Reference, Proxy Ref and all settings in the Animation tab can be animated. This lets you replace referenced Projects or modify the timing.
Caution: Enabling this option will reset the XRef object completely. All modifications made in the master Project will be lost!
Name Space
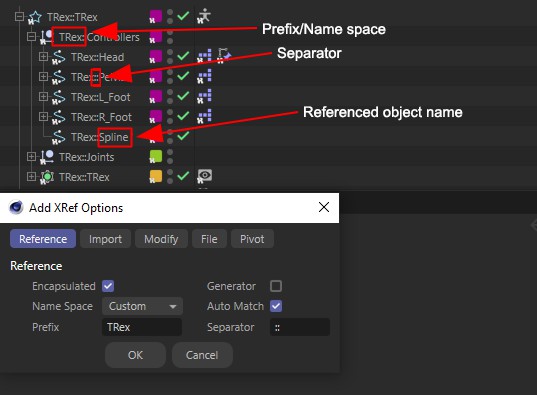
Here you can define a prefix that will be used for each referenced object attached to the XRef object. Setting up a name space is particularly useful if you choose not to encapsulate your referenced objects, or with XRef objects that contain a lot of referenced objects.
None
No name space will be used, each referenced object will keep its original name.
Ref Name
A prefix using the referenced file name will be added to each referenced object.
Custom
Using this mode, you can define your own prefixes. Using the variable "$ID$" will generate a definitive numerical sequence.
Auto Match
Use this option if you want Cinema 4D to match objects using the internal marker of each object before trying to match their names (when reloading a referenced object and keeping track of changes both in the master scene and referenced scene).
If you enable the Auto Match option, then objects will always match, and any changes of parameters, PSR values, etc. made in both Scenes (master and referenced) will be taken into consideration and accumulated accordingly.
If you disable this option, only names will be used, which means if you change the name of the object in the referenced scene, reloading it will reset any changes made in the master Scene beforehand. The referenced object will be loaded anew, which can also have its use if you wish to reset one object in particular.
Prefix
When using the Custom name space mode you can write here the prefix you would like to use for your referenced objects. Internal XRef object IDs will be used by default.
Separator
Here you can type any set of characters to be used as separators between the prefixes and the objects names. Good separators are usually the ones that give a good visual separation, such as <>, __, --, **. Use whatever you prefer.
Import tab
Use these options to determine what will be imported when loading/reloading a referenced scene.
Animations
Enable this option if you wish to import animation tracks and keyframes into the master scene, for further editing.
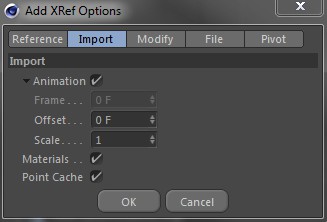 Click on the small arrow to make the Animations options available.
This option is grayed out if no animation was imported from the reference Scene (you can select the items to be imported in the Import tab of the XRef object's options menu or you can disable the Animation option described above). If no animation was imported, Frame will be accessible. Using these options you can enter a specific animation frame number that will serve as the default state. This can, for example, be used to import the same character into a scene multiple times but in different poses; or you can import a tree that is animated using animated Deformers. Each new XRef object can look slightly different.
Use this setting to temporally offset the animation of a referenced Scene. This can also be used to import a single character multiple times. Different Offset values can be used to move the character differently. Note that negative values can also be used to play the animation earlier.
Use this setting to scale an animation temporally, i.e., make it play more slowly or faster. This value serves as a multiplier, e.g., if your animation is 100 frames long and you enter a Scale value of 0.5, the animation will be 50 frames long (twice as fast). A value of 200 will produce an animation 200 times longer and so on. This method can be used to quickly adjust an animation's timing so no actual keyframes have to be edited.
Materials
Enable this option to import materials contained in the referenced scene. If this option is disabled, all material tags will be empty and their parameters locked in the Attributes Manager.
Point Cache
Enable this option to import Point Cache tags, disabling their animation.
Modify tab
Use these next options to determine what types of modifications you can do to referenced objects, in the master scene.
Hierarchy
Enable this option if you want to modify the hierarchy of the referenced objects in the master Scene. This is especially useful if you don't use the Encapsulated option, or any time you would like to make your own grouping, regardless of how it is done in the referenced scene.
Transformation
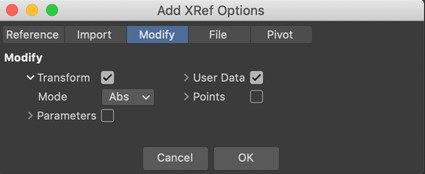 Click on the small triangle to make the Transformation options available.
Rel. Mode
When in this mode, changes made to objects in the master Scene will be assumed relative to their counterparts in the reference Scene. This means that changes to objects in the referenced Scene will be added to the changes from the master Scene.
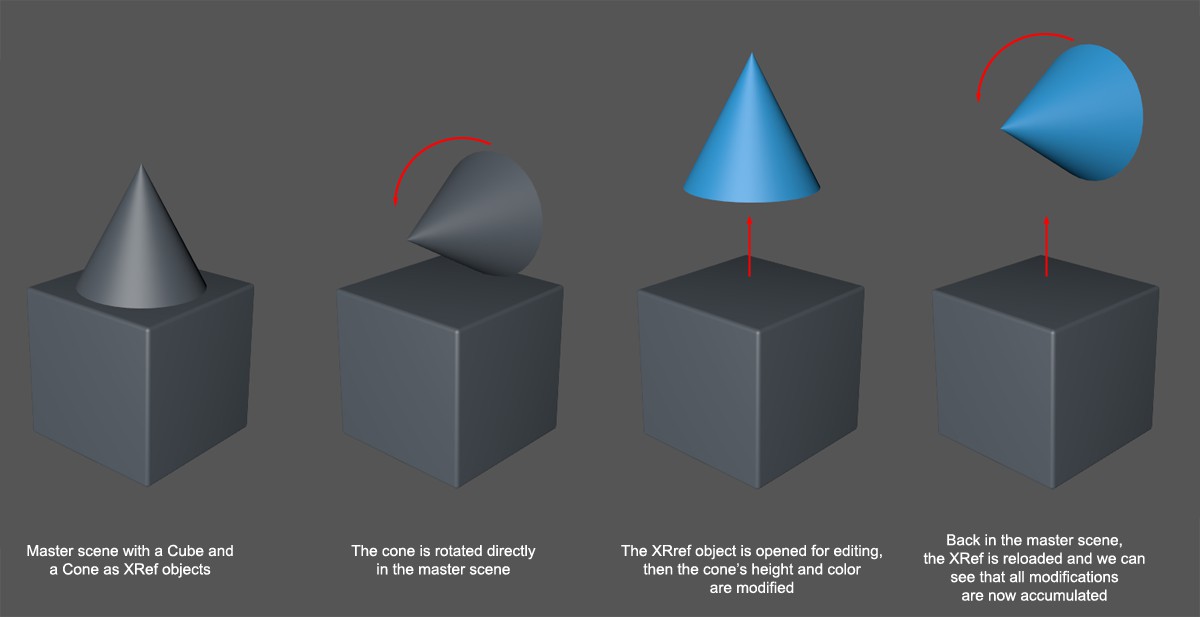
Abs. Mode
When in this mode, changes to objects in the master Scene will be absolute. This means that changes made to objects in the referenced Scene will not be reflected in the master Scene. Or put differently: Changes made in the master Scene "override" changes made in the referenced Scene.
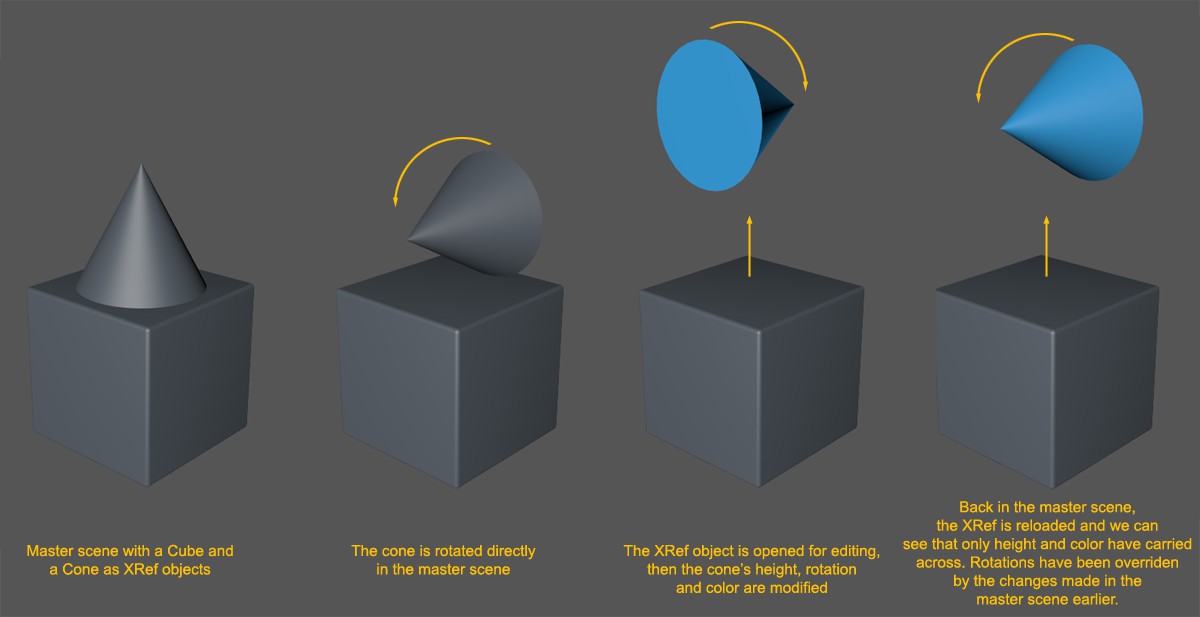 In this example, the rotations of the master and referenced Scenes are NOT added because the rotation in the master Scene was modified (changes made in the master Scene "override inferior" changes). Neither color nor position were changed in the master Scene and were subsequently assumed.
Parameters
Enable this option to modify the referenced objects parameters (frozen coordinates, parametric objects parameters, etc.). If this option is disabled, parameters relevant to the selected referenced object will be locked in the Attributes Manager.
Rel. Mode
When in this mode, changes made to objects in the master Scene will be made relative to their counterparts in the referenced Scene. This means that changes to object setting of a referenced Scene will be added to changes made in the master Scene.
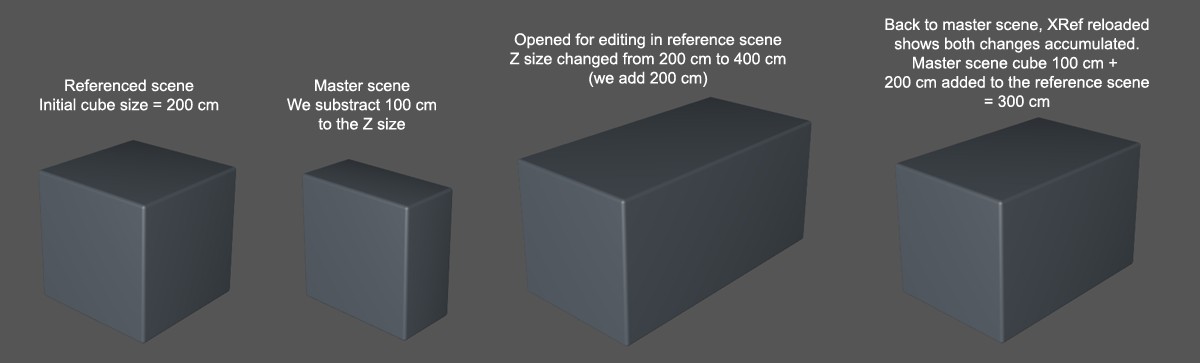 This can also be explained as follows: last referenced cube size = 400 cm. Previously, 100 cm were deducted in the master Scene (200 cm - 100 cm), which results in 400 cm - 100 cm = 300 cm. Hence, all changes made in the master Scene will be "put to memory" (in this example, the master Scene "remembers" that you deducted 100 cm from the cube's Z scale) and passed on whenever the XRef object is updated.
Abs. Mode
When in this mode, changes to objects in the master Scene will be absolute. This means that changes made to objects in the referenced Scene will not be reflected in the master Scene. Or put differently: Changes made in the master Scene "override" changes made in the referenced Scene. With regard to the example shown above, the changes made to the referenced object will be ignored. The cube's Z scale will maintain the master Scene's value of 100 cm
User Data
Enable this option to modify User Data placed on referenced objects. If this option is disabled, the User Data parameters will be locked in the Attributes Manager.
Rel. Mode
When in this mode, changes to objects in the master Scene will be assumed relative to their counterparts in the referenced Scene, i.e., changes to object parameters in the referenced Scene will be added to the changes made in the master Scene.
Example: Let's say you have a User Data slider that ranges from 0% to 100%. The default value upon import of an XRef object is 0%. Set the value to 50% in the master Scene. Then open the XRef Scene and set the value to 30%. Back in the master Scene, the 30% will be added to the previously defined value (50% + 30% = 80%). Note that the defined value limit (of the User Data slider) still applies (i.e., no values less than 0% or greater than 100% can result).
Abs. Mode
When in this mode, User Data defined in the master Scene will not be affected by the referenced Scene. This is normally the desired behavior if User Data should be modified or animated directly in the master Scene. This also avoids any unintentional changes to the Scene when the XRef object is loaded anew.
Points
Enable this option if changes to point data should be permitted. If this option is disabled, all modifications made to mesh points will be ignored and will be lost as soon as the Scene is closed or the XRef is reloaded.
Rel. Mode
When in this mode, changes to objects in the master Scene will be assumed relative to their counterparts in the referenced Scene, i.e., changes to object points in the referenced Scene will be added to the changes made in the master Scene.
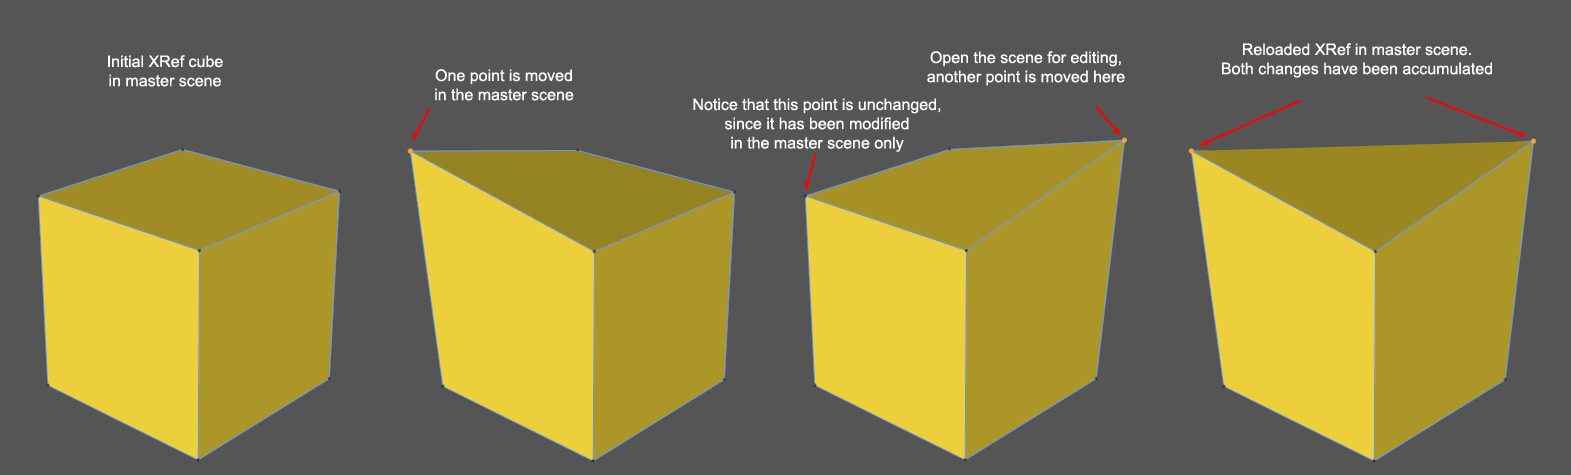
Abs. Mode
When in this mode, changes made to points in the master Scene will always have priority over changes made to points in the referenced Scene. This is normally the desired behavior if final editing should take place in the master Scene and no further changes should be assumed in the referenced Scene.
File tab
Use these next 2 options to determine how the referenced file should be handled when saved.
Relative to Scene
When this option is enabled, the reference path will be set as relative (e.g., "reference.c4d") when loading a reference. If this option is disabled, the path will always be set as absolute (e.g., "./XRef/reference.c4d"). For maximum mobility and ease of use, leave this option enabled.
You can also enter the name of the referenced Scene manually;
Cinema 4D will look for the reference paths by checking 3 locations in the following order:
-
In the current Scene path (at the same folder level, or inside any folder found at the same level than the Scene).
-
By checking the global asset Paths set in your preferences
- Up a level from the current Scene path
This ensures that relative paths can be built automatically as much as possible, when adding an XRef object, or when typing the name of the referenced scene manually.
Since Cinema 4D will look for referenced files using the asset paths rules, it can sometimes take a while to load an XRef if your search path is large and contains a lot of subfolders. In this case, absolute paths are much quicker to work with. Just make sure to use the Save Scene with Assets command if you need to exchange or move the files to another machine.
Keep in mind though, that referenced files’ dependencies (files referenced within another referenced file, or XRef objects inside other XRef objects, if you prefer) will not be automatically saved when using the command Save Scene with Assets, so make sure you manually include any such dependencies when moving your Scene. To that effect, the best practice is to use a specific folder solely for storing the referenced files, then use relative paths for each XRef object within the master Scene and each referenced file.
For example, if you have a master Scene and a folder named "XRef" containing a file named "Cube.c4d" at the same level, you can set the following relative path manually: "./XRef/Cube.c4d". Using this specific type of relative paths will speed up the search, as it will not use the full asset paths set in your preferences, but will only look in a specific folder. If you want to jump up one level in the directory you have to enter two full stops/periods in front of the slash. For example, if ../XRef/Cube.c4d is entered, Cinema 4D will first search one level above the position of the master object then in XRef for the name of the referenced file. You can jump up as many levels as you want.
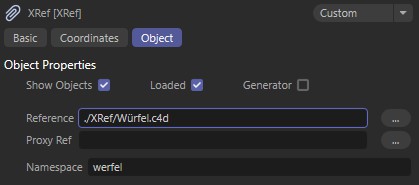 Referenced scenes can be placed in a different folder than the master Scene file, while still keeping their paths relative.
Incremental
When this option is enabled, Cinema 4D will look for the latest incremental version of a saved reference file.
For example, if you have a reference file named "reference.c4d", then the file will automatically load any incremental file derived from that name. Suffixes that will be checked are underscores or dots, plus numbers. In this case, if I have a file named "reference_02.c4d" or "reference.02.c4d", it will be the file automatically loaded. This is a great way to keep all XRefs up-to-date automatically while taking advantage of the incremental saves.
 In this example, the scene file named "Cube.03" will be the one loaded, since this is the latest increment of the Cube scene. If this file didn't exist, then "Cube_2" would be used.

Use this command to reload all XRef objects contained in the scene.
If the Shift key is pressed simultaneously, all elements belonging to XRefs will be reloaded (e.g., if these have been disabled in the XRef Manager). Any materials on the referenced objects that were deleted will also be restored.

Details regarding XRef functionality can be found here.
This command helps you divide existing scenes into XRef objects with separate reference files.
Follow these steps to source out objects to a reference file:
- Select the object(s) (when selecting from a hierarchy only the top most object must be selected).
- Select the Convert Object Selection To XRef command. A window will open that prompts you to save the file. By default the file name will reflect the original file name with the following addition: XRef_xxx_sequential number.
- Save the file. A new window will open, asking if you would like to open the new document for editing. In most cases you will answer with No. You will notice that the objects will be placed as children of an XRef object. You can open the options for each XRef object by clicking the Options button in the Object tab of the selected XRef object, and change how you want to display its hierarchy, what can be modified and so on …
Use this command to divide selected materials in the Material Manager into XRef objects with separate reference files. If these materials were assigned to objects, the Texture tag will subsequently be linked to the XRef objects’ materials.
This lets you establish a clear separation between objects and materials. This is useful when one artist is editing textures while others are modeling and animating and prevents one's work from interfering with the work of another.
Follow these steps to source out materials to a reference file:
-
Select the material to be sourced out in the Material Manager.
-
Select the Convert Material Selection To XRef command. By default the file name will reflect the original file name with the following addition: XRef_xxx_sequential number. XRefs work best when saved to the same directory as the reference file(s).
- Click on Save. A new window will open, asking if you would like to open the new document for editing. In most cases you will answer with No. You will notice that a single XRef object, using the reference file name you just saved, will appear in the Object Manager. This XRef object links to the materials that you converted to XRef in the Material Manager. If you remove the XRef object from the scene, its materials will be removed from the scene as well, since they won't have any connection anymore.
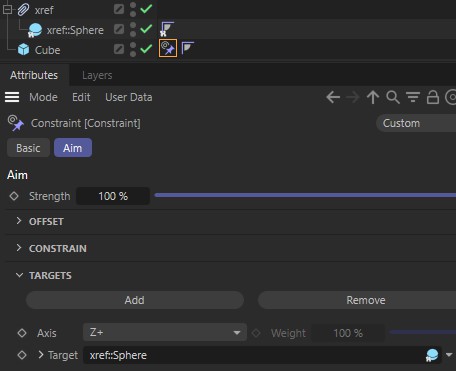 Here, the cube object has an Aim Constraint applied to it. It was aimed at the sphere object before the sphere was converted to XRef. The aim constraint's target link has subsequently been updated to reflect the new status of the sphere object (now an XRef).
Pivot Tab
This tab contains settings that affect the XRef pivot axis (the referenced Scene's world origin). All of the following settings affect the pivot starting from the referenced Scene's original position, scale and rotation. This makes it possible to, for example, import the same Scene multiple times, each time with a different pivot position. This results in a varied placement of the referenced objects without actually moving the XRef object.
Note that the referenced objects themselves are affected - the XRef object's pivot/axis itself maintains its original coordinates in the master Scene.
P
Use this value to move the XRef pivots of individual objects.
S
Use this value to scale all objects in the XRef object as if the XRef object itself were being scaled.
R
Use this value to change the XRef pivot rotation. This will rotate all referenced objects as a whole.