
Options
Activate this option if you like to use a custom aspect ratio for the size of one UV tile. By default, a square UV tile is used.
Resolution Width[32..2147483647]
Resolution Height[32..2147483647]
These values become available by activating Override Resolution. Enter the texture size - if known - you like to use with the material for this object. It's all about the height to width ratio so that the UV mesh can be stretched appropriately. An input of 1024/1024 leads to the same result as e.g. 850/850.
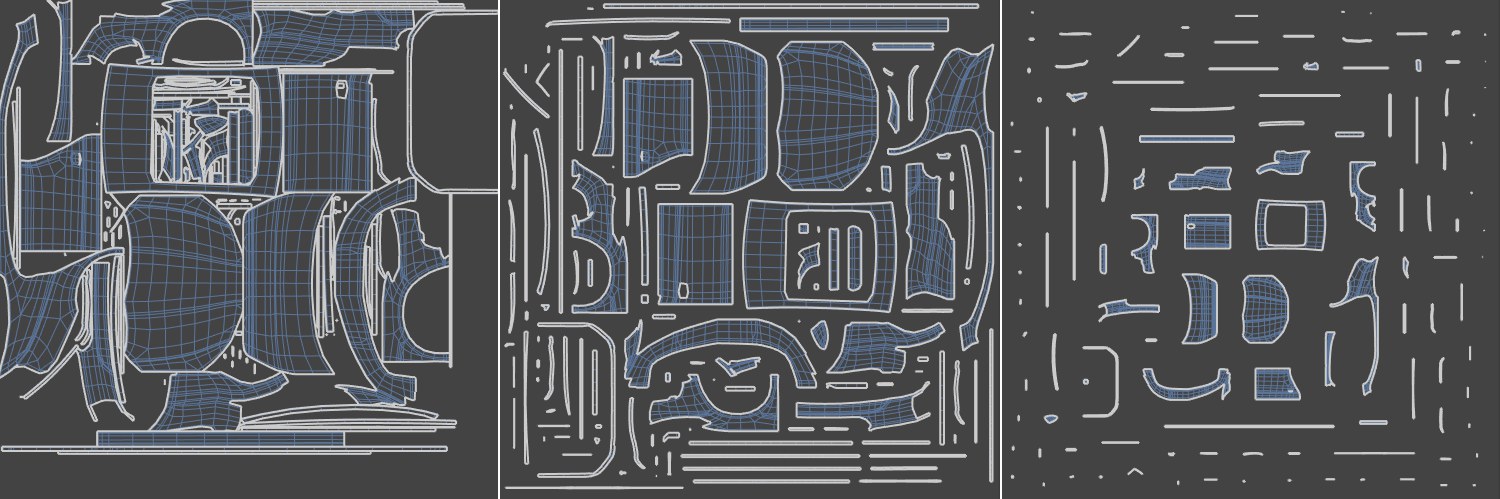 Increasing value for Gap Size from left to right.
Enter the minimum distance between the UV islands in pixels here. Please note that valuable texture area is lost unused as the gaps between UV islands increase. As a result with larger values, the UV islands are scaled smaller and smaller as well. This is particularly important for many small UV islands. A small distance between the UV islands is necessary to prevent color bleeding at the seams of the UVs. Note that in Geometric mode, larger values have increasingly less effect.
This setting is used to edit UV meshes of several selected objects together. The motive behind this is usually the use of one material for several objects.
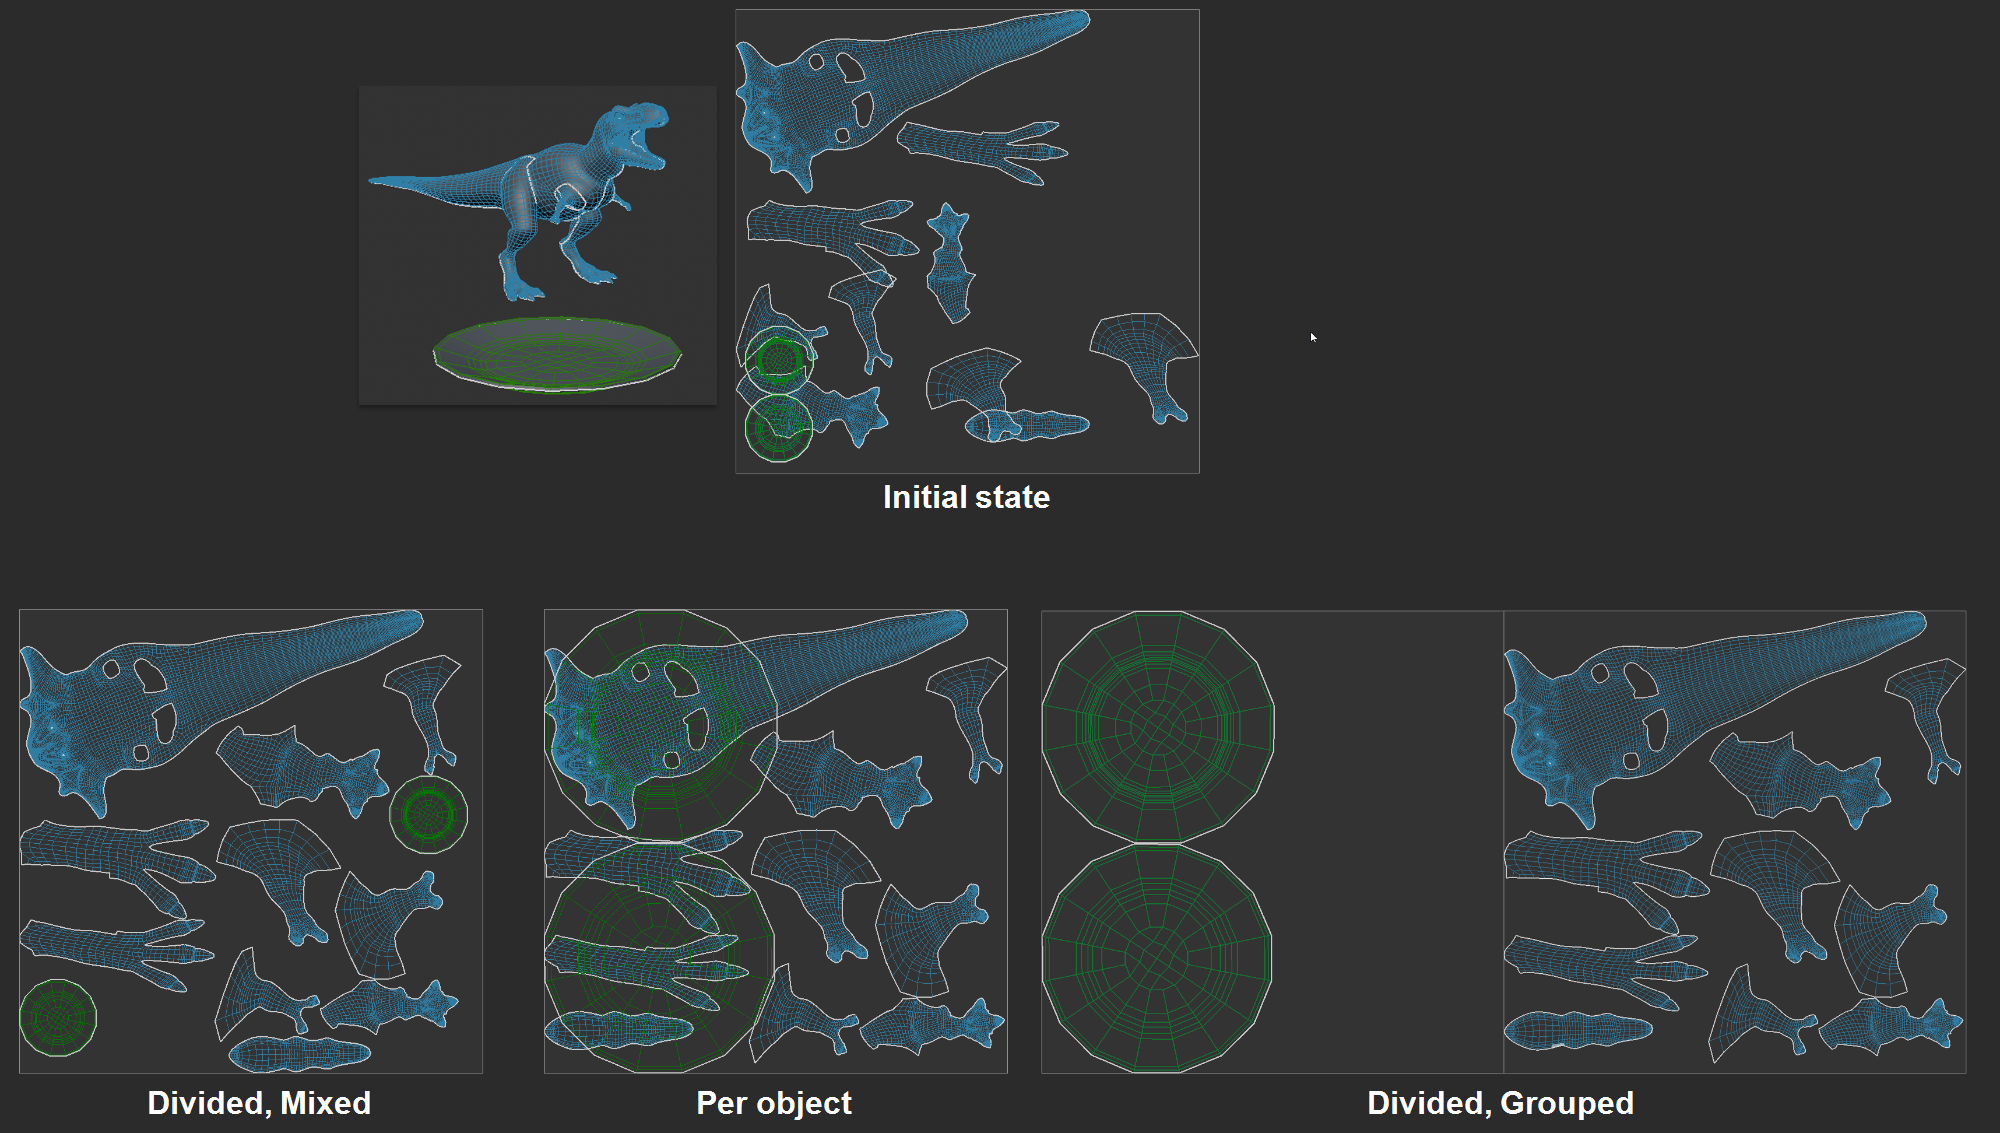 UV Packing of two selected objects with the various options (Scaling 'Auto + Fit' in each case).
In the upper half you can see the scene with 2 objects (T. rex - blue and plate - green) and their two UV meshes. The two meshes initially know nothing about each other, a common texture would not work, for example, as the UV meshes of both objects would partially overlap and identical textures would be projected there.
Various things can be achieved using the following options:
- Merged: This behavior corresponds to that of earlier versions (< Cinema 4D 2025.3). All selected objects are treated as if they were one: all UV islands are arranged without overlapping, whereby UV elements of all objects can be placed on one and the same tile. If more than one tile is required (e.g. because Scaling is set to Preserve or a higher texel density is used), the UV tiles to the right are also used. This mode is suitable for using a material on several objects.
- Per Object: You should select this option if you want to pack each object separately without it seeing the others. Preventing overlaps only applies to one object at a time. This has the same effect as if you were to pack each object individually. This option is not suitable for an identical material for several objects - there are numerous UV overlaps between the objects.
- Grouped: The UV islands of all selected objects are arranged without overlapping, but only UV elements of one object are ever located on a tile. UV islands are therefore placed on separate UV tiles for each object - or several if required. This mode is suitable for using a material on several objects and is useful, for example, when using the UDIM functionality. Textures can then be created per object, resulting in a clean separation despite only one material.
If you want to extend the packing to other tiles within the UDIM functionality, you can specify a start tile here (e.g. 0.1 to begin with UDIM Tile 1011) from which the UV elements are to be distributed if there is not enough space on the current tile.
It is then possible, for example, to distribute a packed tile to several others:
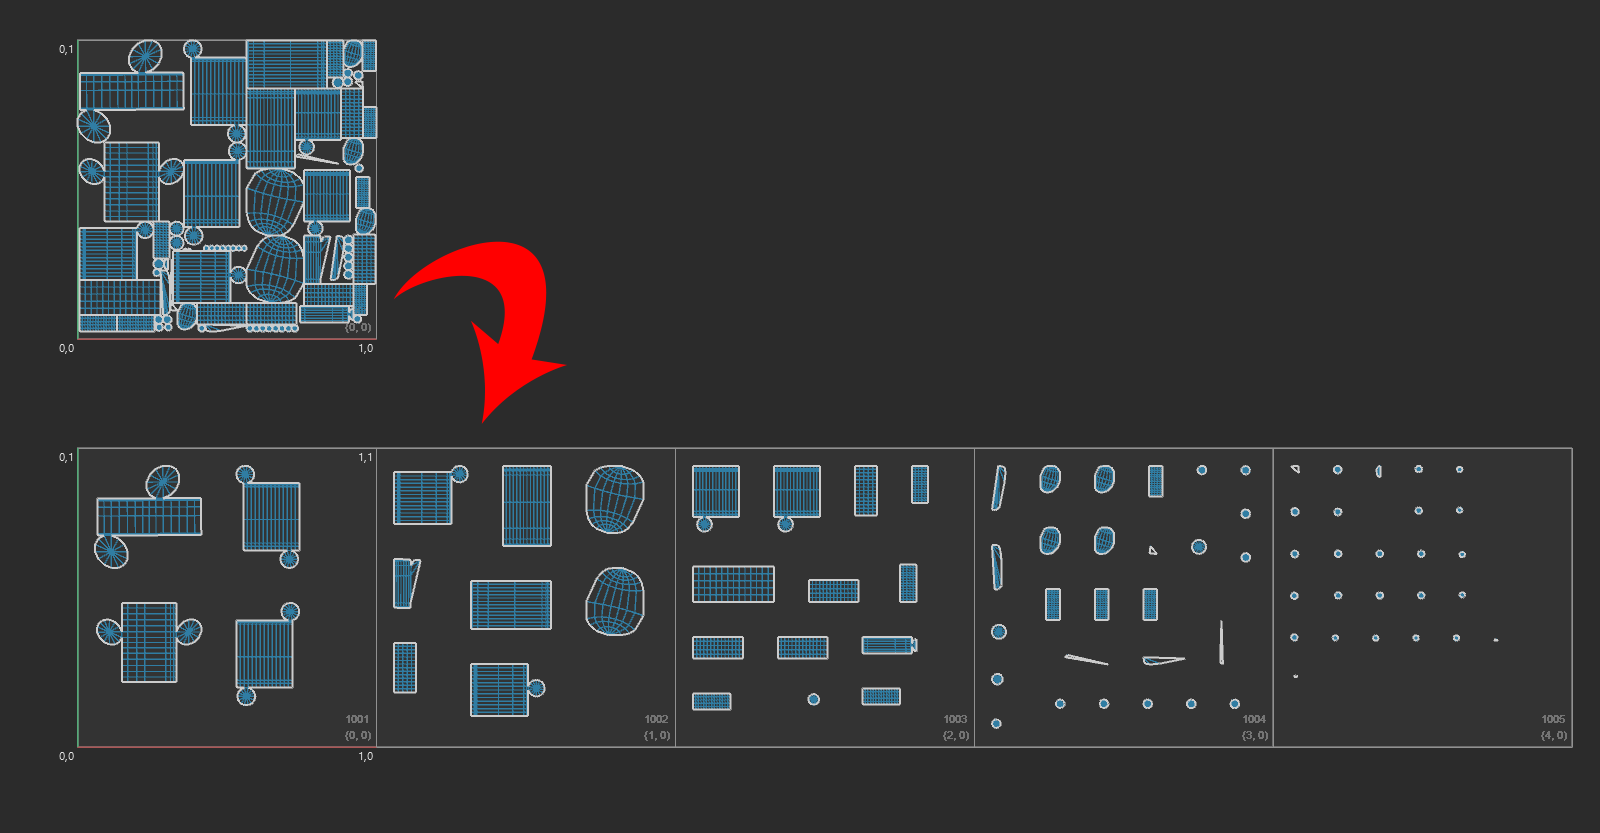 Start tile 0.0 and large gap size automatically distributes the UV islands over several tiles.
To do this, simply set Gap Size to a larger value and prevent Scaling (e.g. by setting Preserve there). Alternatively, you can also define a higher Texel Density.
Also note that UV islands that do not fit on a single tile will result in them being placed in negative UV spaces. These must then be moved or scaled manually as described above.
If you do not want to use the UDIM functionality (or undo UDIM projection and put everything back on the first tile), this should always be set to 0,0 - and Scaling to Auto + Fit. The latter scales the UV elements so that they fit on the first tile, which corresponds to the traditional UV projection.
If you want to pack across several tiles - see also Start Tile - this option decides whether tiles that already contain UV elements should be skipped. This means that there can be no overlaps.
Here you can specify the extent to which UV elements may be rotated during packing:
- Free: no restriction; the UV islands can be rotated as required to achieve the tightest packings.
- 45°, 90°, 180°: the UV islands can only be rotated in 45°, 90° or 180° increments.
- Preserve: the UV island alignments remain unchanged (see also Align UV Islands). This is important, for example, if you have already aligned the UV islands appropriately in a previous step.
Please note that this option is not taken into account in Rasterized UV Packing Mode. Free always applies here.
Use these settings to define whether and how UV islands are scaled when packing. You can select from the following options:
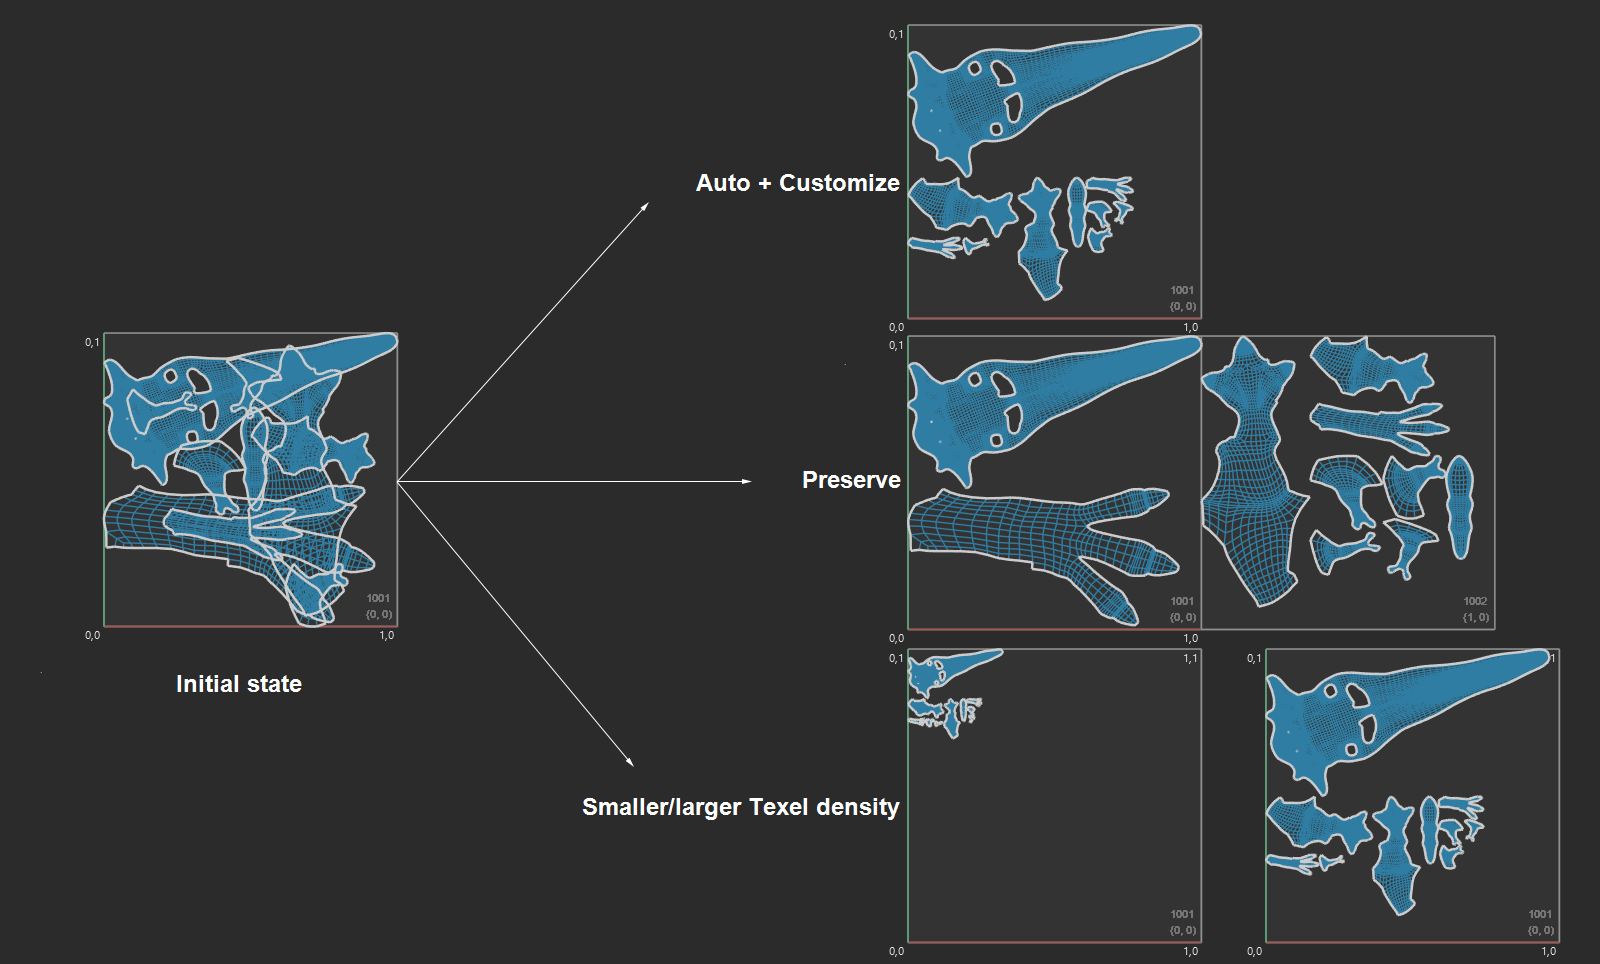 The various scaling options.
- Auto + Fit: this mode corresponds to the previous behavior before Cinema 4D 2025.3: UV islands are scaled (and moved) so that they fit on the tile defined under Start Tile.
- Preserve: in this mode, the UV islands are not scaled, but only moved - even beyond those defined under Start tile. This allows UV islands to be arranged on several UV tiles (UDIM functionality).
- Texel Density: in this mode, the given Texel Density is evaluated (see TD value on top of the UV Editor or a custom Texel Density can be activated below. With this value, the UV mesh is scaled accordingly (details on Texel Density can be found here) and, if necessary, distributed to other UV tiles
With Scaling set to Texel Density you can activate this option to enter a custom Texel Density below.
Texel Density[-2147483648..2147483647]
Here you can use a custom Texel Density value in combination with Scaling Texel Density. To learn more about Texel Density, find out more about it here.
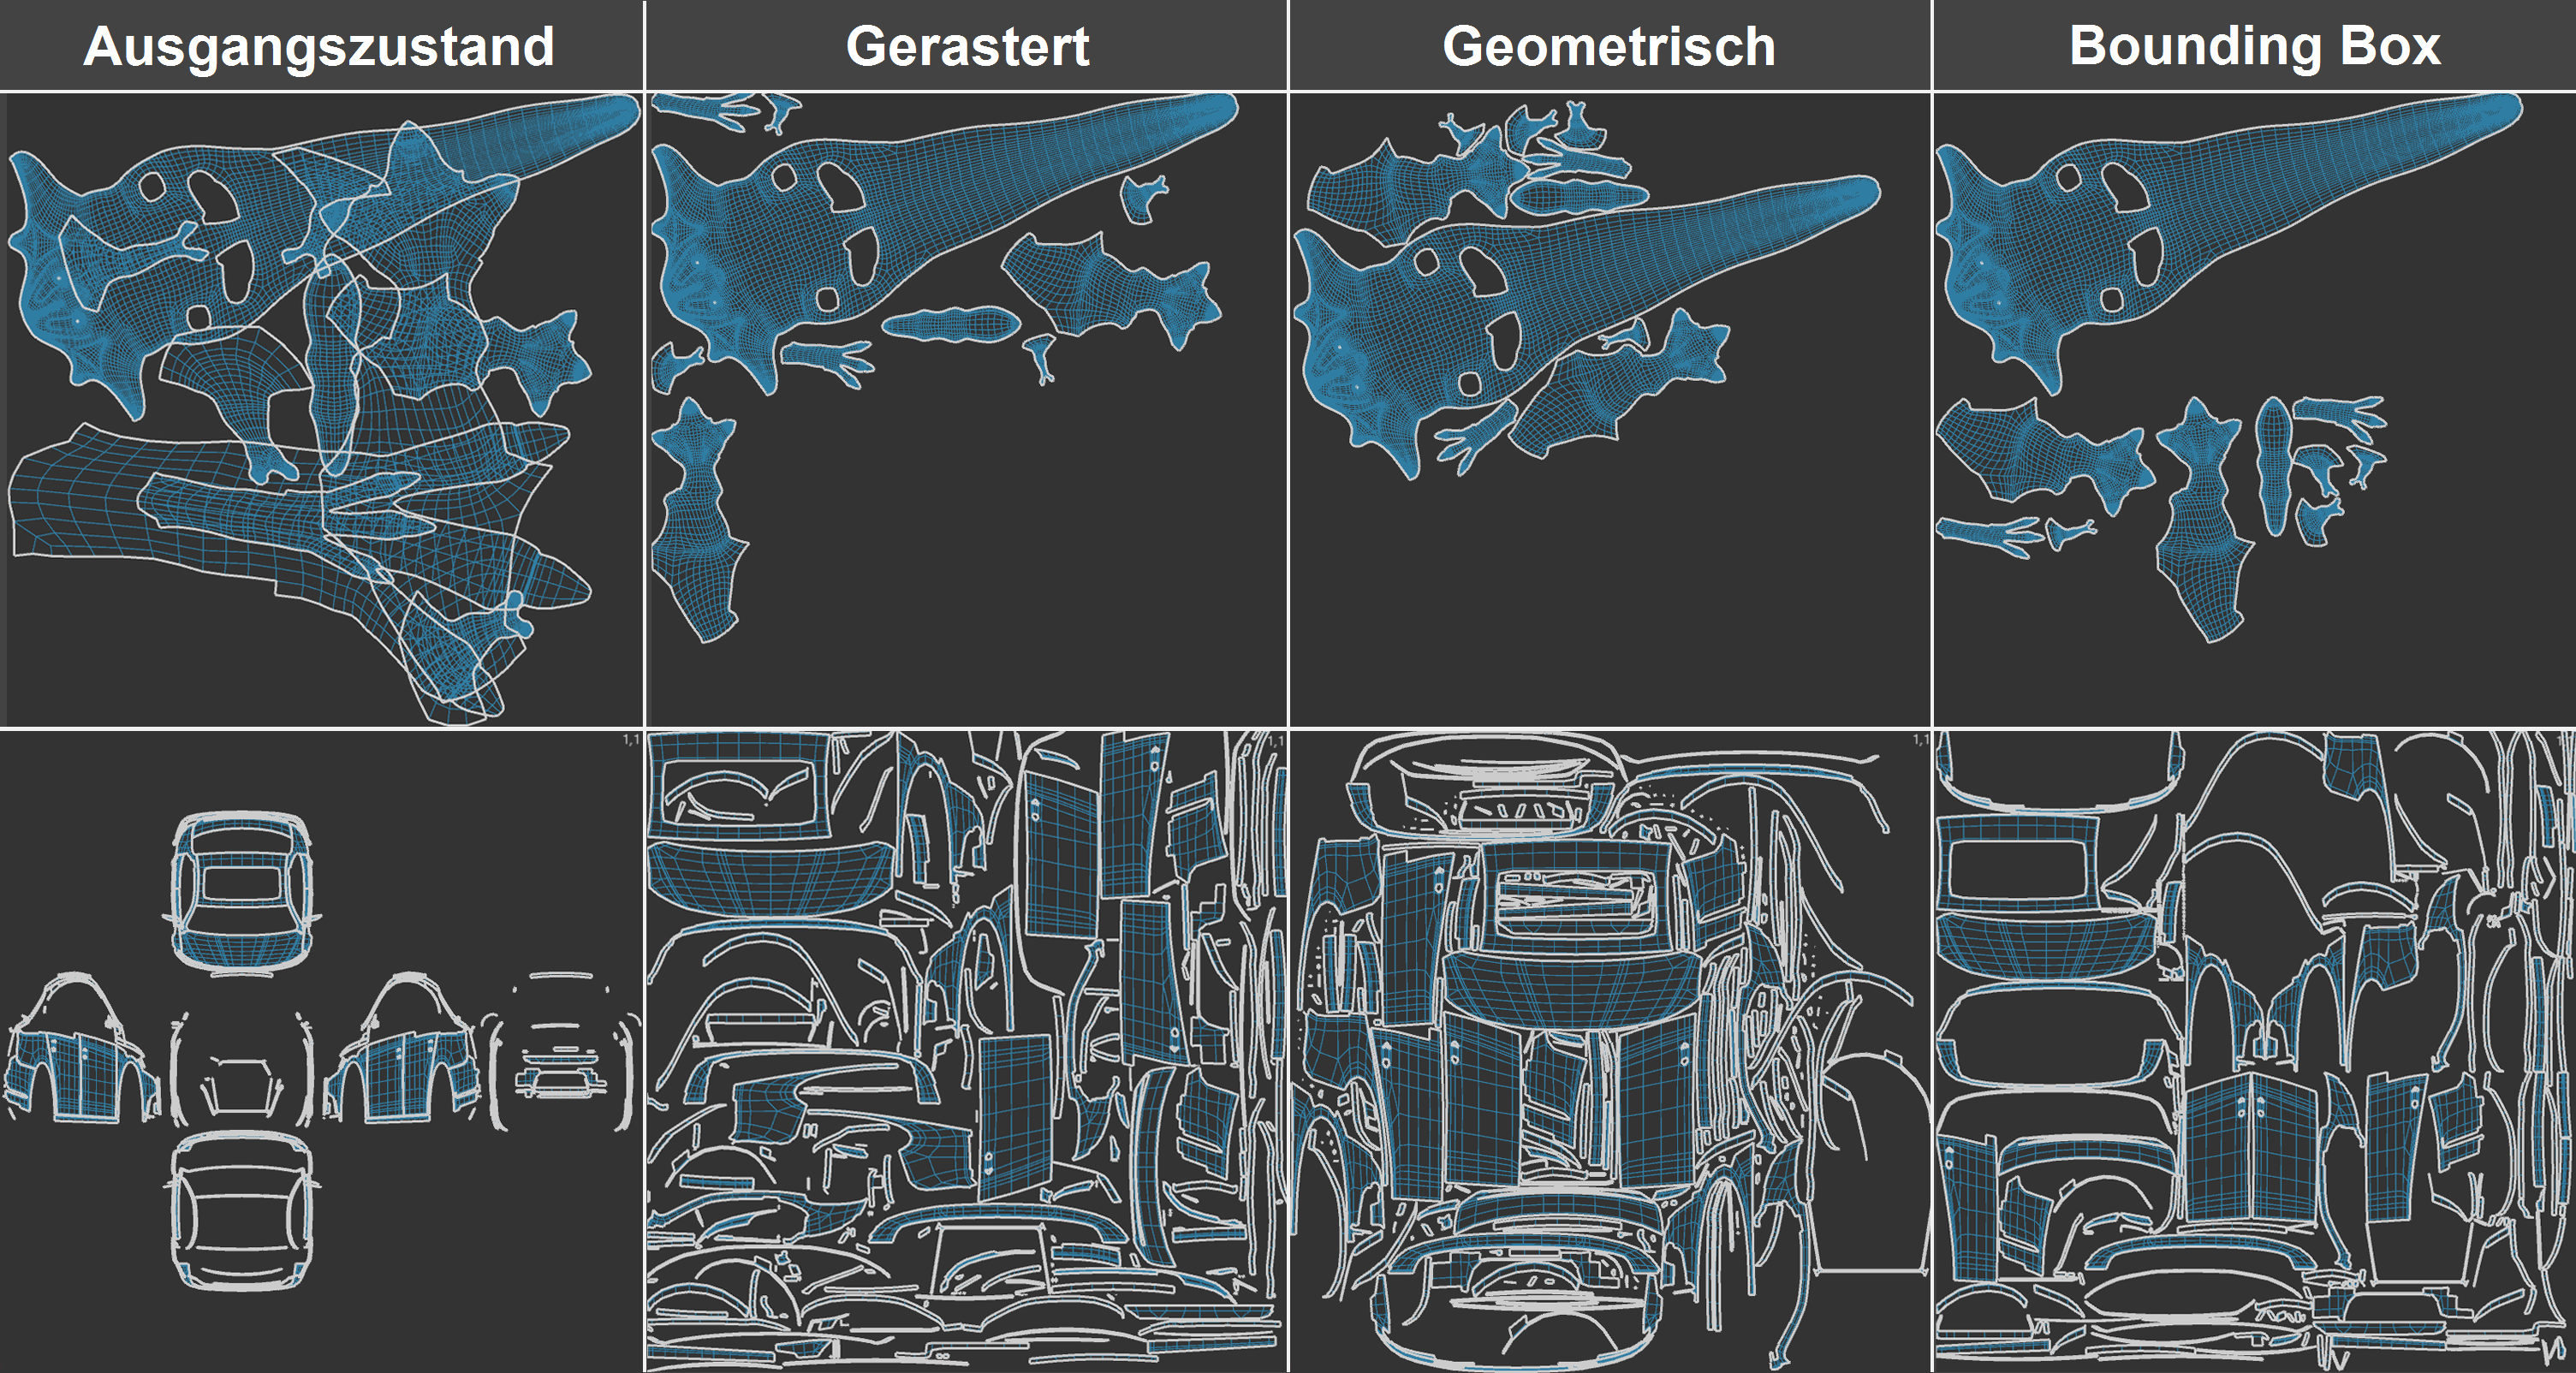 The 3 UV pack modes with different UV meshes. On the left is the initial UV state before packing.
When to use which mode:
- Rasterized: Use this mode for a large number of UV islands, it offers good and fast results. In contrast to the other two modes, deformation of the UV islands is possible under certain circumstances, as well as the creation of new islands in the case of UV island self-overlaps. Note that when multi-processing UV tags, 'Rasterized' and 'Geometric' use the available UV space for the entirety of all UV islands of all UV tags. This means that you can theoretically use one texture for many UVW tags.
- Geometric: This mode offers the best results. The UV surface is optimally utilized here. However, the computing time is considerably longer here than in the other modes, especially with many UV islands. Note that this mode can have problems with UV meshes if they still have self-overlaps - as can occur with projections. Packing can then be aborted with an error message.
- Bounding Box: This mode is very fast, but cannot nest UV islands inside each other like the other two modes can. It therefore 'wastes' more of the UV space than the other two modes. The mode forms a bounding box around each UV island, i.e. a rectangle with the maximum dimensions of the UV island, and rearranges these rectangles including the island by evaluating a number of parameters. Naturally, concave shapes cannot be nested or island holes used, as is the case in the other modes.
Please note that pressing the Apply button several times can always produce different results. In contrast to other operations, there are an infinite number and no single, unique packing solution. The algorithm is heavily dependent on the 'fed' UV mesh. This means that different UV meshes lead to different results.
If this option is activated, the UV islands are scaled independently of each other in the U and V directions so that they occupy the largest possible UV area (also taking the Gap Size into account).
If the option is deactivated, scaling is only performed proportionally.
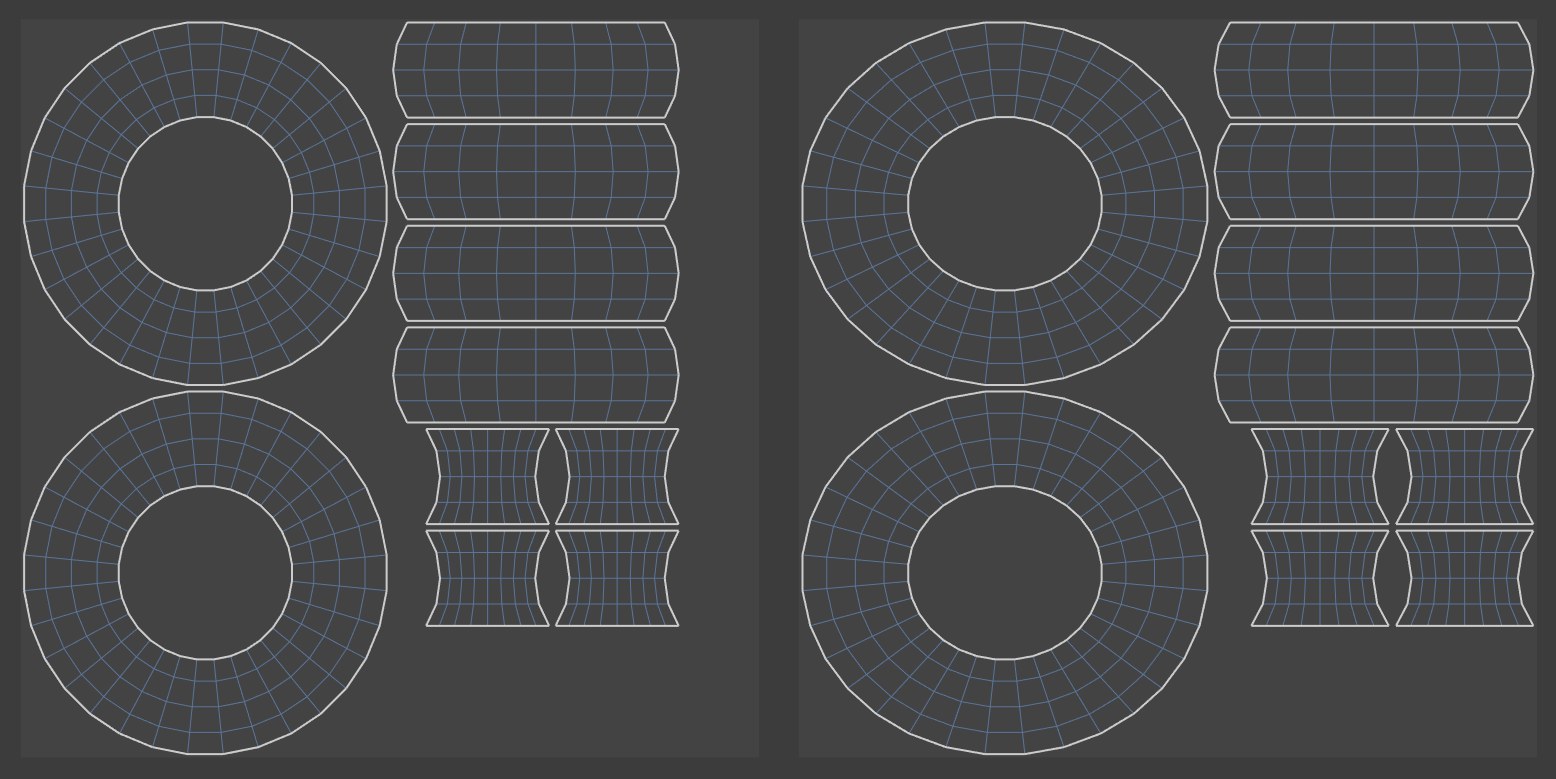 Left deactivated, right activated Stretch to Fit
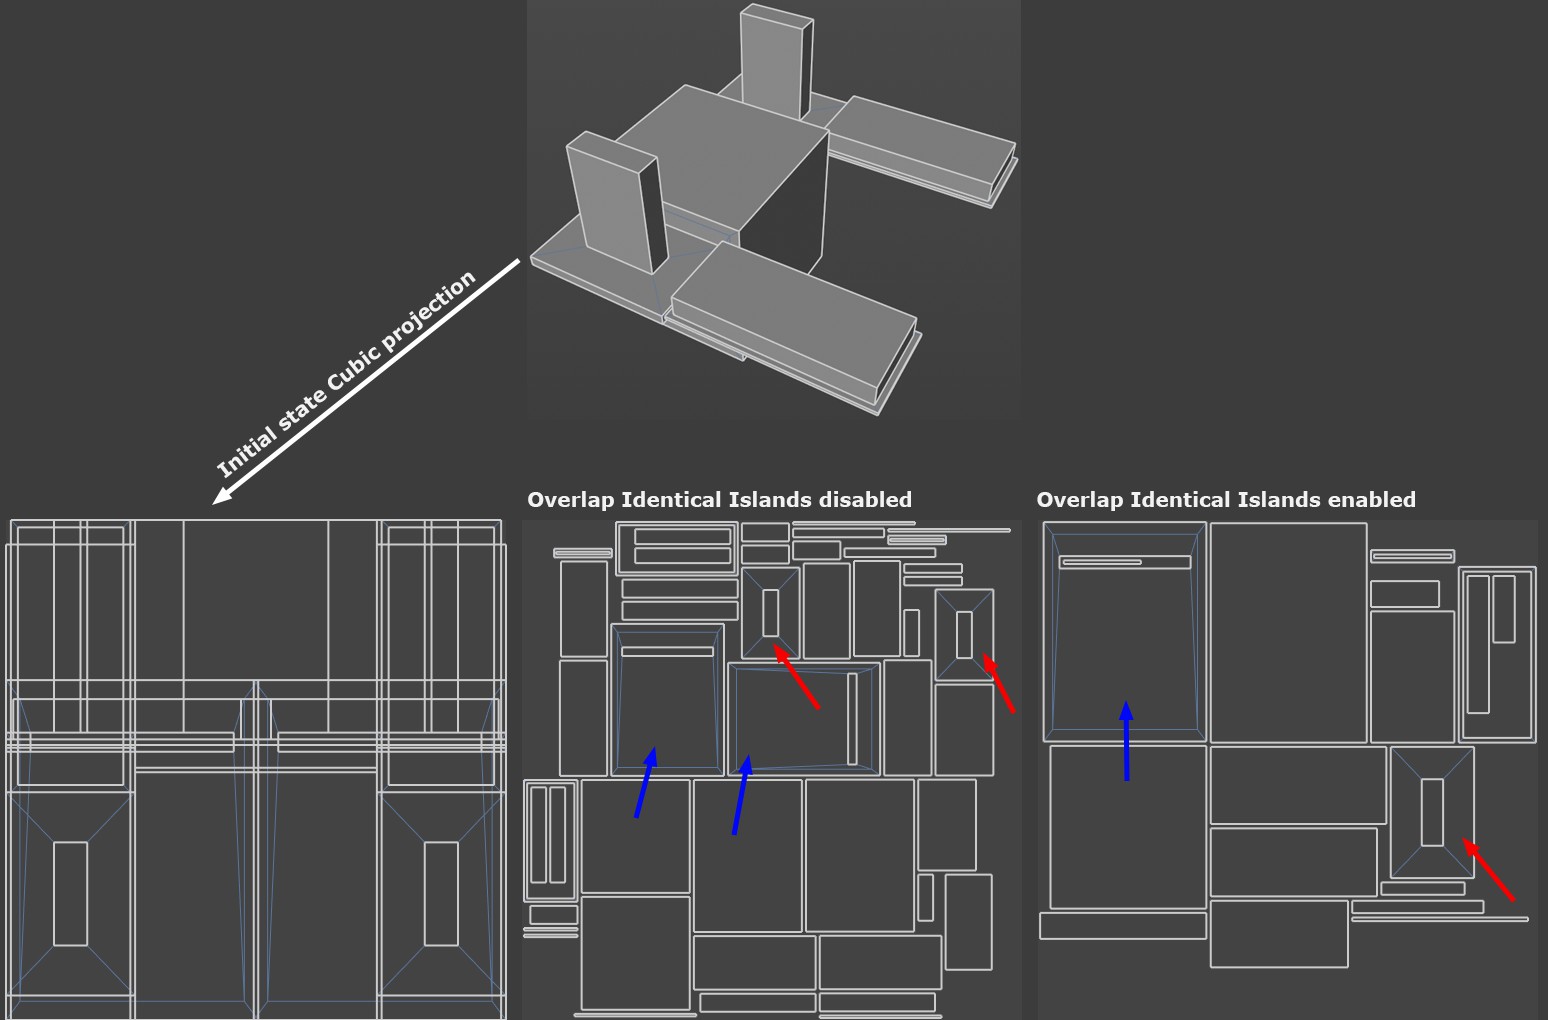
The object shown in the illustration above is first unwrapped using cubic projection and then packed using UV Packing. Note how in the middle illustration below no consideration is initially given to identical or mirrored UV islands and each island takes up its own UV area. As soon as you activate Stack Identical Islands, corresponding UV islands are layered on top of each other.
The algorithm therefore attempts to find identical or mirrored UV islands in order to stack them congruently. The texture is then projected identically onto the corresponding UV islands.
- if Stack Identical Islands is activated, identical shapes or shapes that are identical when rotated 90°, 180° or 270° fall under this criterion.
- if Stack Mirrored Islands is activated, identical shapes or shapes in which one axis is mirrored and these are then identical fall under this criterion. This function does not apply to axially symmetrical UV islands (e.g. to fold one half onto the other).