

Tag Properties
Creating From a Face Capture Object
You can create this tag from the Face Capture Object.
At the bottom of your capture object you will see a button called Create Pose Morph(Object tab):
Pressing this button will create a Polygon Object based on the initial base mesh, in its undeformed state, closely resembling the performers facial structure. It will then add a PoseMorph Tag, XPresso tag and this Move by Maxon Pose Morph Helper tag.
It will set links to the performance and xpresso tag that this helper tag will be working with.
Moving to another Polygon Object
If you wish to use these tags on a different polygon object you can simply drag and drop the XPresso tag and the Moves Pose Morph Helper tag to another Polygon Object in your scene. You will then need to re-created the PoseMorph for your new object and attach that to the tag. You can follow the manual steps below to see how this can be done:
-
First make sure your PolygonObject that you are going to be creating Pose Morphs for is in its default neutral state.
-
Right click on the object and from the Other Tags menu choose Move Pose Morph Helper.
-
Now Right Click and add an XPresso tag from the Cinema 4D Tags menu.
-
Next add a PoseMorph tag by right clicking and selecting it from the Rigging Tags menu.
-
With the new PoseMorph Tag seleted, under the Mixing section click on the Points checkbox.
-
A new Pose will be created and selected called Pose.0. You can delete this pose as it will not be needed.
-
Next select the Move by Maxon Pose Morph Helper tag and then click and drag the tags into the appropriate link.
- And lastly you need to attach the Capture that will be driving the data, so click and drag a Capture Object into the Capture Object link.
Adding Pose Morphs
Now that your tag is all set up you can start added Pose Morphs. You can do this individually, or you can press the "Create All Pose Morphs" button to create them all in one go.
When creating them individually it will activate the appropriate Pose Morph Target and you can immediately start sculpting that morph using the sculpting tools (or any other tool). When you are done you can simply click to create a new Pose Morph Target, the mesh will rest to its base and you can start sculpting it.
Calibrating the Range Mappers
There is an additional field called Calibrate. This lets you use another capture to define the minimum/maximum extremes of the performers faces.
To use this you should create a new capture of your actor and have them move their face so that it goes to all the extremes of their expressiveness. Wide eyes, big open mouth, eyebrows high up and low down etc... basically get your actor to screw there face around for a few seconds to capture the data.
Transfer that into C4D using either there QR Connect or via sharing.
Now open the Moves by Maxon dialolg and simply drag and drop a capture thumbnail into the Range Calibration Capture field. This will set the filename to use for this calibration to be that capture you dragged in.
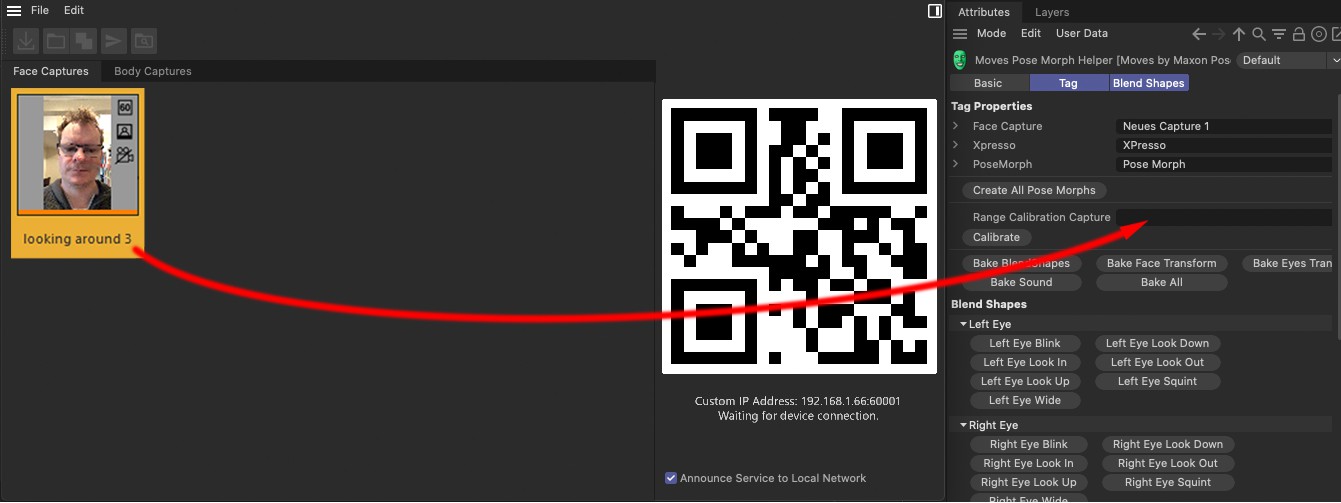
Now press Calibrate.
The capture data will be loaded in and the maximum and minimum values will be calculated and applied to all of the Range Mappers in your Xpresso Tag.
Please be aware that you should never rename the Range Mapper nodes, since the calibration searches for them based on their names.
Now that the calibration is done you can clear the field if you wish to.
Baking
You can also use the tag to bake the blend shape coefficients directly onto a Pose Morph. This will remove the need for the Face Capture Object and the Xpresso tag.
This will create a new PoseMorph tag on the object and bake all the blend shape coefficients to the strength value on a new pose for every blend shape.
It will also take into account the Calibration capture if you have one set.
When complete it will delete the previous PoseMorph tag and Xpresso tag that it was linked to, since they are no longer required.
You can now edit the blend shape data directly by adjusting their keyframes.
This will bake the position and rotation from the capture directly into the polygon object that this tag is applied to.
Before using this button you must copy the Eye Nulls from your capture object and put them as children of the polygon object that this tag is applied to.
Pressing this will then search for all child objects of the polygon object and then bake the position and rotation of the eyes directly onto the null objects.
When this is done you can then delete the Eye tags since they will no longer be required.
This will add a sound track to your the polygon object that this tag is applied to. It will then set it to use the sound for the capture object. It will also set the Start Frame value for the sound if it has also been set on the capture object.
Pressing this will bake all of the above data.