
File Menu
Here you'll find various commands for loading and saving textures, which can be displayed for painting or as a template for UV editing in the UV Editor.
New Texture...
The following window opens when you choose New Texture:
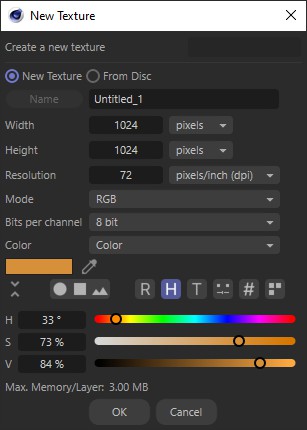
You can either create a new texture (specify the dimensions, color mode, etc.), or you can load an already existing texture..
Name
You can type a name for your texture into the top input box. This name will be used to refer to the texture in the Attribute Manager and it is also used to form the filename when you save the texture (although you may opt to specify a different filename at save time).
Width, Height
These fields define the width and height of your new texture. Select the unit of measurement using the drop-down lists to the right. You can choose pixels (the default), inches or cm.
Resolution
In most cases, the default resolution of 72 pixels/inch (dpi) is appropriate because this is the resolution used by most monitors.
Exception: you may need to change the default resolution if you want to print out the texture and you have specified the dimensions (Width and Height) in inches or cm.
Mode
This is where you choose the color mode used by the texture (grayscale or RGB)
Define the color depth for your new texture. You can select from 8, 16 or 32-bits per channel.
Color
This defines the texture's background color. You can choose one of four options:
Background
The current background color is used.
Foreground
The current foreground color is applied.
Color
Use the color chooser to pick a color for the texture's background.
Transparent
This allocates a transparent background to the texture.
The Max. Memory/Layer value, near the bottom of the window tells you the maximum RAM required for each layer.
Once you have set the parameters as required, click OK to create the new texture. The window will close and you will see the new texture appear in the UV Editor.
Open Texture...
Opens a file dialog to load the image file to be displayed within the first (0..1) UV texture tile. This template then makes it easier to adjust the UV coordinates to the desired texture. The texture is also automatically displayed on the surface of the selected object whose UV coordinates are being edited. However, a material assigned to the object is still used for rendering.
Recent Files
Offers recently loaded textures for quick access. The selected texture will be displayed in the background of the UV Editor and on the surface of the selected object.
Please also note the Filter and Texture options available in the Configure settings available in the menu of the UV Editor. You can configure the tiling and transparency of the loaded texture there.
Merge Texture...
This opens a file dialog that allows you to load a new texture to replace an existing one. The difference from loading a new texture is that you can retain the resolution of the existing texture. The newly selected texture can therefore be scaled to match the aspect ratio and resolution of the texture being replaced. Since the texture loaded by the merge process is integrated into the existing texture, the filename of the original texture is retained (see the Texture menu in the Texture settings of the UV EditorConfigure dialog).You can restore the originally loaded texture by selecting Revert Texture to Saved.
Revert Texture to Saved
If a loaded texture has been modified — for example, by painting on it or by integrating another texture (see Merge Texture... command above) — this option allows you to restore its original appearance.
Close Texture
Close All Textures
Removes the currently loaded texture or all used textures from memory and from the UV Editor.
Save Texture
Saves the current texture under the same name and in the same location.
Save Texture as...
Allows you to save the current texture under a new name and in a custom format.
Save Texture as Copy...
Allows you to save the current texture as a separate file.
Save All Textures
Saves all open textures in their current state.