
Group
In this section you will find all the settings you need to control the growth of the ivy plant. As a rule, the tendril should react to a geometry, e.g., grow up a wall. In addition, growth directions can also be used, e.g., via a spline curve or via a Target object. These assignment options can also all be found on this settings page.
If the ivy should grow along a surface, you can link the corresponding object here. It has advantages if you use an object with as few polygons as possible. Very complex objects, such as rocks created using photogrammetry or complex building models, should therefore be created beforehand, e.g., in a reduced version, and only then assigned here. It is often sufficient if only the polygons on the object on which the ivy should grow are present. This speeds up the generation of the ivy, as collisions with the geometry must also be calculated during the calculation. The position of the Ivy Generator object itself also plays a role here, as its position always represents the start of the tendril. Therefore, place the Ivy Generator near the object where you want the ivy to start growing. An Ivy Generator placed inside a closed object, such as a sphere or a cube, will also only generate a tendril that grows inside the object. Therefore, also pay attention to whether the Ivy generator is in front of or behind the area on which the vine should grow. The growth of the ivy on the assigned geometry can also be restricted by a saved polygon selection (see Selection String setting below).
The term All is used here by default, which means that the ivy can grow on the entire surface of the assigned Surface object. However, if you want to restrict growth there, e.g., to keep windows on a building free of ivy, create and save a polygon selection of the areas on the object where the ivy is allowed to grow.
Enter the name of this saved selection within quotation marks as a Selection String (e.g., "Facade" if your polygon selection was saved with the name Facade ).
You can save a selection as a Selection tag via Select/Save selection. By dragging such a Polygon Selection tag into the Selection String field, the name of the selection entered in the tag is automatically entered.
It is also possible to define several selections and list them separated from each other by + signs or commas, for example (each enclosed in quotation marks again).
In addition, various keywords can also be used here to use automatically generated selections. You can find a complete overview here:
- Default: This term causes an active selection currently present on the geometry to be used. If no selection is active, all points will be used.
- odd: This term is used to select all elements that have an odd index number.
- even: This term is used to select all elements that have an even index number.
- all: This selects all elements of the selected type.
- hidden: Selects the hidden elements of the geometry.
- "Name of a saved selection": If you enter the name of a saved selection in quotation marks, this selection is read out and used. To use a combination of a saved selection and another keyword or selection, use quotation marks with the selection name.
- Index numbers: You can also use index numbers directly, just as you are used to from the Index Array of Text Node.
- Mathematical and logical operations: Mathematical or logical operations can be used to combine selections. Using the string odd – “center” for instance selects all odd elements and then subtracts the selection that has been stored by the name “center”. You can use +, -, & (logical and), | (logical or) as well as a comma to combine multiple selections or index sequences.
This is the total length of the ivy, which can be achieved by adding up all the tendril lengths. It may well be that the tendril does not reach this distance if, for example, a Branch Length that is too short is used. These two settings interact when it comes to the overall growth of the plant.
Max Ivy Length can also be used to animate the growth process, as changing this value does not result in a recalculation of the tendril progression. If you have set a larger Branch Length, you can animate Max Ivy Length from 0 to show the growth of the tendril.
This value can be used to define the density of the ivy, i.e., how long the sections that branch out from the main tendril should be. The gaps between the tendrils can be filled with increasing percentage values. The frequency of this branching is controlled via the separate Step Size value.
The following video shows the effect of increasing Density values on the growth of the tendril. For the sake of clarity, no sheets were created.
This is the maximum length for the tendril branches. Internally, these branches can never be longer than defined for Max Ivy Length. Like Max Ivy Length, Branch Length is also suitable for animation. However, the effect is slightly different, as it only affects the Branch Lengths that branch off from the main branch.
This setting refers to the default Branch Length, i.e., the maximum length of the branching branches on the tendril, and adds a random variation to their length. Like all random calculations, this variation is also based on the Seed value, which you can find at the bottom of this settings page.
This value is very important for defining the desired complexity of the tendril. The value indicates the distance along the tendrils and branches where branching can occur. The smaller this value is, the more often the tendrils branch out. As this can quickly lead to very complex geometries depending on the length of the tendrils, you should only reduce this value carefully. As this function is also based on randomness, you can influence the result using the Seed value.
By assigning a geometry as a Surface object, its proximity and inclination relative to the generated tendril is evaluated. In the sections where the tendril is located on steep sections, this Climb Force acts as a vertical force to allow the tendril to bridge these inclines. A large Climb Force will therefore cause a tendril to grow more in height than in width.
Sections of the tendril that tend to lie on flat sections of the Surface object are affected less or not at all by this force. This can be seen on the right-hand plant in the following video, where part of the tendril remains on the flat ground.
This force acts vertically downwards on the sections of the tendril that hang freely in the air or are at a greater distance from the Surface object. As the following illustration shows, this allows an individual balance to be established between the upward-climbing and downward-hanging branches of the vine.
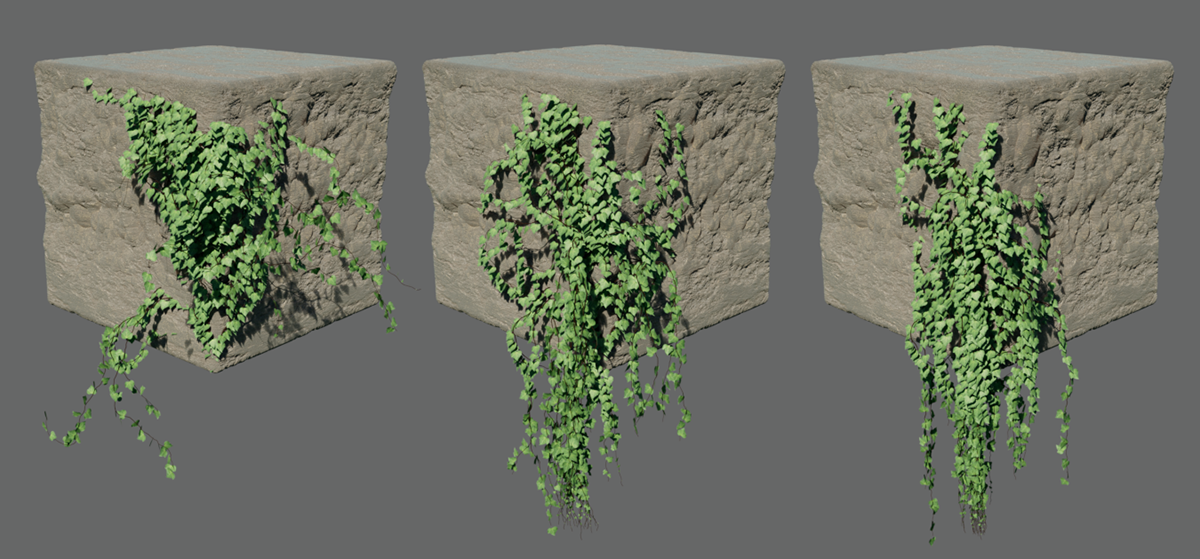 Here you can see increasing values for Dangle Force from left to right.

These settings describe the force that acts between the tendril and the assigned geometry.
This is used to control the force of attraction that the geometry of the Surface object exerts on the tendril. With larger values, the tendril is more strongly forced to follow the surface exactly in the area of influence of the geometry. This reduces sections of ivy that become detached or move away from the geometry. This also reduces the effect of the Dangle Force, which only affects the sections of the tendril that are further away from the geometry.
Pay attention to the shadows of the tendril in the following picture example. This clearly shows that the distances between the tendril and the object are reduced as the Surface Force values increase.
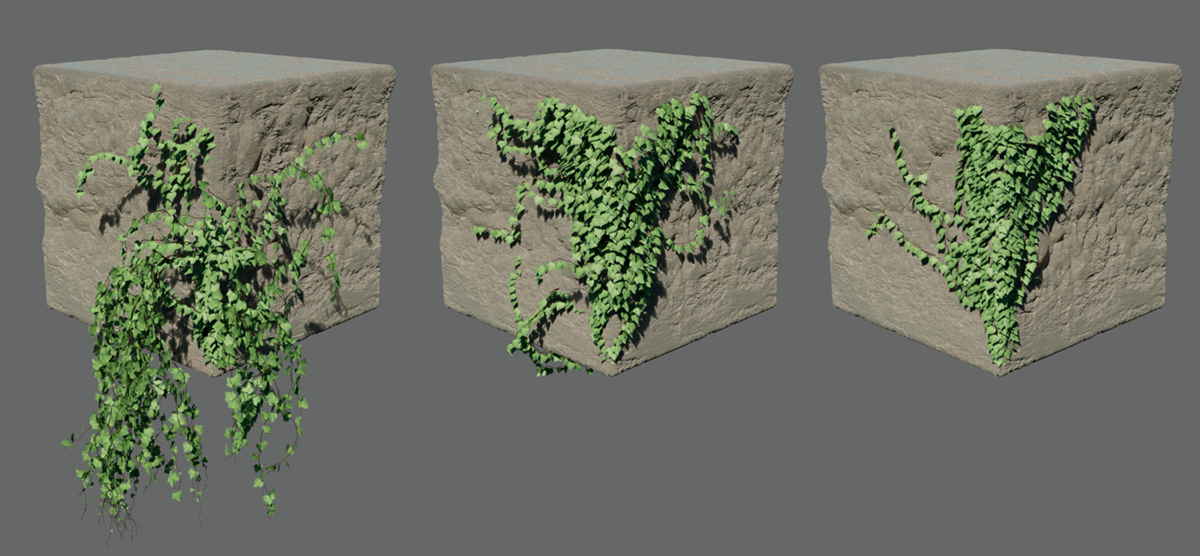 Increasing values for Surface Force from left to right.
This is a kind of safety distance that should be maintained between the geometry of the Surface object and the ivy. An elevation can, for example, prevent the tendrils or leaves from penetrating the geometry if a material with displacement is used on the Surface object.
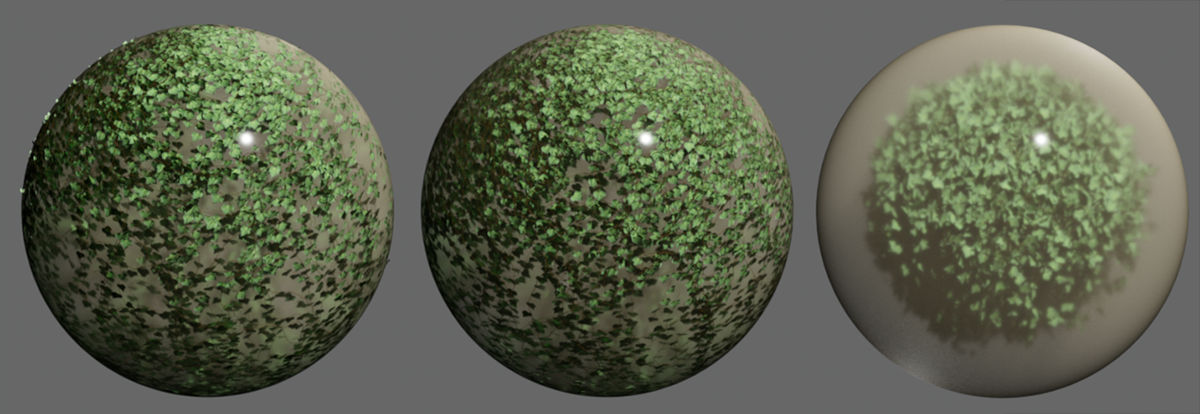 Here, an Ivy generator was placed inside a sphere and this sphere was assigned as a Surface object. The effect of Surface Offset 0 can be seen on the left. Individual leaf tips can penetrate the sphere. A slight increase in the value prevents this (see center). An extreme elevation, as shown on the far right, can also be useful if a visible gap should remain between the ivy and the object.
Use the Surface Force to control the strength of the force of attraction between the tendril and the Surface object. Use this parameter to define the distance from the surface of the geometry at which this force acts. An increase in height will therefore in many cases also reduce the proportion of knots that detach from the surface. In conjunction with an increased Surface Force value, the entire plant is forced to follow the assigned geometry.
These settings can be used to link an additional object whose position should exert a force of attraction on the ivy. A simple Null object can also be used, for example.
The ivy is attracted to the Target object from the end of its tendrils and branches at the desired Target Force strength, which can be used to animate or shape the plant growth.
Here you can link any object to whose position the ivy should react. An attractive force is simulated, the strength of which can be adjusted using the Target Force. If a Surface object is used at the same time, this always has priority. This means that you cannot pull the tendril through the Surface object with the Target Object if the Surface Force has not been set too small.
This is the strength with which the Target object influences the growth of the ivy plant. At an intensity of 100%, the tendrils will try to reach the position of the Target object by the shortest route. If the Target object is further away than the tendrils are long, the ivy will form a straight line in the direction of this target position.
Similar to using a Target object, the course of the tendrils can also be influenced by these settings. Here, however, a spline can be used to exert a force of attraction over the entire course of the plant. This allows the tendrils to be individually shaped and animated as they grow. Individual settings are available for influencing the main and secondary shoots of the ivy.
Here you can link a spline object with which you want to shape the course of the ivy. Pay attention to the direction of the spline, i.e., the order of the points. The spline should start where the position of the Ivy generator is.
Ivy has a main tendril that determines its growth and from which the secondary branches branch off. This value determines the influence of the assigned spline on this central part of the ivy. If a higher value is used here and a lower value is used for Branches Force, the basic shape of the spline will influence the growth of the ivy, but the growth directions of the secondary branches will remain unaffected.
This is used to control the force of attraction of an assigned spline on the secondary branches of the tendril. With increasing values, the secondary branches of the ivy will orient themselves more closely to the course of the spline and the tendril will be able to move less far away from the spline overall.
These settings control the angle changes on the tendril and thus make it possible to influence the spread of the ivy.
This parameter defines the angle at which new shoots are generated at a branching point. The smaller this angle is, the slimmer the ivy runs along a single direction. Higher values lead to more volume in the tendril.
This gives the tendrils random changes in direction, which leads to natural variation in growth. The frequency and magnitude of the directional changes are subject to a random calculation, which in turn is based on the Seed value. A change in Seed therefore also results in a new distribution of growth directions and variations in the tendrils.
Max Count[-2147483648..2147483647]
This value can be used to limit the number of leaves produced and also the growth of the tendrils. The effect is similar to that of a reduced Max Ivy Length setting, although there is no adjusted scaling of the leaf sizes at the trimmed ends of the rank. The following video illustrates this difference.
The calculation of the ivy also takes into account random variations, e.g., the angles at which branches and bends develop in the tendrils. All random calculations are based on this Seed value. A change to this value can therefore be used to create a new ivy variant without having to change the other settings on the Ivy Generator.