

Object Properties
Use this slider to set the overall intensity of the effect.
This is the main setting used to control the effect of the Deformer. Use this parameter to define the number of times smoothing is applied to the deformed object. A higher number means stronger smoothing, whereas 0 iteration will have no effect on the deformed mesh.
Use this parameter to display the impact of the base smoothing that Delta Mush applies to the mesh in the Viewport. Behind the scene, the Deformer applies normal smoothing and then the difference delta of the deformed mesh. This option is useful to troubleshoot issues that might arise from these Delta Mush smoothing operations, by displaying the normal smoothing only. If you notice polygons collapsing or artefacts appearing, for example, you can use this parameter to show if the base smoothing collapses the mesh as well. It can also be used as a global (or local, with vertex map and/or falloff restrictions) Smooth Deformer, in addition to the Delta Mush deformations, to add a bit of overall, brute-force smoothing on top.
This parameter controls the way the tangent of each vertex is calculated. A tangent is basically the difference between two vertexes and each mode changes the way this difference/variance is calculated. Depending on the deformation occurring, some modes yield better results than others, so use the best mode for each individual case. That being said, the Based on UVs mode will usually yield the best results most often, but it will only give good results if your model has proper, non-overlapping UVW coordinates set up. Using UVs is the most stable solution, because UV coordinates are fixed, and do not change when a mesh is deformed, so the tangent of each vertex does not change over time.
Edge
In this mode, the Deformer calculates the variance between a reference vertex and another vertex along the same edge that are being deformed and applies smoothing between the edge vertexes based on the difference. A stronger variance usually means a stronger smoothing is applied. Depending on the type of deformation, this mode might yield the best results.
Neighbor Points
In this mode, the Deformer calculates the variance between a reference vertex and another vertex sharing the same polygon. It will usually calculate the tangent between two vertexes at the diagonal corners of a polygon. Depending on the type of deformation, this mode might yield the best results.
Polygon
In this mode, the Deformer uses the normal of polygons to calculate the variance and apply smoothing. Depending on the type of deformation, this mode might yield the best results.
Based on UVs
In this mode, the Deformer calculates the variance between vertexes that are being deformed and vertexes that are not based on their tangents as laid out by their current UVW coordinates. This mode will yield the best results overall, as the calculated tangents are not being changed by a deforming mesh, but require proper, non-overlapping UVs to be laid out for the mesh first.
Defines the smoothing algorithm used by the Deformer.
Fixed
This mode applies the same amount of smoothing weight to all vertexes. This mode is the fastest to calculate, and can be very useful when used on a mesh made of polygons of similar size. It will not work as well on meshes that have both large and small polygons to smooth out.
Proportional
This mode applies smoothing based on the distance between vertexes that are being transformed and those that are not. This mode usually produces better results, as it will modulate the strength of the Deformer per polygon area and preserve the shape of meshes the best.
Use this option to exclude vertexes that are at the edges of open holes in your meshes (for example, an open-ended sleeve mesh on your character).
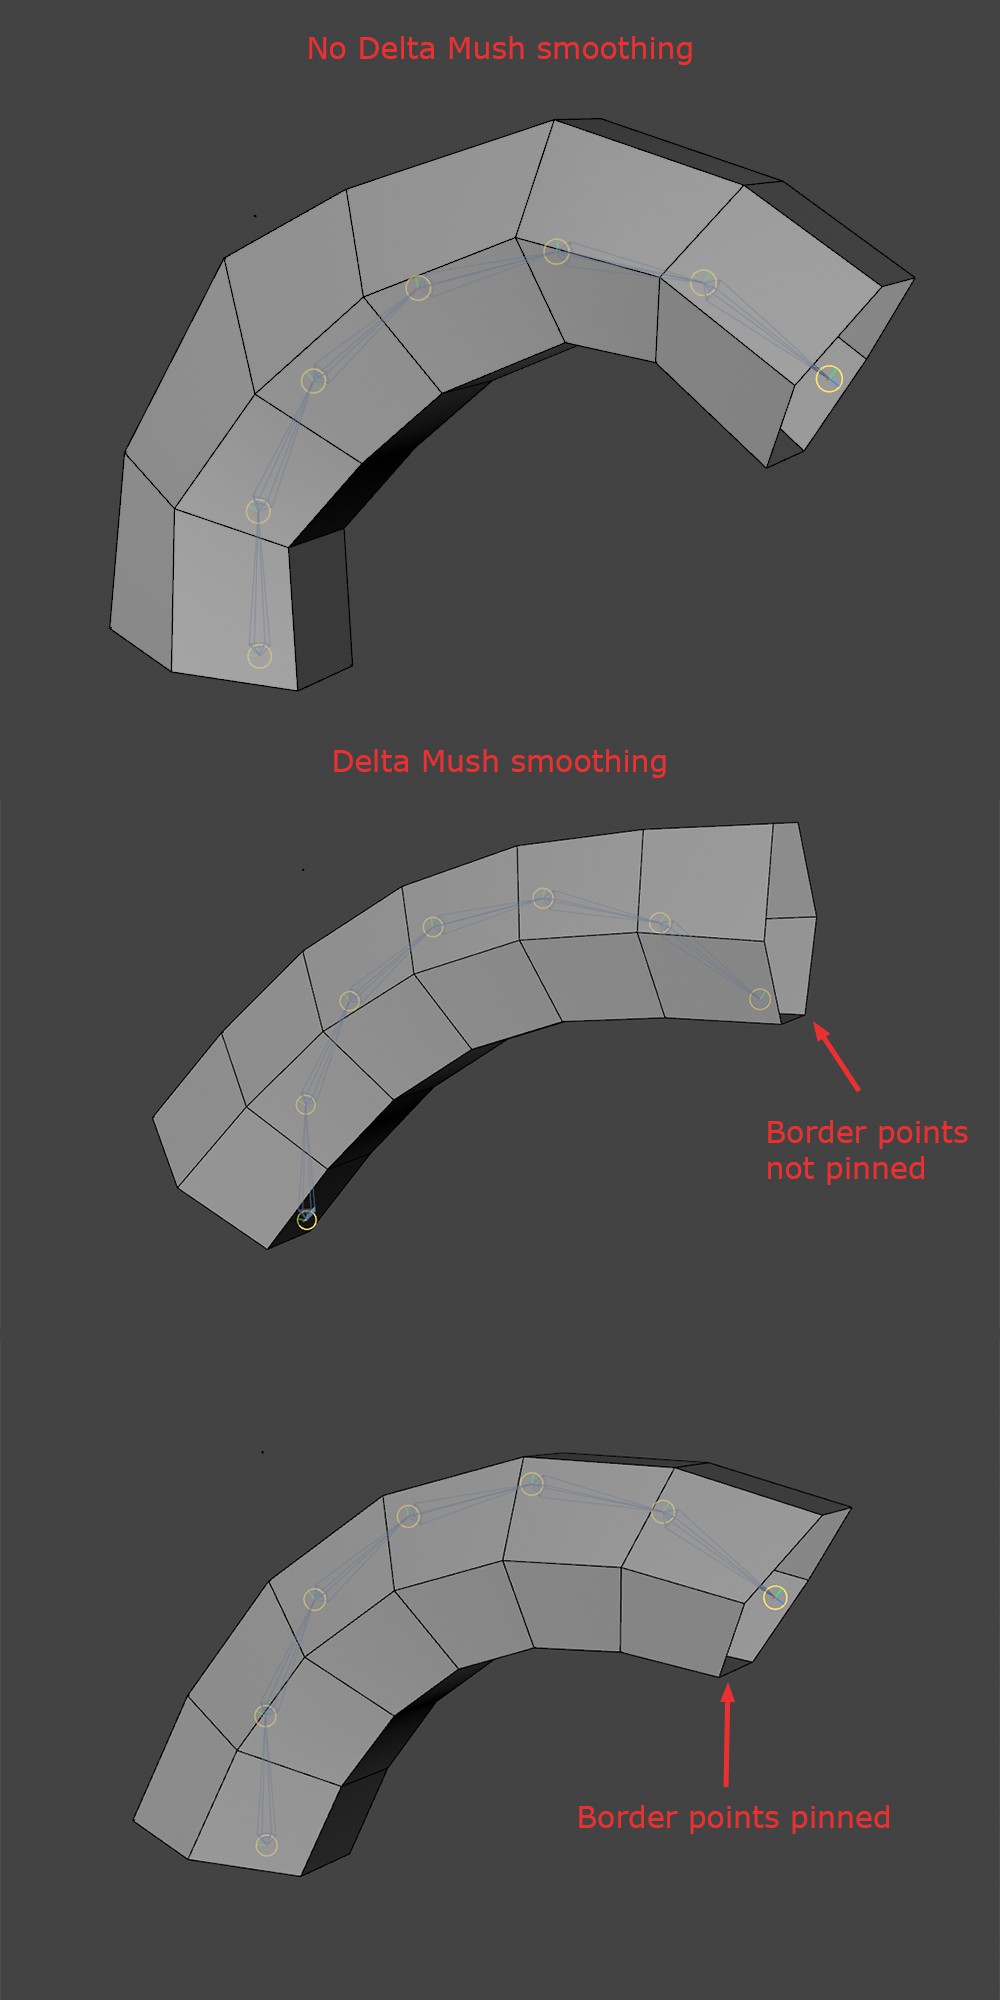 Cylinder deformed by joints with open caps (top) – Deformed cylinder smoothed with a Delta Mush Deformer without Pin Border Points (middle). Here, the border points are being smoothed out, causing the mesh to lose its initial shape – Deformed cylinder smoothed with Pin Border Points enabled (bottom). Here, notice how the shape is being preserved, while still smoothing out the curvature of the cylinder.
Initializes the state of the Deformer with its current settings. This command allows for faster calculations of the Deformer, as by default it works at smoothing the mesh in its non-deformed state, then smooths it again in its deformed state, yielding twice the amount of calculations and leading to slowdowns. Initializing the rest state allows the deformer to record its current state and speed up deformations as a result. Note that once initialized, all options pertaining to smoothing are grayed-out and not available. If you need to edit these, you will need to release the recorded values first.
Removes the recorded state of the Deformer.
RAM used
Initializing the Deformer will record, or cache, its state and store it within the scene file data. Here, you can see the amount of memory used to do so.