
Euler Filter

In addition to the Coordinates Rotation Order, Frozen Transformations and the Quaternion Rotation option, Cinema 4D has another tool up its sleeve in the fight against the recurring enemy "gimbal lock": the Euler filter.
It is always advisable to use the Euler filter - which only affects animated angle coordinates W.H, W.P and W.B - if you find such effects in the timeline (often found in imported motion capturing data or baked animations):
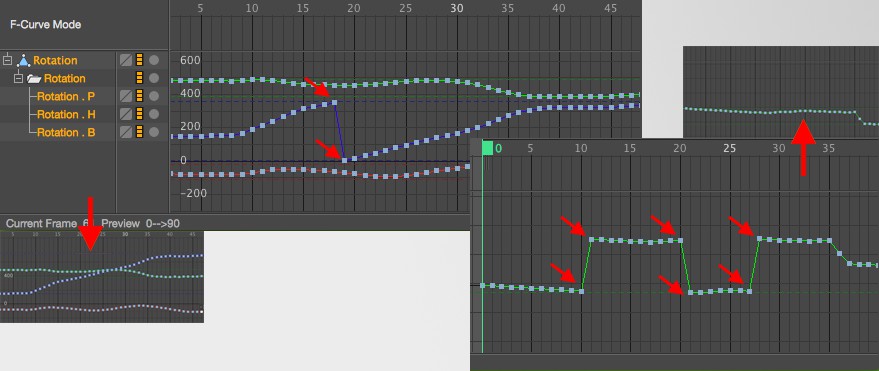 The Euler filter eliminates the unsightly jumps.
These are spontaneous jumps (hereinafter referred to as the gimbal lock effect) from one key to the next in the 360° (rarely 180°) range, which occur due to the gimbal lock effect. These are usually not visible when running the animation in the editor, but then become noticeable with unsightly results at the latest when using motion blur.
The Euler filter now permanently eliminates these jumps for existing key animations and ensures even, continuous key value changes.
How to use it
Select the entire object in the timeline (Rotation at the top of the illustration), all angle tracks are selected and the Euler filter command can be called up. The command is grayed out if only individual angle tracks are selected.
Settings
From/To
Define the time range for which the Euler filter should apply. In many cases, the complete animation length preset when the program is called up is sufficient. However, you can also filter any period of time. Please note that nothing is changed outside this area, i.e., gimbal lock effects may simply be moved to the start and end points defined here.
180/360 Degree Step
In rare cases, 180° jumps may occur instead of the 360° jumps mentioned above. This is noticeable if the Euler filter does not work with the preset 360°. In such a case, switch to 180°.
Synchronized Rotation
The Euler filter needs the two other keys on the other two angle tracks (= synchronized rotation) for each key on one angle track to be effective.
If the option is activated, missing tracks and keys are created with a constant, optimized value. If the option is deactivated, the filter only works in areas that have already been synchronized and does not create any new tracks/keys itself.
Minimize Gimbal Lock
This activated option then eliminates the gimbal lock effect. You can deactivate them, e.g., to create only missing tracks/keys with the Synchronized rotation option activated.
Adjust Tangent
If this option is activated, an attempt is made to align tangents of changed keys (and their immediate neighbors) with those of the previous or next key, thereby smoothing the interpolation. If this option is deactivated, auto tangents (see Auto Tangents) is only used for the changed keys.