

Basic Properties

Sometimes, when working with numerous icons that look the same, you want to have a better overview of it all. This is what this function does. Objects and tags can be assigned their own icons or existing icons can be re-assigned or colored:
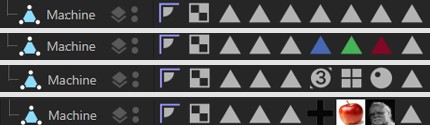 Examples for tags that were colored, replaced by existing ones and custom tags.
Note the Show Custom Icons command in the Object Manager’s View menu, which lets you switch to the Cinema 4D icons.
There are a few objects and tags (e.g., Material tags) that can’t be colored because they are controlled by Cinema 4D directly.
Here, you can either
-
load a bitmap - whereby an alpha channel will be evaluated, if present. Internally, this bitmap will be scaled and distorted accordingly if it has a different size than 64*64 pixels (which is used internally by Cinema 4D).
or - enter an existing command ID for corresponding icons. These IDs can be found in the Command Manager.
This function can be used to color an existing or a custom icon. You can select from the following options:
- None: No coloring will take place
- Display Color: Each object can be assigned a Display Color in the Basic tab. This will be used here. Since the Display Color can also assume a layer color objects can also be colored according to the layer to which they are assigned. Please note that some objects have their own option here, such as the legacy light objects, which can adopt their set light color also for their icon color by using the Light Color option. Redshift lights always take on the color of their light with Display Color activated.
- Custom: Lets you select a custom color.
Tags have no Display Color and can therefore only be colored using a custom color. To do so, activate the Icon Color option.
Load/Save Presets
These commands can be used to save icons as a preset or to load an icon.
General details regarding the Preset System in Cinema 4D can be found there.
When tags are created, they are automatically given a name according to their function. For example, a Vertex Map tag is appropriately called a "Vertex Map".
However, you can also give all objects and elements (e.g. shaders) any name you like. The object or element appears under this name, e.g. in the XPresso Editor or in the Timeline or link fields.
So far, so good. However, there are tags that can be assigned as often as required (e.g. Selection tags, Vertex Color tags, etc.). If they all had identical names, this could lead to problems. Imagine 2 Polygon Selection tags with the same name and you want to restrict a material to one of the selections: this becomes difficult with identical names, as only the Selection tag furthest to the left is used.
This is why Cinema 4D numbers them consecutively where it makes sense. For example, 3 Polygon Selection tags on the same object:
- Polygon Selection
- Polygon Selection.1
- Polygon Selection.2
This automatic numbering occurs when creating tags using the menu/command, when duplicating with the ctrl key and with some tag-creating tools such as the Paint Tool, MoGraph Selection, Bind Tool, etc.
Enable the Include Children option if you want the tag to affect child objects also.
Disable these options to switch off post effect lines and post effect shading for the object.
Generally you will not need to use this mode. It is designed for exceptional culling cases, such as when you need to see lines through an alpha map. It is much like the culling options in the Sketch material on the Render tab, except the tag gives you an easy way to set the culling for a single object and then per Sketch Style tag (good for not culling facial lines against, say, hair).
For the object that has the Sketch Render tag:
Exclude mode excludes ALL lines from the Sketch Style tags in the Style Tags box from being culled by this object.
Forced mode forces the Sketch Style tags in the box to be culled by the object that has the tag, even if this object is behind the tags lines.
 Normal culling (left) and forced culling for the cube. Note how the sphere's outline is culled where it overlaps the cube, but remains where it overlaps the sphere.
See Forced.
Cinema 4D normally displays the settings of assigned tags (e.g., the Phong tag) when an object is selected in the Attribute Manager as if it were an object's own setting - however, tag tabs are marked with a small icon to the left.
Disable this option if you don't want the tag settings to be shown for the object.