Character Definition Tag
Use this command to record the rest pose for each hierarchy. It is recommended that it be the same pose across all characters and have all characters face the -Z axis. This is due to the fact that the character solver transfers the difference between each character's rest pose in order to be agnostic about objects/joints orientations between hierarchies. Facing the same axis gives a common starting orientation that can then be extrapolated from.
Note that to protect against user error and improve stability, the command is disabled as long as the Character Solver tag is enabled. Make sure you reset to the reference pose before editing and setting a new reference pose, as it will help prevent solving errors. It is especially true for characters that are animated, as animated poses can really increase the delta values or differences between hierarchies of the source and target characters and induce solving errors. Each character needs to have a fairly similar pose for a proper evaluation.
Use this command to return to the reference pose. This is useful if you need to add new components and objects, or need to edit the rest pose
Note that to improve stability, the command is disabled as long as the Character Solver tag is enabled. It is recommended to use this command before editing and setting a new reference pose, as it will help avoid extreme reference pose differences between source and target characters that could lead to solving issues.
Open the Character Definition Manager. This manager is used to create an identification map of your respective hierarchies and gives context to the retargeting
You can open a Character Definition Manager for each character you are working on, by either using the Open Manager command of each Character Definition tag, or Shift-clicking the Character Definition tag of each character itself.
This should make it easier to compare each tag and troubleshoot any mis-matching of attributes, hierarchies or any other error, should they occur. We recommend you rename your tags to reflect target and source tags and avoid confusion when working with multiple managers.
Add a Character Solver tag to your hierarchy. You can create this tag on any object, but if added to a hierarchy that already has a Character Definition tag applied to it, the "Target” field will automatically be populated with that tag. Character Solver tag is used to transfer motion between hierarchies.
Character Definition Manager
This manager consists of two sections: the body parts definition hierarchy on the left panel, representing a tree view, referred to as a body parts list, and the attributes for each selected body part on the right panels.
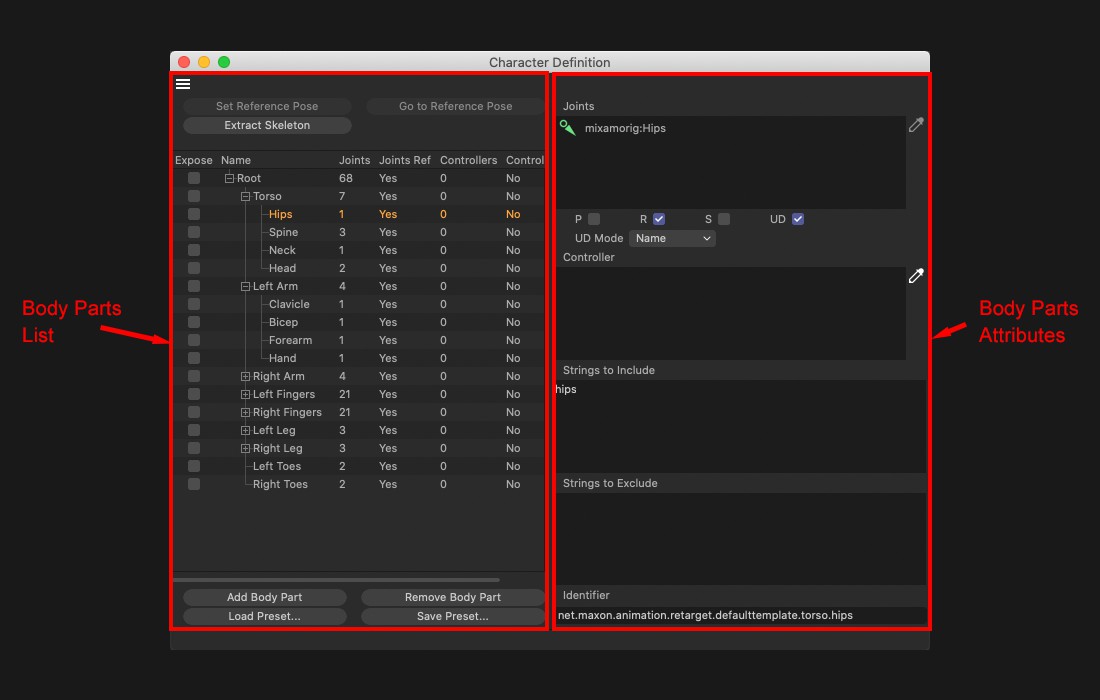 The two main panels of the Character Definition manager.
By default, a standard biped character definition will populate the definition hierarchy, with common naming conventions such as distinction for left and right side of a hierarchy, as well as body parts for arms, legs, hands and so on… Selecting each body part will display their attributes on the right panels.
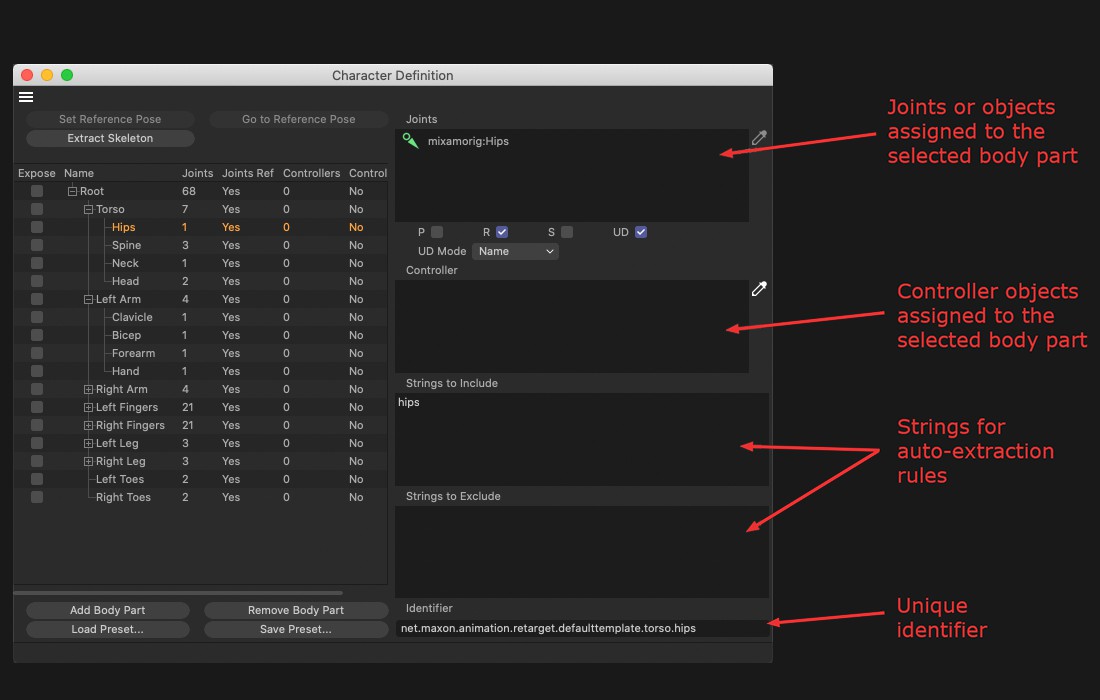
Set Reference Pose
See above.
Go to Reference Pose
See above.
Extract Skeleton
find any object or joint similarly named in your character hierarchy and assign them automatically to each definition body part.
This allows you to easily and quickly populate your body parts list with joints or objects, without having to assign them manually.
Definition List
This is the definition list, or list of body parts available for assignment. The default preset comes with a list suitable for a standard biped character. You can create your own list here or edit an existing one.
The list can contain body parts groups (empty body part components that have no objects assigned, used for organizing hierarchies by grouping other body parts), or regular body parts that have objects assigned. It is composed of six columns:
Expose
This column is used to expose the strength parameters of the corresponding body parts, so they can be adjusted or animated later on. The exposed sliders are accessible when selecting the Character Solver tag. Note that only exposed parameters from the target character definition tag will be displayed, as this is the object being driven.
Individual body part strength values are invaluable to add a bit of variation to the targeted hierarchy, as it helps define the amount of influence the source object has on the targeted body part. Keep in mind that at 0%, the recorded reference pose for that object, joint or controller will be used. At 100%, the object will be fully driven by the source's parameters.
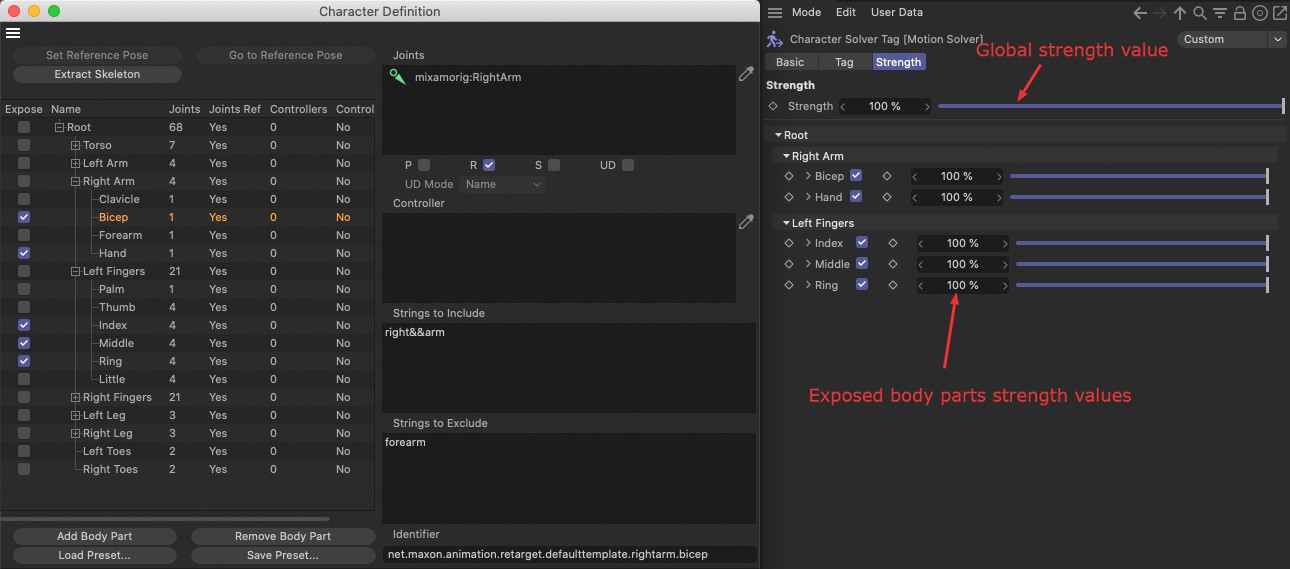 Exposed parameters of individual body parts are shown in the Character Solver tag, under the Strength tab.
Name
This column represents a hierarchy of body parts groups and body parts.
Joints
Shows the number of joints or objects assigned to each body part.
Joints Ref
This column is used to show if the assigned joints or objects have a recorded reference pose. A body part missing a reference pose will not be evaluated.
Controllers
This column shows if controller objects are assigned to the body parts. This section is used to evaluate alternative ways of driving your objects without losing your joints/objects assignments. If for example you have a source character that contains both motion capture data and custom controller animations, you can decide which will be transferred to the target character.
The Character Solver tag allows you to switch between a Joints or Controller evaluation, effectively changing which objects are evaluated and which motion is transferred as a whole on the fly. One target character could be using the joints attributes for motion targeting, while another might use the assigned controllers that drive another set of joints.
The current limitation of using Controller objects is that their PSR parameters cannot be dissociated or filtered out and they cannot be extracted automatically. The solver will always evaluate all the parameters (PSR) for these objects.
Controllers Ref
This column is used to show if the assigned controller objects have a recorded reference pose. A body part missing a reference pose will not be evaluated.
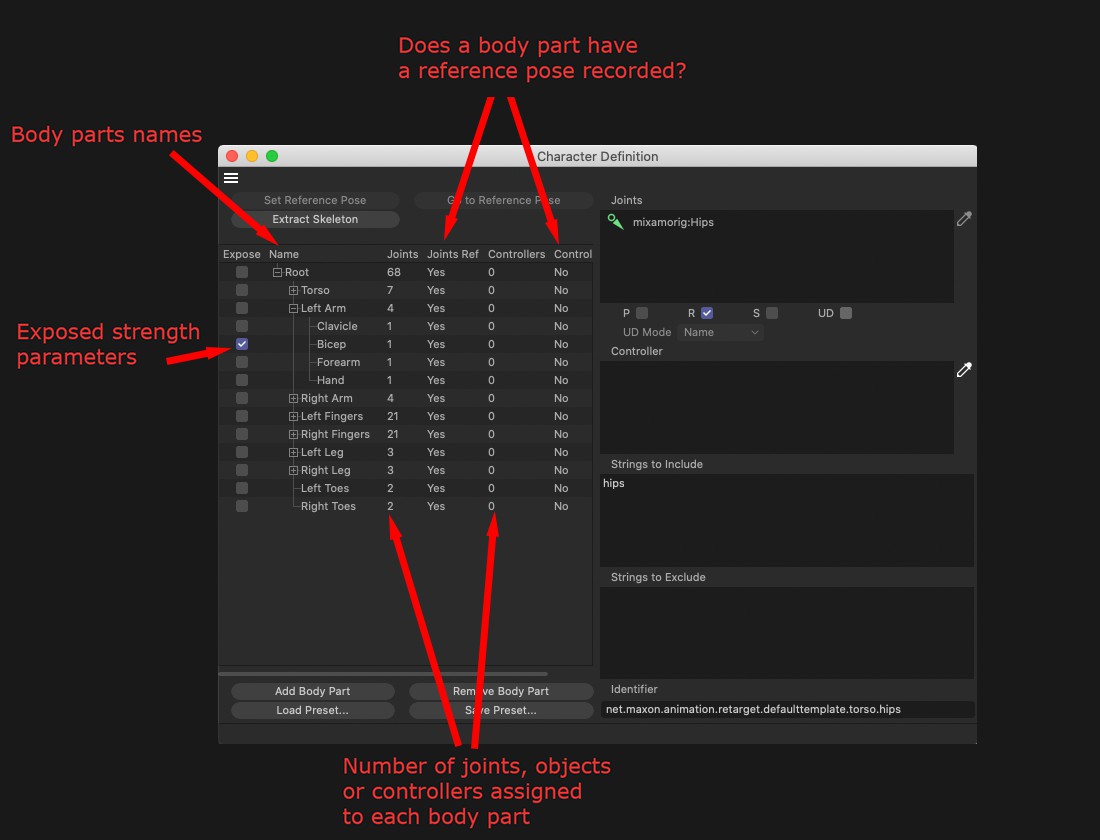 These columns provide information useful for comparing between the source and target definitions. It can let you know at a glance if both definitions have the same hierarchy of body parts, assigned objects and if reference poses are stored properly, so you can correct any mismatched parameter.
As long as all objects that need their animation transferred are referenced properly and in the correct order, the tool should not have any issues transferring the animations.
Contextual Menu
Right-clicking anywhere in the body parts field will summon a contextual menu.
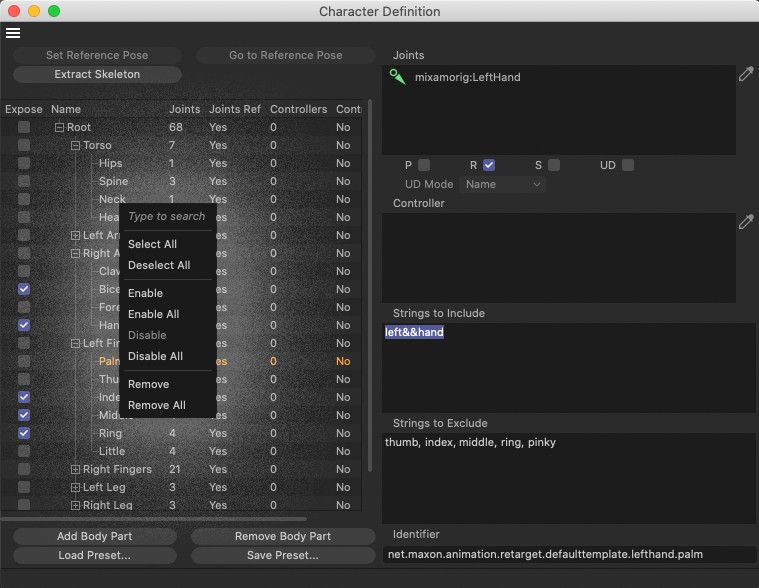
Select All
Selects all body parts and body parts groups.
Deselect All
Deselects all currently selected body parts and body parts groups.
Enable
Enables the Expose parameters of all currently selected objects.
Enable All
Enables the Expose parameters of all body parts.
Disable
Disables the Expose parameters of all currently selected objects.
Disable All
Disables the Expose parameters of all body parts.
Remove
Removes the currently selected body parts or body parts groups from the character definition tag.
Remove All
Removes all body parts or body parts groups from the character definition tag. Note that the Root body part cannot be removed.
Add Body Part
Use this command to add new body parts to the body parts hierarchy. It could be useful to add additional limbs and a tail when trying to convert the default character biped preset to a character quadruped preset, for example.
Click and drag to position each new body part within the hierarchy. You can assign new body parts as children of others, to create component groups.
Remove Body Part
This command is used to delete selected body parts from the body parts hierarchy. Alternatively, you can use the Delete key to remove selected body parts. Be careful, though, deleting a body parts group will delete its children as wel.
Load Preset
Load previously saved preset definitions.
Save Preset
Save the current definition (body parts hierarchy and naming convention) as a preset. It is recommended to use the same definition as much as possible, in order to have direct compatibility across all your characters. When needed, though, you can create your own custom definitions and save them as presets. Useful when your definitions deviate from the default naming convention and hierarchy, or when creating different character types, such as quadrupeds, monsters and so on.
Joints
This object field will show which object or joint is assigned to the selected body part. It can either be populated automatically using the Extract Skeleton command, or by manually dragging and dropping .
Joint Context Menu
Right-click the objects field to summon a contextual menu.
Start Picking Session
Start a picking mode that allows you to add objects to the object field by selecting them in the viewport or Object manager.
Stop Picking Session
After starting a picking session, right-click the objects field again and use this command to stop the object picking session. Alternatively, you can also click on the pick session button to the right of the object field to start a session.
Select Object(s)
Selects highlighted objects in the Object Manager.
Remove
Removes highlighted objects from the objects field.
Remove All
Removes all objects from the objects field.
P.R.S and UD
In S24, we can now have more control over which parameter can be driven by the source object. Here, you can define if you want the object Position, Rotation or Scale values to be driven by the source object or not. In addition, you can now drive User Data values attached to the object being driven as well. These parameters can be very useful for non-standard rigs, such as custom facial rigs or User Data sliders set up to drive morphs or any other parameter.
Only parameters that are enabled in the target Character Definition tag will be taken into consideration. All data from the source Character Definition tag is evaluated by default.
UD Mode
Here you can define how User Data parameters will be matched between source and target objects.
Name: Uses naming to match User Data entries. If you have two User Data entries with the same name, both will be driven by the source. Note that capitalization is taken into account.
ID: Attributes will be linked using the User Data ID number.
ID + Name: Uses a combination of User Data ID number and name to match entries.
Data types will be evaluated as well, so only matching data types will be linked. A boolean data type cannot be driven by a Color data type, for example.
Controller
Assign individual controller objects to each body part. This allows you to drive the targeted object via its IK controllers or any other type of object, regardless of hierarchy. Since the type of hierarchy or controllers used cannot be predicted, you will have to assign these manually and create your own presets. These fields cannot be auto-filled using the Extract Skeleton command.
Individual PSR values cannot be filtered out either at the moment, everything is evaluated.
That being said, objects assigned to this field do not have to be IK controllers. Your IK controllers do not have to be applied to the Controller field either, you can just use the Joints field to evaluate them if you need to. This field is mostly used as an alternate way of evaluating your retargeting without losing your original joints/objects assignments. Since evaluation modes can be changed on the fly in the Character Solver tag, you can alternate easily between driven objects that way.
Joint Context Menu
Right-click the objects field to summon a contextual menu.
Start Picking Session
Start a picking mode that allows you to add objects to the object field by selecting them in the viewport or Object manager. Alternatively, you can also click on the pick session button to the right of the object field to start a session.
Stop Picking Session
After starting a picking session, right-click the objects field again and use this command to stop the object picking session. Alternatively, you can also click on the pick session button to the right of the object field to stop the session.
Strings to Include
Define here the strings to include in your search when matching objects’ names between hierarchies. You can use modifiers along with objects names to further filter the search. A comma (",”) is used as an "or” modifier (this name "or” this name), and double ampersand ("&&”) as an "and” modifier.
So, if we were going to use the strings and modifier "hand,palm”, for example, the tool would look for objects containing the strings "hand” OR "palm” in their name to assign them to that body part. If we were going to use the strings and modifier "hand&&palm”, the tool would instead look for objects containing both "hand” AND "palm” strings to assign them to our body part.
Note that character case is not taken into account during search.
Strings to Exclude
Similar to the Strings to Include field, use this section to exclude strings from the search. This can be very useful to exclude words that contain a string you are trying to search for and that could be misidentified as a result. For example, you could be searching for the string "Arm”, but would probably need to exclude the string "forearm” for an accurate search (so that the forearm joint is not assigned to the arm body part). The comma and double ampersand modifiers can be used here as well.
Identifier
This is the unique identifier recorded for each specific body part preset. Use this for troubleshooting, as a way to check if body parts of both hierarchies share the same identifier.
Note that body parts matching is done through the Identifier. You can edit this field at will and use your own identifiers, but you must ensure that each identifier is consistent across all definitions, otherwise body parts won't be matched properly.